I've had a few emails since I posted yesterday's hat-themed printer's tray, asking where I bought it from. The truth is, I made it myself! I took photos throughout the process, so here's a quick tutorial to show how I did it :)

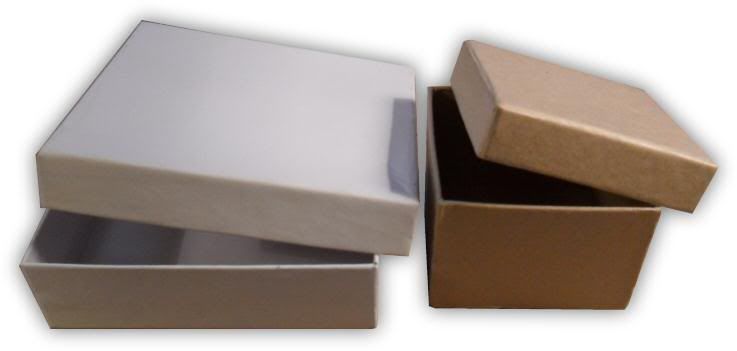
I started out with a bunch of small boxes - the smallest ones I bought at a pound shop, 3 for 49p, the large ones came from Michaels in the US, I forget how much they were but I'm thinking around 50 cents each. I used the lids from 2 large and 6 small for this project. Obviously you can use any size of box, in any arrangement you like.

I used my ATG gun to stick the lids together. Notice that the bottom box was too large so I took a 1/2 inch slice out of it. It doesn't matter if the join is a bit raggy, it won't be seen once it's covered with patterned cardstock.

The small lids were slightly shallower than the large ones, so I added 2 strips of chipboard on the back to even out the height. I then completely covered the back with another sheet of chipboard to make the tray more sturdy.

Notice that I've added a length of wire to hang it on the wall (string would work too if you don't have any wire).

The wire was twisted on the inside and is unseen once the compartments have been lined with patterned cardstock.

Finally, each compartment was lined with patterned cardstock and edged with tissue tape. It's all ready now to be filled with whatever goodies you choose! :) It's also a LOT cheaper than one you'd buy in the shops (I'm sounding like a Blue Peter presenter now LOL) I hope this was useful for some of you - see you tomorrow! :)

 I started out with a bunch of small boxes - the smallest ones I bought at a pound shop, 3 for 49p, the large ones came from Michaels in the US, I forget how much they were but I'm thinking around 50 cents each. I used the lids from 2 large and 6 small for this project. Obviously you can use any size of box, in any arrangement you like.
 I used my ATG gun to stick the lids together. Notice that the bottom box was too large so I took a 1/2 inch slice out of it. It doesn't matter if the join is a bit raggy, it won't be seen once it's covered with patterned cardstock.
 The small lids were slightly shallower than the large ones, so I added 2 strips of chipboard on the back to even out the height. I then completely covered the back with another sheet of chipboard to make the tray more sturdy.
 Notice that I've added a length of wire to hang it on the wall (string would work too if you don't have any wire).
 The wire was twisted on the inside and is unseen once the compartments have been lined with patterned cardstock.
 Finally, each compartment was lined with patterned cardstock and edged with tissue tape. It's all ready now to be filled with whatever goodies you choose! :) It's also a LOT cheaper than one you'd buy in the shops (I'm sounding like a Blue Peter presenter now LOL) I hope this was useful for some of you - see you tomorrow! :)

21 comments :
Very clever Dan - TFS.
Trays & shadow boxes can be soooooo expensive...the few I have were obtained either through loyalty cards or discount weekends.
Toni :o)
Thank you for the tutorial. Excellent advice to add chipboard to even out the depth of the boxes and to cover the back in chipboard to make it more sturdy. I like your paper-covered project as well! :)
Super tute on making your own !!
Thanks for sharing Dan!
Thanks for this tutorial. I bought a printer's tray which was very expensive for its size, I thought. This is such a great idea to make your own. Thanks for sharing :)
So easy to do - going to start saving boxes now - TFS
That's a great tute and a very worthy Blue Peter moment! ;)
Thanks for sharing
xoxo Sioux
Cool! TFS.
Brilliant Dan! Thanks so much for sharing, will definitely be having a go at making one :D
LOL @ Blue Peter!!! You are a genuis! Off to check out my stash!!!
Great idea!
How ingenious! Thanks for the tutorial! Great project!
your just to clever Dan and love your great ideas x
That is a fantastic idea Dan, thank you! xx
Thanks for sharing such a fantastic idea!
Brilliant idea Dan
I love it! Thanks for sharing.
OMG thats genius, can't believe i never thought of it myself, thanks for sharing.. guess what i'll be doing today lol
This is too much1 I think I maybe have half the stuff already for doing just such a project! Thanks so much for your wonderful new ideas!
Rose
Great tutorial. I love shadow boxes. Thank You.
Priscilla
Great work - want to do this....found your blog from the Gingerstamp Forum - when Nancy finds a good site she shares it with us all....imagine I have to get your link from America....they won't understand the Blue Peter referal but hey, we all do! Thanks for putting up the tutorial - I've bookmarked your site. Greetings from Northern Ireland!
Post a Comment