Cutting Machine Concertina Organiser
Edit - I've started to make my files available from my blog again and am adding a new set each week. Check out the "Cutting Files" tab at the top of the page to see which ones are available for download.

While making some of
Tricia Morris's Expanding Memories organisers as featured on the much-missed Scrapbook Lounge, I kept thinking to myself "I'm sure I could make something similar to this on the Cricut, where all the cutting and measuring would be done for me". It's taken me a while, but I've finally gotten around to doing it. Tricia's organiser is based around hinged chipboard panels and is sturdier because of that, but I went for quickness of construction and Cricut-cutability!
No more laborious measuring and concertina folding for the sides either - I've cut tiny fold guides on each piece to make it a breeze to fold and assemble! Although this was inspired by Tricia's project, I started from scratch and the construction is quite different. I've also rethought the way that it closes. I haven't made a print/cut version of this, because if you're cutting the whole project by hand you may as well make Tricia's original! You can see how to make her project in
this video. If you need the bookplate and file tab shapes, they can be found on my other site, "My Crafty Files".
In the download files I've included files in the SVG download for baby cricut and expression (the sides are the same for both, the top and bottom panels for the baby cricut have "baby" in the name).
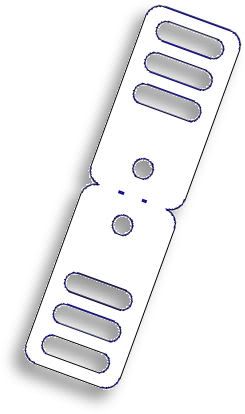
To fit more on a page, I've left you to cut your inner panels using a paper trimmer. If you're cutting the Expression or Robo version, where you need inner panels that are 5"x7", you can save card by cutting as shown below:

Again, this template will be "live" for 1 week. Next week, it will be taken down, and new ones will replace it. Don't forget, if you have any requests, pass them on! I can't promise, but I will take suggestions into account when planning future templates.
These files may not be uploaded to a group, forum or website for sale or redistribution, or shared among individuals. They are expressly for the personal use of each person that downloads them from this blog.
There are 2 versions of each template:
- An SVG version which can be imported into the Sure Cuts a Lot program and then cut out on your Cricut.
- A DXF version which is Craft Robo friendly, and ready to be imported into your Robomaster software (I'm not a Robo user, so if there are any problems with this, please let me know!)
- I have NOT created a print and cut version for this, as explained earlier
Simply right click on the appropriate button below, and choose "save link..." or "save target..." and save your template!
Any feedback on the templates is more than welcome, and if you have any suggestions for possible future templates you'd like to see, please let me know!
If you make anything using one of the templates, please post a link to it here so that others can be inspired by how you've used them!
I hope you like the templates - let me know how you get on! :)
Templates © dan99crafter@gmail.com 2009

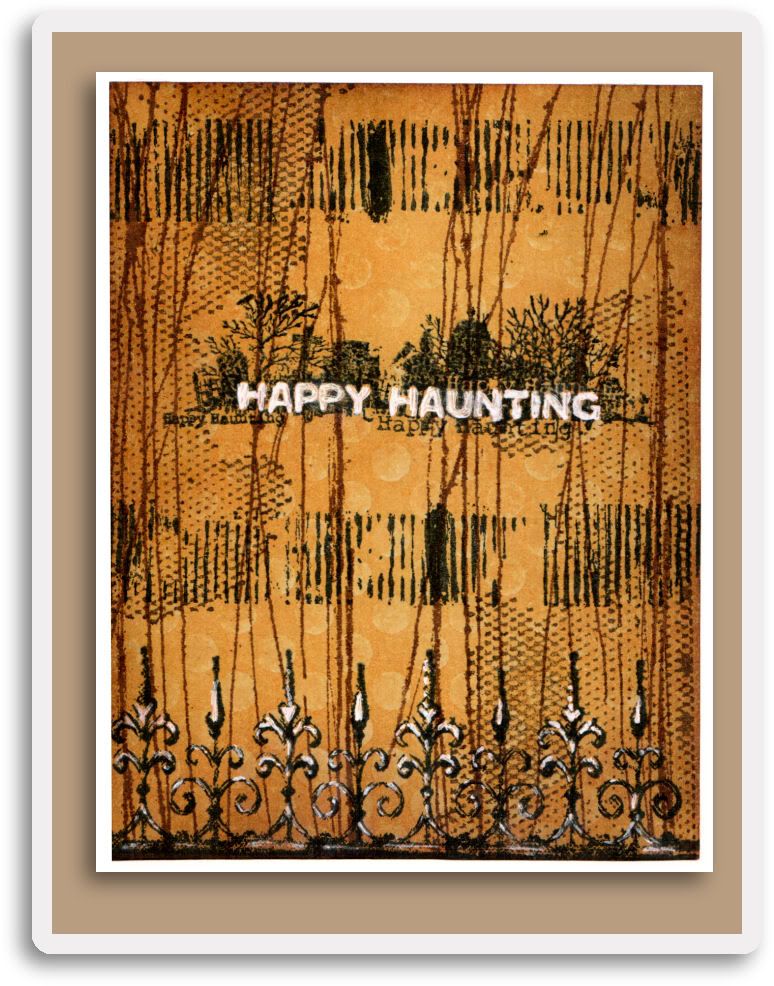
 Here's the last of the 3 tags I made on Tuesday. On this one, I rubbed Fired Brick, Mustard Seed and Brushed Corduroy ink pads onto a non-stick craft sheet and then spritzed it with water. I laid the tag down onto the inky mess and then picked it up and dried it. I repeated these steps twice more, to give the funky psychodelic background you see here.


 Another recycled item, this time a gift box made from 2 bases from Tria pen boxes. You can see what the bases look like below. I removed the inner lip from one of them, and it became the lid, fitting perfectly onto the other base!