
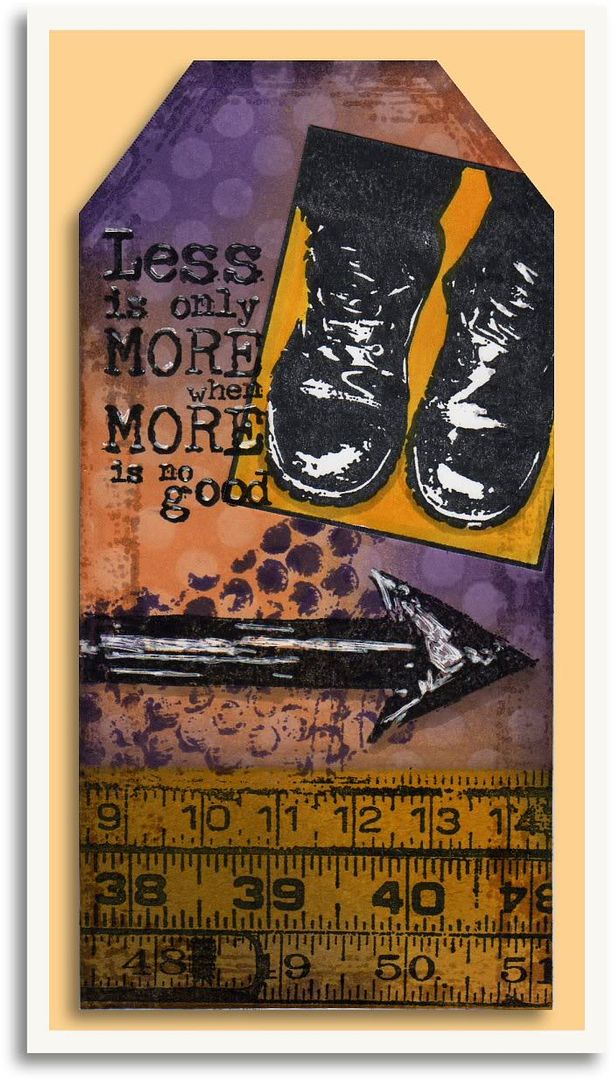
Another day, another tag!! (Hopefully any german readers will enjoy that pun! lol)
Once again, more new stamps that I'm trying out for the first time (I'll try to remember where they're all from, but I always forget!)
I started out by colouring the tag with Dusty Concord and Dried Marigold distress ink, applied from the ink pads with an ink blending tool. I then spritzed the large dots background stamp from Cornish Heritage Farms with water and stamped it on the tag and left it to dry.
I used a wet baby wipe to remove a lot of the colour from the bottom section of the tag, then applied Mustard Seed distress ink to that section with my ink blending tool. I then stamped the rulers background from Lost Coast Designs, with black ink.
The bubble wrap stamp is from a Paperbag Studios plate, and I stamped with with Dusty Concord ink (see how much darker it stamps compared to the areas where I applied it with the blending tool?)
The Less is More stamp is from a PaperArtsy sheet, and I stamped it in black and highlighted areas with a white pen. The shoes stamp was a gift from a friend, so I've no idea where it comes from! I stamped it separately, then used a water brush and Spiced Marmalade distress pad to paint the orange colour into the white area. I used a grey promarker around the toe of the shoes to make them pop a little more. I then cut out the image and stamped the Less is More stamp across it's bottom left corner, then lined it up with the phrase already on the tag and stuck it in place.
The arrow is from the same Paperbag Studios sheet as the bubble wrap (I think!) and it was stamped in black and highlighted with white pen. Finally I used a scratches stamp from Tim Holtz's Slight Alterations set and stamped it with Milled Lavender distress ink around the edges of the tag to finish it off.
I hope you like it, I had a lot of fun making it! :) Click on the image to see a larger view.

 Two more Halloween cards to thrill and chill you! Or not :o) Whatever :o) Lots of rich layered stamping in the first card, so much so that the photo doesn't really do it justice! Click on an image to see a larger view.

 Another Halloween rest day today, so here are 2 more pages of the book I'm working on. Once again the blank pages were cut on the Cricut with Sure Cuts a Lot.
 Two more Halloween cards today - I include the first because someone yesterday someone said they liked the little guy in the middle, and to answer a question from yesterday, it IS a Stampotique stamp.
 I thought, dear reader, that we'd take a break from Halloween today, so here are two pages from a snake book I'm making, which will be bound with the Bind-it-All. They're not actually the first two pages of the book, but I've grouped them together here because the techniques used on both pages are the same. I only wanted 4 holes down each side of the page, so I didn't punch them on the BIA, I cut them on the Cricut instead, using the Sure Cuts a Lot software.

 The panels were cut from pale grey cardstock and I applied ink from a Spiced Marmalade Distress Ink pad with an ink applicator tool. The large polka dot stamp (from Cornish Heritage Farms) was spritzed with water and then stamped on each panel. When they had dried I distressed the edges with Vintage Photo distress ink, applied as before.
 I can't take the credit for this idea, someone emailed me a couple of weeks ago suggesting it as a future freebie. Try as I might, I can't find the email anywhere, so humble apologies to the person concerned!
 I've been a bit pressed for time today so didn't really have time to decorate these properly, but the important thing is that I've cut them and tested to make sure everything is ok. Hopefully you can see from the picture that that is the case!
 Another day, another tag!! (Hopefully any german readers will enjoy that pun! lol)
 Once again playing around with some new stamps to try them out! No plan or fancy techniques with this tag, just trying to get a feel for the new stamps and seeing how they stamp.
