Showing posts with label Artistic Stamper. Show all posts

Wednesday, 9 March 2011

Gingersnap Creations - "Office Supplies" Challenge

"Office Supplies" is the theme over on the Gingersnap Creations blog this week. After completing the configurations box that I blogged here I had 3 of the small boxes left, which I thought would be perfect for this project.

I started by joining the 3 boxes together with my ATG gun, then covered them with paper from the Tim Holtz "Crowded Attic" card stack, finishing off the edges with Tissue Tape. I pierced 4 holes in the bottom and inserted large chrome brads to act as feet. I added 2 metal handles to the front and filled the compartments with office supplies (of course!). The tickets were from the "Lost & Found" card stack and the vintage eyeglasse came from the Artistic Stamper. Click one of the images for a larger view.

Pop over to the GC blog to see how the other DT members have interpreted the challenge - go on, you know you want to! :)

Saturday, 13 September 2008

Saturday Freebie #15!

There's Snowflakes Like Home!

[EDIT: These files are no longer available via my blog. Email me for details of how to access them]

It's Saturday again, and that can only mean one thing - an awful pun for the title of this post! No, that's not what I mean, I mean it's time for some new, original, FREE shapes for you to download!!

Today's selection are snowflakes - useful for cardmakers, scrapbookers and all-round paper-crafters! No holiday project is complete without them!!

Here are images of the files, along with an idea of what the cut example will look like. As usual, I have cut these out on the Cricut before uploading them, to make sure that they cut as they should! Click on the images to see a larger view.

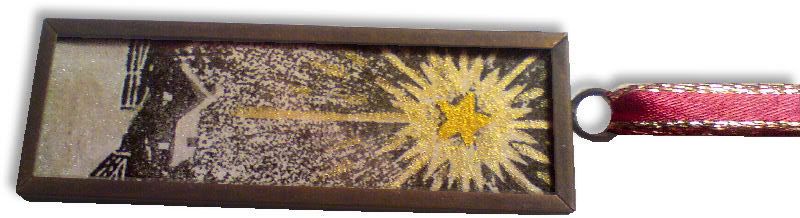
I covered this box frame with gold acrylic paint and distressed it before stamping on it with Archival ink and colouring the images with Sakura gel pens. All the stamps I used on the frame and inside it were from the wonderful Victorian Christmas plates by the Artistic Stamper. I coloured the snowflakes red and stamped on them, just to try something a little out of the ordinary!! I think they suit this project well, and if you squint, they almost remind you of poinsettias!

Again, these templates will be "live" for 1 week. Next Saturday, they will be taken down, and new ones will replace them. Don't forget, if you have any requests, pass them on! I can't promise, but I will take suggestions into account when planning future templates.

These files may not be uploaded to a group, forum or website for sale or redistribution, or shared among individuals. They are expressly for the personal use of each person that downloads them from this blog.


Because there are 4 files, I have put them into a zip file to make downloading easier. After saving it, open in the usual way, and drag the templates out onto your desktop or wherever you wish to save them.

There are 3 versions of each template:
  • A printable version (JPG files) that you can import into a program like Word, then resize, print, cut out and use like any other paper template (these are NOT Word files, so don't use File/Open in Word! Use Insert/Picture to bring them into a Word document).
  • An SVG version which can be imported into the Sure Cuts a Lot program and then cut out on your Cricut.
  • A DXF version which is Craft Robo friendly, and ready to be imported into your Robomaster software (I'm not a Robo user, so if there are any problems with this, please let me know!)
Simply right click on the appropriate button below, and choose "save link..." or "save target..." and save your template!

Any feedback on the templates is more than welcome, and if you have any suggestions for possible future templates you'd like to see, please let me know! If you make anything using one of the templates, please post a link to it here so that others can be inspired by how you've used them!

I hope you like the templates - let me know how you get on! :)

Templates © dan99crafter@gmail.com 2008

Thursday, 3 July 2008

Hanging around the tree

Here is a Christmas decoration I made for the Artistic Stamper's Christmas in July blog challenge. Go over to their blog and check it out, there's a great canvas to be won! Just make something Christmassy and let them know about it!

I used one their wonderful vintage Christmas stamps, and decorated it with their great new range of pearlescent mica paints. You can see the sheen on the gold here, and just about see it in the snow (blame my photographic skills - it shimmers beautifully in the flesh!).

Finally, I sandwiched the piece between 2 pieces of memory glass, and placed it in a vintage bronze frame. A piece of festive ribbon to hang it on the tree finished it off nicely!

I hope you like it, click on the image to see a larger view :o)

Wednesday, 25 June 2008

Dans ma maison il y a ... de la musique

A somewhat late entry for the Dans ma maison challenge!

The house was cut out on the Cricut, then spiced marmalade and dusty concord distress inks were applied with cut'n'dry foam.

The music stamp, from the Artistic Stamper, was applied with black versafine ink. Large eyelets were set in place, and the twill music ribbon, also from the Artistic Stamper was tied in place.

Finally, the roof gable, window and fence were fixed in place.

I hope you like it, click on the image for a larger view! :o)

Monday, 12 May 2008

So Salsa Challenge - Stitches


Having discovered a new challenge involving tags, I just had to have a go! :o) I have a weakness for tags, dunno why, maybe I didn't get enough presents as a kid or something? Anyway, the So Salsa Challenge this week was "stitches", and here's my attempt!

The stitches stamps I used are by Autumn Leaves, used in conjunction with stamps by Stampers Anonymous, Elements, Artistic Stamper, and a few others I'm sure! Inks were distress ink pads, versafine and ancient page.

Masking and selective inking were the two main techniques used. I hope you like it! Click on the tag for a larger view :o)

Saturday, 10 May 2008

Um.... 5 More Triangular ATCs


Well, I enjoyed making the last 5 so much, I thought I'd make 5 more! This time, I didn't have the sense to make two of them point-side down, so they'd be easier to photograph, so they're split into 2 images here. Click on either to enlarge them.


Nothing groundbreaking to say about these really! In the second, the word "bored" is deliberately spelled that way! Honestly!! :oD The 2 stamps used in the 4th are some that I had made for me as a one-off.

I hope you like em! Ta for taking a look! :o)

Thursday, 8 May 2008

5 Triangular Stamped ATCs

I have just completed these ATCs for an interesting-sounding swap. Each person taking part must make 5 triangular ATCs, 2.5in wide x 3.5in tall. The only other criterion was that they should be stamped. As I have been known to a bit of stamping from time to time, and also have a ruler that can measure in inches, I thought "why the heck not?" :o)

All images were stamped with either versafine or ancient page (my new favourite) ink pads. Cards were coloured with blended distress ink pads, applied with cut'n'dry foam. Other techniques used included masking and painting with a waterbrush.

As ever with ATCs, less time and trouble is spent on decorating the rear side. In this case, I simply stamped my "handmade by dan99" stamp, masked it, then overstamped and painted one part of the image.
I hope you like 'em! Even more importantly, I hope that the recipients like them too! All I have to do now is make sure I get them in the post on time, LOL. Click on either pic to see it larger. :o)

Saturday, 5 April 2008

Stamped Chipboard Flowers


These flowers are part of the new chipboard range by the Artistic Stamper. They're white on one side and grey on the other. The white sides were inked and stamped, and the grey sides were painted with acrylic dabbers and stamped.

I didn't spend too much time on them, because there is such a small amount of petal space available for stamping, that there was no point in doing anything too complicated, it just wouldn't be seen. The brown one is stamped and embossed in gold, which, as always, doesn't show up too well when scanned!

I hope you like them, click on an image to enlarge it. :o)

Friday, 4 April 2008

Tagstravaganza - Day 2

Another day, another tag!

Nothing fancy to say about this one that you haven't already read in yesterdays post, dear reader. Another of the Artistic Stamper's chipboard tags, decorated with their stamps and using the painted mask and batik techniques.

I hope you like it, click on any image to enlarge it :o)

Thursday, 3 April 2008

Tagstravaganza - Day 1 - The Painted Mask Technique


This is my first blog post in AGES so I'll dive straight in. I've been busy working with some of the new chipboard shapes from Artistic Stamper. On this large sized tag, I thought I'd have a go with a new technique I've dreamed up for colouring stamped images (at least it's new to me, if someone has claimed this before, I apologise!) I've called it the painted mask technique, and it's been used here on the pocket watches and the gothic arch. Basically it involved stamping your image, then painting it with acrylic paint (either white as I have done here, or in whatever colours suit your image). After painting, you stamp again in the same place, giving a masked effect but with coloured areas that match the stamp exactly (depending on how accurate you are with your stamp position).

The red side - text was stamped and embossed with clear powder. Tag then was coloured with fired brick and aged mahogany distress inks applied with cut'n'dry foam. Brown paper was placed over the tag and it was ironed with a hot dry iron to remove the embossing powder (Tim Holtz's batik technique). Text was stamped again with brushed corduroy distress ink. Arch was stamped with black versafine and dried with heat gun. It was then overpainted with white acrylic paint, dried and restamped. Finally the word Architecture was stamped with black versafine. I added two of natures "free" stamps (the most personal and individual of all!) and I was done.

Mustard side - painted with butterscotch acrylic dabber and edges distressed with brushed cordury pad (doesn't show up well in this scan). Watches and keys stamped with black versafine. Watch over-painted with white acrylic paint then restamped.

I hope you like them! Click on any image to enlarge it.

Saturday, 19 January 2008

Garden Jigsaw Frame

Sorry about the camera flash glare on this one, I'm certainly no David Bailey! LOL

Pound shop blank jigsaw and art shop shallow wooden box, enrichened by some great stamps and a chipboard flower from the Artistic Stamper.

Jigsaw stamped in stazon and coloured using distress inks and a water brush. The flower in the top left corner was subsequently masked out and the background was coloured then stamped with a text mat.

The inside of the frame was tinted with brushed corduroy distress ink, and the outside painted with old paper crackle paint and stamped with another text mat in brushed corduroy.

The flower was coloured with mustard seed distress ink and mounted with 3d foam onto the frame.

I hope you like it! Click on the image to enlarge it.

Saturday, 12 January 2008

Beauty Secrets

I finally got to have a go with the Gibson Girls stamps from the Artistic Stamper tonight. Not the kind of subject matter I'd usually go for, but the images were so strong and suitable for a stark monochrome approach that they instantly appealed to me. This project hasn't photographed that well, but hopefully it's clear enough for you to see what's going on!

The frame was painted inside with espresso dabber and outside with frayed burlap crackle paint. It was then stamped with walnut stain and black staz-on.

The blank jigsaw was a pound shop bargain that I've had stashed away for a while until the right project came along!

The Gibson girl images were stamped on the puzzle using black staz-on (there is a slight gloss to the puzzle, so staz-on was the best option). They were then stamped again onto thin card and cut out to make masks. One by one, each mask was placed exactly over the same image on the puzzle pieces to protect the black and white faces. The pieces were then tinted and stamped with distress inks. Each piece was mounted onto 3d foam and fixed in place inside the frame.

I hope you like it! :o) Click on the image to enlarge it.

Friday, 11 January 2008

A Dream of Sunflowers

I enjoyed making the last shadow box so much, I thought I'd have a go at another one, again using stamps from the Artistic Stamper.

The inside of the frame was painted with espresso paint dabber and the outside was painted with scattered straw crackle paint which was rubbed with walnut stain distress ink when dry.

To create the flower on the edge of the frame, I applied faded jeans and peeled paint distress ink to card and then over-stamped with walnut stain, ensuring the stem part of the stamp was on the green area and the flower was on the blue.

The background cards inside the frame were tinted with various shades of distress ink, water spritzed, crumpled and ironed flat.

The flower on the right was stamped with walnut stain distress ink, and the stem was coloured with a water brush and acrylic paint. The flower was stamped in walnut stain on card previously coloured with a yellow distress ink (I forget which one!). It was then cut out and placed on the background.

The flower on the left was stamped in walnut ink on the background card, then restamped card that had been tinted yellow, cut out and fixed into place.

The copper bookplate was painted with expresso paint dabber (and a green-ish verdigris type colour on the right hand edge, I forget the name), then sanded with an emery board to reveal the copper beneath. The text (which means "a dream of sunflowers") was printed out from computer in dark brown ink.

The eyelets were ... um... eyeletted into place (breaking my cropodile in the process (sob!)).

And there you have it, a dream of sunflowers! I hope you like it :o) Click on the image to enlarge it, more to follow....

Tuesday, 8 January 2008

Crackle Frame Shadow Box


I thought I'd try something a bit different today - a shadow box. I bought a few of these frames a while back and have been waiting for an excuse to have a go at one! All stamps used in this project were from the Artistic Stamper, as were the watch parts.

The inside of the frame was painted with espresso paint dabber, and the front and outer edges with frayed burlap crackle paint. When the crackle paint had dried, I applied walnut stain distress ink to it to accentuate the cracks in it. The "Time is..." phrase was stamped with black Staz-on. The crackles don't show up that well in this photo, but they're there, believe me!

The background card inside the frame was tinted with walnut stain distress ink applied with Cut'n'Dry foam and then flicked with water to produce lighter spots on it. I then crumpled it up, flattened it slightly, then rubbed it lightly more walnut ink to highlight the crumple folds. I then turned it over, spritzed it with a little water and ironed it flat (yes, yes... I know.... enough already! Those of you that know me find it hard to imagine me with an iron in my hand, but you have to believe me, it's true! Would I lie to you, dear reader?) For some reason that I have not yet fathomed, this produced light blue/grey marks where the crumples had been. I'm not complaining, I think it looks great, I just wish I knew how it had happened!

The card was then stamped with a calligraphic mat and tape measure stamp in brushed corduroy distress ink, and glued into the frame.

The watches were created as follows (going from right to left):
  • stamped in walnut stain distress ink
  • stamped and embossed with gold embossing powder then tinted with walnut ink
  • stamped with black Staz-on onto acetate, run through a Xyron sticker-maker to make the back sticky, then gold leaf was applied to the back. It was then scrubbed with a rough brush to distress it slightly.
The watches were layered with 3d foam pads.

The watch face and glass were layered in the lower left corner with a spiral paper clip, tinted with gold Krylon pen.

The key in the top right corner was a real one I had lying around the house, which was suspended from jute twine and held in place with 2 drawing pins coloured with a copper Krylon pen.

The chipboard key was from Maya Rd. It was coloured with gold Krylon, sanded to distress the edges and gently edged with walnut distress ink. It doesn't show up well in this photo, but the word ORIGINAL was then stamped onto the key using black Staz-on ink.

And that's about it! It took a fair while to make, but I'm really pleased with it. I hope you like it too! :o)

Monday, 7 January 2008

Artistic Stamper Insect ATCs


Hello again dear reader, after a lengthy Christmas break! I hope the holiday season was as good for you as it was for me.

It's been all excitement here at Dan Towers - on New Year's Eve I found out that I'd been voted Crafter of the Year by the members of the Craft Swap Forum. I'm particularly thrilled about that because all of the people nominated were so talented and any of them would have been a worthy winner.

In addition, I've been invited to join the design team for The Artistic Stamper, an invitation which I was delighted to accept! The 3 ATCs shown here are the first things I've made using some of their beautiful stamps.

The insects were stamped with Staz-on onto acetate and coloured using solvent based pens and alcohol inks. The insides of the slide mounts were tinted with walnut stain distress ink and spritzed with Moonglow mist ink to give a bit of a gold shimmer. The slide mounts and background cards were tinted with walnut stain ink and stamped with one of the Artistic Stamper's calligraphic mats in brushed corduroy distress ink, and a vintage tape measure stamp. The quotes were computer printed and mounted onto black card.

I hope you like! Click on any image for a larger view. More to follow... :o)
Related Posts with Thumbnails