
 A few weeks ago a few people asked me to create a tutorial on how I blend Ranger's Distress Ink pads when I use them on a project. It has taken me longer than I'd hoped, but here is the result, my first ever video tutorial!! Many thanks to Jane3865 for the loan of the camera and to Jayne from Puffin Crafts for operating the camera and allowing me to film in their store!
Win a tag! (NOW CLOSED)
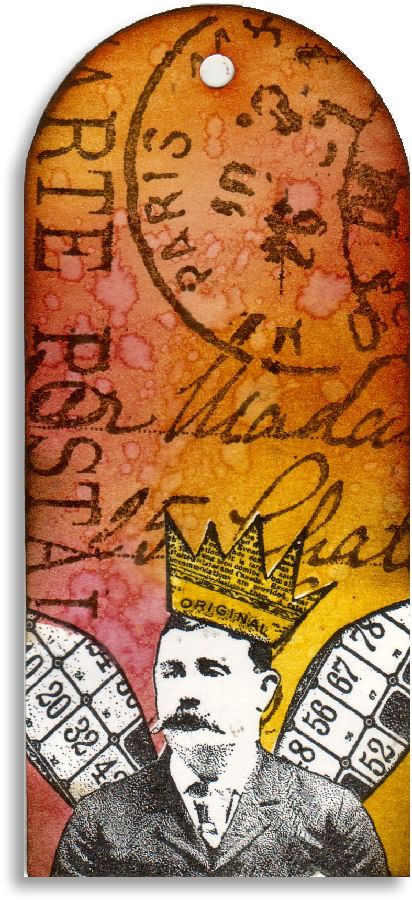
During the tutorial, I create the tag on the right (actually, I made 5, what with fluffing my lines and having to start over again, LOL). If you leave a comment on this post, 5 names will be picked at random and a tag will be sent to each of those people! Click the tag for a larger view.
To attempt this tutorial, you will need:
- Rubber stamps
- Acrylic block (if necessary)
- A black water-resistant ink pad, such as Versafine or Staz-on
- Distress ink pads in 4 or so colours
- A Ranger alcohol ink applicator or ink blending tool (they're the same thing!) - If you don't have one, you can apply the ink without it, but you may not get such a graduated result
- Squares of cut'n'dry foam, with adhesive velcro on the grey side, or squares of ink blending foam, which already have velcro on the back when you buy them
- A non-stick craft mat
- A water brush or an artist's paintbrush and a pot of water
- Some post-it notes
- Scissors or a craft knife
Good luck, and let me know how you get on!

102 comments :
Great tutorial! I have always wanted to try these inks just didn't know how...now I know. THANKS DAN!
That was fabulous!!!!! I really enjoyed your tutorial Dan!!!! I was able to follow that so easily!!!! I've added it to my todo list :) Thanks for posting it :)
Heather
I agree with ohscrap. I was looking at the walnut ink the other day at the store but was unsure how to use it. And your tutorial was done very well, so thank you for doing it. Scraphappy7 (Sheree)
I'm definately going to try this now. I like the post it note for the mask too, I think thats a great idea. Thanks Dan.
Dan, You are one crafty Dude! I loved watching your tutorial!
Kim B
You make it look so easy and fun, Dan. I must go out and get me some alcohol ink pads!! Thanks for the inspiration. Beautiful tag.
Dan,
I have never tried alcohol inks and now I must.
Thank you for a great tutorial.
marda
This is great . I have alchol inks and not ventured far with them . I am looking forward to having a go at this . You have done a great job with video well done and thanks alot
Barbara
That was awesome!! Very well done....you made it look so easy. I am definitely going to try this.
Thank you so much.
Deanna A.
jdamund@centurytel.net
Great tutorial Dan, thanks, love the subtle look and colouring you get by applying the ink like this.
Corrina
ps - nice to hear your voice too
Dan, you are so clever. The tutorial was great.
I have often looked at your super stamping and wondered how you got all the lovely background shading - thank you for making it look so easy. Will have to give this a go.
Toni :o)
Although you can see Tim Holtz in his tutorials, my girls thought you were "hotter"! They like your "accent" and asked if you had products to sell... they'd buy them. lol! Great tutorial!
Aha! No more mud puddles for me!! I was doing everything wrong!! LOL Great tutorial Dan, thanks so much!!
It's a pity that in Greece there are no shops except the internet to buy scrapbooking material..ggrrr
Wow what an Amazing tutorial, Thanks Dan. Will be having a go on that this afternoon, adding post it notes of my shopping list this morning! Thanks oncve again Dan, have alway loved your work and wondered how you do it. Sarah
Great tutorial dan! The tag looks great!
Great demo Dan - have never really known how to use post it notes but will now have a try. Thanks xx
wow what a fab tutorial. lots of insperation, "i must go and have a play today".
Thanks Dan
Wow this is fab. I am off to two craft shows this month and the tools for this job are now on my list. I thought you could only get that affect with inks. Sadly little bottles of inks are hard to use when you have 2 young boys. Thank you for sharing. Judih x
That's great Dan! xx
Wow Dan, this is great !! Thank you for the lesson ! with regards from Holland Ageeth
Really clear, wonderful tutorial with an amazing out come! More please Dan... and can we see the face that goes with that wonderful deep voice next time please??!!
Dan enjoyed the tutorial, very informative. The tag is fab and the masking technique is great. looking forward to trying it out!
Karen
Fab tag Dan and thanks for the tutorial
x
I'm another who has wanted to use these products but had no idea how - just need to buy them all now! Enjoyed your tutorial, thanks a lot :)
Great tutorial and it comes just after I picked up a bunch of distress inks too! Love the tag too, hope I win one!
absolutely wonderful..thank you
x
This is great, Dan!
Thanks for the tutorial.
Marie-José from the Netherlands
Dan that was brilliant
Thanks so much. Will definately give that a go. You made it look so easy
Wow! thanks Dan for a great tutorial love the tip about coming in from the edge - that should solve some of my problems. going to try this method on some of your houses so watch this space! Lol xxx
Wonderful tutorial. I'm not new to distress inks, but your way of applying them is different and very effective. Never thought of spritzing water that way too, much more control than straight from the bottle. Thank you.
Dan - that was fantastic ... MORE MORE MORE ... am off to shave my legs now :0)
Excellant job Dan!! Keep up the great work.
Great tutorial! Love your accent (from a true southern girl).
Sally
Thanks for the tutorial! I now know the secret - the foam pads. I kept trying the felt ones. How do you store your felt pads after you ink them up?
Cindy F.
Thanks for taking the time to share your creative ways with us. I will look foward to your next video. That was very informative and will make trying this a breeze.
Thanks for the kind comments everyone! :)
Cindy, I store my foam pads in a small tupperware box. Although they're not wet as such, they stay inky for quite some time, so it keeps them out of the way of other stash!
great tutorial well done, i never new lord lucan (the dude in the stamp lol) could look so good!
What a fab tutorial Dan, one of the best I have seen. It is so easy to follow your instructions and explanations. Thank You So much. Like most of the others have said....What an accent!!
Viv
I loved this tutorial. I haven't done much stamping, but watching this, I really want to try it!! THANKS!
WOW Dan thats one of the best tutorials I have ever seen, I also have taken on board a few things now, like post it notes, and the inking from the side with the pad tilted, loved it you sexy talking dude you :-) x
That was great, Dan! I've learned something new, and found something new to spend money on...lol! Thanks for doing the video for us.
Jill...:-)
Fantastic tutorial! You make it look so easy!! Makes me want to go out and pick up some of those distress inks!
What a great tutorial! To be honest, I didn't even know there were foam pads for the Ranger applicator. I have the felt pads.. but it looks like I better buy the foam pads AND the non-stick sheet. (I've eyed them but just hadn't bought it yet.)
Thanks Dan! :)
Kimberly
Fabtasic tutorial Dan! I'd never thought of the post it notes as masks before. Also might just have to purchase a few more inks too!!!
Sara :)
Dan, You did a GREAT job!!! Now I need to go shopping and pick up a couple of the items you used. Thanks so much for taking the time to do this for us!
Judy M.
Wow, fab, groovy Dan....loved your tutorial...you dulcet tones were the perfect accompaniment to a great project :O)) Thanks for doing this - you should be doing this full time for some big inky manufacturers...cos you knock spots off others I have seen xxx
Dan, loved your tutorial. I learned some new techniques! Hope you do more tutorials in the future!
Thanks so much for all that you share!
Pat
I am so impressed with your tutorial. It was beautifully done and most professional. Your step by step process is one that is easy to follow and I can't wait to try it. I am not a stamper because I never thought I could do something this style of work. I own every product on the supplies list except the stamps. Off to the internet Tim Holtz site for me. Thanks so much for teaching this. Deanna
Wow I am so impressed with this beautiful blending technique. You make it look so easy I can't wait to try it. Thanks so much for sharing the technique and your valuable time. Deanna
Fantastic Dan,
Hope this is the start of many more
Thanks!!!
Thanks dan, thats great.... ummm distress inks are now at the top of my xmas list. Thanks :)
Well done! You could use "cosmetic wedges" those foam triangles that us ladies use to apply makeup if you can't get the foam. Another bonus: the're cheap!
Absolutely fabulous dahling!!!!!!!!!
You are a genius Dan, thank you for sharing your techniques with us
Shazza
x
Dan, that was a neat tutorial! I have not used the distressing inks yet, so you are truly an enabler, and I will now have to purchase them...anyhow, loved the tag and how you made it, you are really good and a great teacher.
dimahi59
Diane
Thanks for a very informative tutorial, the 1st of many I hope! The finished result is FAB as always :o)
fantastic Dan - thank you so much for a brilliant tutorial - hopeyou do consider more in the future
OMG, Dan! This is fantastic! You know I'm just learning but this really gives me great inspiration (and instruction) to try something new. Thank you so much! You are awesome!
What a great process!
Dorothy
Thanks Dan that was brilliant,I have some of those Ink Pads,but did not know what to do with them.
As the others before me have said Dan you did a brilliant job! You very clearly and completely covered how you do such wonderful work.
The tip with tilting the pad solves my edge problem!!!
Now I have to dig out my water brush I purchased ages ago and have never used!
Brian @ Long Beach, CA USA
Fantastic Dan, your creations never cease to amaze me!!!
Clairexx
Great tutorial.. You make making the tag so much easier than I ever thought them to be. Great job, Dan. Thanks.
Thank You - that was awesome.
I HAVE to check out the Tim Holtz stamps now.
I hope you do more tutorials...the front seats are great. :)
Thanks again Dan
We were just discussing masking on a scrapbooking group I belong to. Your tutorial was very timely and made it look so easy. Thanks.
Loved the tutorial! I've got to try this now.
You are amazing! Will you marry me?
I never knew what the water pen was used for! Got to go and get one of those.Thanks.
Great tutorial, Dan. Love the tag.xxx
Wow Dan, fabby tutorial, thanks, you're a star!
Thank you for a wonderful tutorial, Dan.
You have inspired me to have a play with my distress inks.
Beautiful tag!
Great job Dan! You taught me how to blend and what tool to use. Please make more videos!
Thanks Dan for the great tutorial - I can see now why mine never look as good as others I have seen! I'll try out your method.
Awesome tutorial Dan! So easy to follow...well done! Can't wait for the next one!
Yaaay!
Dan was hoping this would happen!
Well done!
What a fantastic video!!! Thanks so much for sharing that with us. I look forward to more tutorials...hint hint!!!!
Great tutorial Dan - I've often wondered how you get such great blending from the distress inks - now I know! Thank you so much for sharing.
looks fantastic thanks for sharing with us Dan I will have a go now that i seen how is done
Hug
joana
Fabuloso video ! Thanks very much Dan, you are a star !
thanks for doing this reminder tutorial about distress ink..I had completey forgotten about the masking technique!
great tutorial Dan thanks.
hope there are going to be more:)
well thank you dan for a great tutorial - I have these inks but after a brief play when I first got them - I havent used them much - well I am certainly going to give this a go - so cheers hun - and will be popping by again soon to see if there are any more tuts
Elaine
Great tutorial and great tip about how to hold the pad so as not to have hard lines. You should do some more tutorials - how about one on distress embossing inks and another on grungeboard?
This is the tutorial that I have been looking for!! Thanks for putting this together for us. And will you please do more?
Thanks!!!!
Brilliant tutorial Dan -thank you
Great job! Thanks for sharing your creativity.
Fantastic... and not to seem to greedy but MORE PLEASE lol
Thanks for showing me how to get this effect. I think I'll need to investment in some foam pads.
Great tip with the post-it-note masks!
Keep the videos coming Dan.
Traceyr :)
Brilliant tutorial and great timing too! I had another 8 of the Distress Inks (got 12 now) drop through the door this morning and this will really help.
Cheers Dan xx
Dan,
I'm too late for the contest, but I still wanted to leave you a nice comment, that was an awesome tutorial! I've played with inks before, but wasn't too happy with my results. You've inspired me to try again! Love the tut, keep 'em coming!
Thank you so much for this video. I loved it and it showes me now how to do a tag which I have never done.
May I ask one thing. Could you do a video doing an ATC card. I love it. Your work is so awesome. TFS
That was a great video, I never knew how to do anything like that, you have given me great insight.
Thanks
Beth
Fantastic video Dan !!! thank you for sharing xx jo xx
thank you now I know how to do it. Very inspirational.
What a great tutorial Dan thanks a million,looking forward to the next one
Wow, great tutorial I bought these inks a while ago and couldn't remember what to do with them ! Did you make your foam block ? I haven't seen that before
What a great tutorial. This is better than Tim Holtz. I like your tips about starting off the paper and using the tip of the foam only. Thank you very much for the info.
Wow Dan, That was awesome.. Thanks so much!!
Thanks so much for this, Dan. I'm still so new at all of this, but the distressed look calls my name more and more. Your tutorial is truly awesome, and I can't wait to try it out myself!
Oh WOW thanks Dan, I have been considering buying some of these inks and your tutorial has convinced me that I now NEED them.
Fantastic tutorial Dan, thanks so much sharing this technique with us. I found your link via Blue Eyed Girls blog...love the tag she created using your technique too.
I'm off to find some of those foam pads now!
Dan what an awesome tutorial! I LOVED the finished product and can't wait to try this myself now! *Hugs* and thanks so much for sharing the video!
Post a Comment