Sunday, 18 April 2010

Who Killed Cock Robin?

The theme on the Sunday Stampers Challenge today is "Free as a bird", and this is my entry :) Just a bit of minimal fun :)
Who killed Cock Robin?
I, said the Sparrow,
with my bow and arrow,
I killed Cock Robin.
.
.
.

All the birds of the air
fell a-sighing and a-sobbing,
when they heard the bell toll
for poor Cock Robin.
Stamp is Tim Holtz by Stampers Anonymous, the rest is by me :) As ever, click on the image to see a larger view. Comments welcomed!

Saturday, 17 April 2010

Freebie #53!


Birdcage
[Edit - I've started to make my files available from my blog again and am adding a new set each week. Check out the "Cutting Files" tab at the top of the page to see which ones are available for download.]

Edit to add - I just wanted to share this great page for a bind-it-all book, made by Anne (check out her blog here). Isn't it great? I love seeing how people use my files! :)

Birdcages seem to be everywhere right now - be it on rubber stamps, die cuts or patterned papers. I see no reason why my blog should miss out, so here I am, bang on-trend, with this weeks free file download! This file, ready to cut on digital cutting machines like the Cricut, Gazelle, Craft Robo etc, will be available for 1 week only, so grab it before it's gone! After that time it will feature as part of a collection on my other site.

Please remember you are only allowed to download this file for your own use and may not distribute it to others in any form. I spend a great deal of time creating my designs, please respect the terms under which they are given.

Again, this template will be "live" for 1 week. Next week it will be taken down, and new ones will replace it. Don't forget, if you have any requests, pass them on! I can't promise, but I will take suggestions into account when planning future templates.

These files may not be uploaded to a group, forum or website for sale or redistribution, or shared among individuals. They are expressly for the personal use of each person that downloads them from this blog.

There is 1 file but I have put it into a zip file to make downloading easier. After saving it, open in the usual way, and drag the file out onto your desktop or wherever you wish to save it.

There are 2 versions of each template:
  • An SVG version which can be imported into the Sure Cuts a Lot or Make the Cut program and then cut out on your Cricut.
  • A DXF version which is Craft Robo friendly, and ready to be imported into your Robomaster software (I'm not a Robo user, so if there are any problems with this, please let me know!)
Simply click on the appropriate button below to download the file!

Any feedback on the templates is more than welcome, and if you have any suggestions for possible future templates you'd like to see, please let me know! If you make anything using one of the templates, please post a link to it here so that others can be inspired by how you've used them!

I hope you like the templates - let me know how you get on! :)

Templates © dan99crafter@gmail.com 2010

Friday, 16 April 2010

Home Sweet Home

Just a quick post to show a card I made today.  Most of the stamps used are from a set by Darkroom Door.  Apart from that it was the usual distress ink and promarker jiggery-pokery!  As ever, click on the image for a larger view :)

Wednesday, 14 April 2010

Gingersnap Creations Challenge: Found Objects

The theme of the new challenge on the Gingersnap Creations Challenge blog is "found objects", and this is my entry. Why not pop over to their blog and see how the other Design Team members have tackled this theme? :)

The found object on this is the bottle cap. Stamps are by Tim Holtz, Darkroom Door, Crafty Individuals and U.N.Known :)

Colour is courtesy of distress ink pads and promarkers, stamping used Memento black, Archival black and Archival sepia.

The photobooth pics are by Darkroom Door, and were torn, sanded and inked until they looked like they had been .... er... torn, sanded and inked :)

The screws are not real ones, they just look like they are, they're actually snaps!

The French sheet is actually a rubber stamp of an old shoe bill. It was stamped with black Archival and then I tapped a Brushed Corduroy distress ink pad onto my craft sheet and spritzed very generously with water. The sheet was then laid in the puddle and dried with a heat gun. The edges of the whole thing were sanded and distressed with more Brushed Cordury.

As ever click on the image for a larger view :)

Saturday, 10 April 2010

Freebie #52!

Candy/Gift Bag

[ EDIT - I've started to make my files available from my blog again and am adding a new set each week. Check out the "Cutting Files" tab at the top of the page to see which ones are available for download.]

Aren't these fun? Modelled on the traditional brown paper grocery bag, they're perfect for small gifts, party favours, candy or cookies! Fill with the goodies of your choice, fold over the top and staple closed or punch a couple of holes and tie with some pretty ribbon!

The places to make the major folds are obvious, but I've included score guides on the side panels for the inverted Y folds. In my initial design I included ready cut holes for ribbon, but I found that when I resized the bag larger or smaller the holes became either too big or too small so I left them out - it's no trouble to make your own holes with a punch or cropodile, then they're always the right size :)

Please remember you are only allowed to download this file for your own use and may not distribute it to others in any form. I spend a great deal of time creating my designs, please respect the terms under which they are given.

Again, this template will be "live" for 1 week. Next week it will be taken down, and new ones will replace it. Don't forget, if you have any requests, pass them on! I can't promise, but I will take suggestions into account when planning future templates.

These files may not be uploaded to a group, forum or website for sale or redistribution, or shared among individuals. They are expressly for the personal use of each person that downloads them from this blog.

There is 1 file but I have put it into a zip file to make downloading easier. After saving it, open in the usual way, and drag the file out onto your desktop or wherever you wish to save it.

There are 2 versions of each template:
  • An SVG version which can be imported into the Sure Cuts a Lot or Make the Cut program and then cut out on your Cricut.
  • A DXF version which is Craft Robo friendly, and ready to be imported into your Robomaster software (I'm not a Robo user, so if there are any problems with this, please let me know!)
Simply click on the appropriate button below to download the file!

Any feedback on the templates is more than welcome, and if you have any suggestions for possible future templates you'd like to see, please let me know! If you make anything using one of the templates, please post a link to it here so that others can be inspired by how you've used them!
I hope you like the templates - let me know how you get on! :)

Templates © dan99crafter@gmail.com 2010

Wednesday, 7 April 2010

The Raven King Was Not Amused

The theme on 3 Muses today is "blackbirds", so I took the opportunity to make another page for the book I've (slowly) been working on! I'm not quite sure what his beef is, but he's clearly not impressed! LOL

The rulers were stamped first, then masked off while the bubble wrap was stamped at the left and right edges. Everything was then masked again and the suit and tie was stamped, then also masked while bubble wrap was stamped in the background then "knocked back" with white acrylic paint. Finally the head and crown were stamped, cut out and applied, then the row of smaller ravens was stamped.

A combination of promarkers and distress inks were used for colouring, and the text was computer printed. As ever, click on the image for a larger view :)

Tuesday, 6 April 2010

Keep out of reach of children

When I accepted the invitation to join the Design Team at Gingersnap Creations, I was asked to make something using gingery colours to accompany the DT announcement. This scary (at least I hope it's scary, I meant it to be!) Jack-in-the-box was the result. I notice that other team members have now started to blog their pieces, so here's mine! :)

The body, hands, collar parts, box and winding handle were all designed on computer and then cut on the Cricut using SCAL. The head, "cirque" and harlequin diamonds were Tim Holtz stamps. The spring was a length of Bind-it-all wire, the hinges were originally brass and I coloured them with promarkers.

As ever, click on the image for a larger view! :)

Monday, 5 April 2010

Home is where the heart is

Another day, another card. I don't really think of myself as a card-maker, but I seem to have been in the right frame of mind for it lately! I'm not going to say much about it, cos it's late and I need to get to bed! :)

The backing paper (which you can scarcely see) and the text were printed from the computer. The stamping was highlighted with glossy accents, which as I look at it now is glistening and gleaming, so, of course, it's not even visible in the photo! :) As ever, click on the image for a larger view.

Sunday, 4 April 2010

To Chuck Taylor, With Thanks

A simple card dedicated to a simple, enduring classic!

Ask any of my friends, and they'll vouch for the fact that they never see me wear anything else than the classic black and white Converse "Chuck Taylor" sneakers. :) I've always loved them, ever since I was a kid, and I kid you not, I feel happier when I wear them!

For obvious reasons, this image of a battered old pair of Chuck Taylors is one of my favourite stamps in my whole collection. You may not know, but before I became a stamp-addict, all of my crafting was done on the computer. I turned the clock back a little to those days and made the backing paper myself and printed it onto card. It was sanded and edge-distressed with Brushed Corduroy distress ink, as was the stamped image. Both were placed on top of a black matte and adhered to the card. I did warn you that it was simple! LOL

The Sunday Stampers Challenge this week has the theme "lace" - this card has 2 laces on it, so I figure it counts! :) As ever, click the image to see a larger view.

[Edit - I've googled til I'm blue in the face and I can't find who makes the stamp, sorry :( ]

[Edit again - OK, we're making progress! Thanks to Carolyn for contacting me with the info that this stamp is by Postmodern Designs and is called Hi Tops in a Box! Now all we need to do is FIND it, which is not proving easy so far!]

Saturday, 3 April 2010

Freebie #51!

CD Gift box[Edit - This set is no longer available from my blog, and now comes with a DVD gift box too! Find it on my other site by googling "My Crafty Files" or email me for details.]

Useful at any time of year, and always good to know you have it in reserve when needed! :) (Much cheaper than buying one too!) Although I've shown the CD peeking out of the end here, obviously both ends do close :)

I cut mine at 7.38" wide x 11.09" high and it was a perfect but snug fit for the standard cd case I was using as a guide. If you want it a little roomier, obviously you can cut it slightly larger! Since it will cut from an 8" x 12" piece of cardstock, you've got plenty left to make a matching tag or gift card! :) I've included fold marks for the major folds - if you don't want those, just cut the box in blackout mode.

Please remember you are only allowed to download this file for your own use and may not distribute it to others in any form. I spend a great deal of time creating my designs, please respect the terms under which they are given.

Again, this template will be "live" for 1 week. Next week it will be taken down, and new ones will replace it. Don't forget, if you have any requests, pass them on! I can't promise, but I will take suggestions into account when planning future templates.

These files may not be uploaded to a group, forum or website for sale or redistribution, or shared among individuals. They are expressly for the personal use of each person that downloads them from this blog.

There is 1 file but I have put it into a zip file to make downloading easier. After saving it, open in the usual way, and drag the file out onto your desktop or wherever you wish to save it.

There are 2 versions of each template:
  • An SVG version which can be imported into the Sure Cuts a Lot or Make the Cut program and then cut out on your Cricut.
  • A DXF version which is Craft Robo friendly, and ready to be imported into your Robomaster software (I'm not a Robo user, so if there are any problems with this, please let me know!)
Simply click on the appropriate button below to download the file!

Any feedback on the templates is more than welcome, and if you have any suggestions for possible future templates you'd like to see, please let me know! If you make anything using one of the templates, please post a link to it here so that others can be inspired by how you've used them!

I hope you like the templates - let me know how you get on! :)

Templates © dan99crafter@gmail.com 2010

Friday, 2 April 2010

[Picture Not Available]

I thought I'd make a "just because" card today. I love "just because" cards, it's so much more freeing not to have to fit in with a particular theme or celebration, and you can just let your imagination run wild! :)

I practically threw the kitchen sink at this one - most of the elements have either been soaked, sanded or crumpled and ironed! Fun to do though :)

Most of the colouring was done with Wild Honey and Rusty Hinge distress ink pads, two of the newer recently-added colours. The calendar table at the bottom was stamped first, coloured, spritzed with water drops then dried. I then masked it off with a scrap of paper while I worked on the rest of the card. I thought it would be fun to mark it with today's date, as a reminder of when I made it. The photo is another from a sheet by Darkroom Door (not stamps, it's a sheet of vintage photos on cardstock that you cut out and use), which was crumpled, sanded and tinted. The vintage family portrait is a Tim Holtz stamp by Stampers Anonymous.

The upper section of the card was inked with the two colours of distress ink, crumpled, brushed lightly with the darker DI pad, spritzed with water and then ironed dry to flatten it out. The background was then stamped and the iron fence detail was enhanced with a white pen. After assembling the finished piece, I matted it onto a cocoa coloured panel and stuck it on the card.

As ever, click on the image if you want to see a larger view! :)

Thursday, 1 April 2010

There's no "I" in "Team"

... but there is an I in Design Team, in fact there's even a D-a-n in Design Team :) I'm very excited to announce that I have accepted offers of places on two great design teams!

The first is for Scrolls Work Rubber Stamps, based in Idaho in the US. This is their first design team, with members drawn from both sides of the Atlantic, so I'm particularly honoured to be a part of their journey right from the start! Among their great range of designs are some quirky, different images which I think are very "me"!

The second is Gingersnap Creations, a fun and creative group gathered from all over the world. They first came to my attention through my friend Hels, who was (and still is) a member of their team. I've seen the list of great creative challenges they have planned for the next 6 months and I can't wait to get started!


Identification Check

Another project based around one of my shield files from a couple of weeks back, and this is also my entry for this weeks Theme Thursday Challenge. Because I was using a vintage photo in this piece, I wanted the whole thing to have a faded, vintage feel. To achieve this, I set myself the challenge of using only Promarkers and only the pens that were in my "skin tones" wallet. I think the pale, washed-out colours have worked really well on the background, and lend an old-fashioned feel to it. Well, that's my opinion and I'm sticking to it! LOL

The photo is from a set by Darkroom Door, and was liberally coated with Rock Candy Crackle Paint before putting it into the memory frame. The striped background was stamped in black and then coloured with the aforementioned Promarkers. The rugby team stamp is by Paper Artsy and the Identification Check ticket is by Crafty Individuals. The type charm is one of Tim Holtz's. Finally, I finished the whole thing off by punching a series of holes along the bottom with the crop-o-dile and "sewing" with some jute garden twine. That's about the nearest you'll ever see me to a needle and thread! LOL

As ever, click on the image for a larger view :)

Tuesday, 30 March 2010

A True Story

Inspired by some of the hangy things my friend Linda has been making, I decided to make something tonight that used more embellishments than is the norm for me. I used one of my shield designs from a little while ago, cut twice and layered to make it stronger.

Tim Holtz type charm, memo pin, Stampin' Up large eyelets, TH ball chain and a copper paper clip frame - not exactly overloaded, but more than I would usually use! :)

Background colours are Wild Honey and Barn Door Distress Inks, tree was stamped and embossed with a grainy white embossing powder before inking. Click on the image if you wish to see a larger view :)

Monday, 29 March 2010

Tutorial Video - Editing Nodes in Sure Cuts a Lot (SCAL) 2

I received an email today asking how to remove gaps left in pages when making wordbooks in SCAL (such as those you might get with a letter A or C). This led on to a general investigation of how to edit paths in SCAL. It was much easier to make a quick video rather than type a lengthy explanation, so here it is! I hope some of you find it useful :) If you want a clearer view, there's a full screen button in the toolbar below the video.

Saturday, 27 March 2010

Freebie 50# - Daisy Gift/Favour Box

[Edit - I've started to make my files available from my blog again and am adding a new set each week. Check out the "Cutting Files" tab at the top of the page to see which ones are available for download.]

I can't believe we've reached the half century - 50 free templates given away so far! And that's not including a few extras that weren't in the regular cycle!

These fun favour/gift boxes are perfect for Easter with the spring daisy on top, or use them for wedding or party favours, the choice is up to you! :)

Please remember you are only allowed to download this file for your own use and may not distribute it to others in any form. I spend a great deal of time creating my designs, please respect the terms under which they are given.

Again, this template will be "live" for 1 week. Next week it will be taken down, and new ones will replace it. Don't forget, if you have any requests, pass them on! I can't promise, but I will take suggestions into account when planning future templates.

These files may not be uploaded to a group, forum or website for sale or redistribution, or shared among individuals. They are expressly for the personal use of each person that downloads them from this blog.

There is 1 file but I have put it into a zip file to make downloading easier. After saving it, open in the usual way, and drag the file out onto your desktop or wherever you wish to save it.

There are 2 versions of each template:
  • An SVG version which can be imported into the Sure Cuts a Lot or Make the Cut program and then cut out on your Cricut.
  • A DXF version which is Craft Robo friendly, and ready to be imported into your Robomaster software (I'm not a Robo user, so if there are any problems with this, please let me know!)
Simply click on the appropriate button below to download the file!

Any feedback on the templates is more than welcome, and if you have any suggestions for possible future templates you'd like to see, please let me know! If you make anything using one of the templates, please post a link to it here so that others can be inspired by how you've used them!

I hope you like the templates - let me know how you get on! :)

Templates © dan99crafter@gmail.com 2010

Wednesday, 24 March 2010

Work in Progress

Another Ikea frame covered using the template I gave away here a few days ago. I do plan on putting something in the frame eventually, but for now it's empty.

I dabbed Bundled Sage and Stormy Sky inkpads onto a nonstick craft mat and spritzed with lots of water, then dabbed each card piece into the inky watery mess! The result looks quite bold and dramatic in this scan, but in real life it's quite blurry and dreamy and the join lines between the sections aren't nearly so obvious! :)

Sunday, 21 March 2010

Mind your own beeswax!

The theme over at the Sunday Stamper's Challenge today is "Time", so (tenuous link here, lol) I'm entering this, because it has a clock on it! :)

I covered a piece of chipboard with torn newsprint, which I painted with melted beeswax to hold it in place (being deliberately heavy handed and messy with it :)

The stamped chipboard tiles were coloured with Promarkers, placed on the background and painted with wax to hold them in place too. The text items were stamped on white card, cut out edge-distressed with Walnut Stain distress ink and then attached to the piece with some of Tim Holtz's memo pins (which I'm loving btw - my favourite item of the new idea-ology selection!).

Click the image for a larger view, comments welcome!:)

Saturday, 20 March 2010

Freebie #49 - Ornate Bookplate!

[Edit - I've started to make my files available from my blog again and am adding a new set each week. Check out the "Cutting Files" tab at the top of the page to see which ones are available for download.]
There are 3 layers to this ornate bookplate, but of course you could separate them into 3 single layer bookplates, the choice is yours! :) Use them on mini-book covers or as a decorative surround on a birthday card message - the only limit is your imagination! :)

Please remember you are only allowed to download this file for your own use and may not distribute it to others in any form. I spend a great deal of time creating my designs, please respect the terms under which they are given.

Again, this template will be "live" for 1 week. Next week it will be taken down, and new ones will replace it. Don't forget, if you have any requests, pass them on! I can't promise, but I will take suggestions into account when planning future templates.

These files may not be uploaded to a group, forum or website for sale or redistribution, or shared among individuals. They are expressly for the personal use of each person that downloads them from this blog.

There is 1 file but I have put it into a zip file to make downloading easier. After saving it, open in the usual way, and drag the file out onto your desktop or wherever you wish to save it.

There are 2 versions of each template:
  • An SVG version which can be imported into the Sure Cuts a Lot or Make the Cut program and then cut out on your Cricut.
  • A DXF version which is Craft Robo friendly, and ready to be imported into your Robomaster software (I'm not a Robo user, so if there are any problems with this, please let me know!)
Simply click on the appropriate button below to download the file!

Any feedback on the templates is more than welcome, and if you have any suggestions for possible future templates you'd like to see, please let me know! If you make anything using one of the templates, please post a link to it here so that others can be inspired by how you've used them!

I hope you like the templates - let me know how you get on! :)

Templates © dan99crafter@gmail.com 2010

Thursday, 18 March 2010

Inked and Stamped Ikea Frame

After a trip to Ikea today I came back with 3 of these "Ram" frames - 4"x6" and a bargain at 3 for £1.59. I decided to make a template for the frame, which I would cut from white card and then ink/stamp it to cover the frame. I got busy in Inkscape and the result is a Microsoft Word template that you can print yourself and cut by hand - either on white card as I did, to decorate, or on patterned paper for a quick new look!

Templates © dan99crafter@gmail.com 2010

These frames vary by a millimetre or two, which I guess isn't suprising at 50p a time, so be sure to print the template on scrap paper first and cut it out then check that it fits correctly!

If you use the template, please let me see pics of what you've made! :)

Wednesday, 17 March 2010

The Proof is in the... page?

Another page of the concertina book that I'm currently working on, and I had a lot of fun making this one :) This page also counts as my entry into this weeks Theme Thursday Challenge, which is "masculine"!
The word PRIORITY was stamped in off-white acrylic paint and then the tag was inked with Rusty Hinge, Wild Honey, Barn Door and Walnut Stain distress ink pads applied with an ink blending tool. The page was then crumpled and spritzed with water then ironed dry. The ornate bookplate was inked with the same colours used previously and the PROOF word was stamped in Timber Brown Staz-on. The photo is froma collection by Darkroom Door and it was folded and sanded to distress it, and Exhibit A was stamped onto it with the same Staz-on colour. The red rays on the left side were stamped with Barn Door distress ink. Finally, the edges of the page were distressed with a Tonic Studios edge distresser. Oh, and the thumb prints were intentional! :) They were "stamped" with Walnut Stain distress ink.

3 pages done, 9 more to go! :) Click on the image for a larger view.

Monday, 15 March 2010

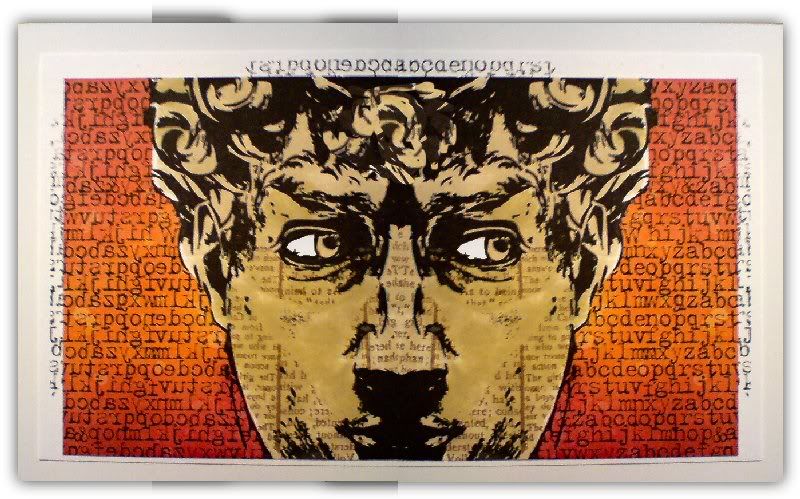
If David Didn't Have Half a Head

Just a bit of fun... I was playing around on the computer and wondered how Tim Holtz's David stamp would look if it wasn't just half a head - here's the result! :)

Sunday, 14 March 2010

Bits'n'Pieces

... is the theme over on the Sunday Stamper's Challenge this week, so I chose this PaperArtsy stamp that I've had for a while but not used yet. I thought that the way the wording was cut into bits and pieces was perfect for this challenge! I added some "manly" bits and pieces floating around in the background too for good measure :) The photo is a bit washed out in places, I'll try and do better next time! lol

Click on the image for a larger view :)

[Edit to add - The stamps used in the background were: bike chain and cogs from a set by Technique Tuesday, screw by clevercut.co.uk]

Saturday, 13 March 2010

Freebie #48 - Plaques and Shields

[Edit - I've started to make my files available from my blog again and am adding a new set each week. Check out the "Cutting Files" tab at the top of the page to see which ones are available for download.]

Looking back through the freebies I've given away here in the past, I've come to the conclusion that most of the files I design are intended to be the base of a project rather than the decoration for a project. This probably reflects the way in which I mainly use my Cricut - I've got lots of stamps and brads and ribbon and embellishments, what I need is something nice to put them on! :) This weeks collection is no exception to that rule!

Hopefully you'll find all kinds of uses for these plaques and shields. Pictured right is one that I cut out and decorated earlier in the week (yes, I know that shape isn't in this collection, but you get the general idea! lol) Use them as fun pages in a mini-book or as mattes for photos on a scrapbook page. Why not use them as tags, a nice change from the usual shapes we usually see!

Please remember
you are only allowed to download this file for your own use and may not distribute it to others in any form. I spend a great deal of time creating my designs, please respect the terms under which they are given.

Again, this template will be "live" for 1 week. Next week it will be taken down, and new ones will replace it. Don't forget, if you have any requests, pass them on! I can't promise, but I will take suggestions into account when planning future templates.

These files may not be uploaded to a group, forum or website for sale or redistribution, or shared among individuals. They are expressly for the personal use of each person that downloads them from this blog.

There are 4 files and I have put them into a zip file to make downloading easier. After saving it, open in the usual way, and drag the files out onto your desktop or wherever you wish to save them.

There are 2 versions of each template:
  • An SVG version which can be imported into the Sure Cuts a Lot or Make the Cut program and then cut out on your Cricut.
  • A DXF version which is Craft Robo friendly, and ready to be imported into your Robomaster software (I'm not a Robo user, so if there are any problems with this, please let me know!)
Simply click on the appropriate button below to download the file!

Any feedback on the templates is more than welcome, and if you have any suggestions for possible future templates you'd like to see, please let me know! If you make anything using one of the templates, please post a link to it here so that others can be inspired by how you've used them!

I hope you like the templates - let me know how you get on! :)

Templates © dan99crafter@gmail.com 2010

Friday, 12 March 2010

Accordion Book, page 2

Another day, another page for the accordian book I'm working on. Nothing complicated on this one, just basic stamping/inking, with a good strong stamped image at it's centre.

Click on the image to see a larger view :)

Thursday, 11 March 2010

Easter Bunny Came Early!

A little package dropped through my door today - the 12 new colours of Distress Ink pads, courtesy of the Easter Bunny. I know, I know, it wasn't really from the Easter Bunny - he's busy right now house-sitting for the Tooth Fairy, who's gone to Cancun for a few weeks, but this is how I justify my spending to myself, so don't burst my bubble! lol
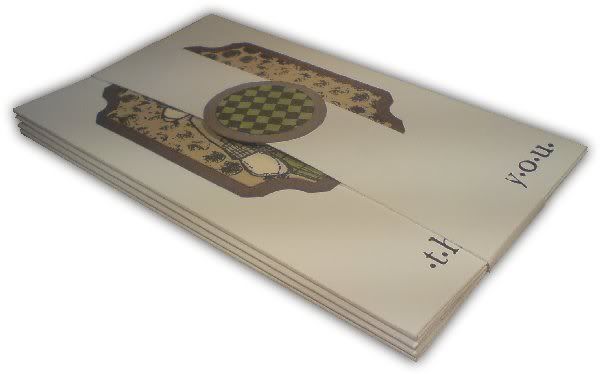
Obviously, I had to try them out immediately, but I was very restrained - I only used 2 of the new colours, Bundled Sage and Forest Moss - I didn't want to make my other Distress pads get sibling rivalry! :)

This is a panel for a book I'm currently making. The panel itself, the inner panel and the leaves were all designed by yours truly and cut on the Cricut. All the stamps were from Stampers Anonymous, and the black pad was Versafine. That's about all there is to say about it, click on the image if you want to see it a little larger :)

Monday, 8 March 2010

Autumn Toned Thank You Cards

Usually when I take photos of a project for my blog, they're either taken with my phone or scanned on my scanner. This is the first time I think I've mixed a photo from each, and what a difference! The 4 cards were scanned and the white cardstock is gleaming. Compare the stack of cards which I photographed with my phone, the cardstock is almost orange! LOL I know now not to do that again!

The panels were cut on the cricut and then stamped/masked/stamped again/coloured. Thanks for taking a look! :)

Sunday, 7 March 2010

White Rabbit

The Sunday stamper theme over on my friend Hels' blog is taken from the song White Rabbit by Jefferson Airplane. My entry is this plaque, made entirely with Tim Holtz stamps from Stampers Anonymous. I had fun making it, hope you like it! :)

Saturday, 6 March 2010

Freebie #47 - Tag, You're It!

[NOTE - I've started to make my files available from my blog again and am adding a new set each week. Check out the "Cutting Files" tab at the top of the page to see which ones are available for download.]

I had a lot of fun making these - and I think they look pretty stylish, if I say so myself! :)

Cut them twice, once normally for the top layer, then again in blackout mode to get the base tag shape. I cut mine at 6x3 inches, and the winter tag ripped a couple of times, it's pretty intricate. I changed to a newer, stickier mat and it cut perfectly first time, so keep that in mind when you're cutting!

Please remember
you are only allowed to download this file for your own use and may not distribute it to others in any form. I spend a great deal of time creating my designs, please respect the terms under which they are given.

Again, this template will be "live" for 1 week. Next week it will be taken down, and new ones will replace it. Don't forget, if you have any requests, pass them on! I can't promise, but I will take suggestions into account when planning future templates.

These files may not be uploaded to a group, forum or website for sale or redistribution, or shared among individuals. They are expressly for the personal use of each person that downloads them from this blog.

There are 4 files and I have put them into a zip file to make downloading easier. After saving it, open in the usual way, and drag the files out onto your desktop or wherever you wish to save them.

There are 2 versions of each template:
  • An SVG version which can be imported into the Sure Cuts a Lot or Make the Cut program and then cut out on your Cricut.
  • A DXF version which is Craft Robo friendly, and ready to be imported into your Robomaster software (I'm not a Robo user, so if there are any problems with this, please let me know!)
Simply click on the appropriate button below to download the file!

Any feedback on the templates is more than welcome, and if you have any suggestions for possible future templates you'd like to see, please let me know! If you make anything using one of the templates, please post a link to it here so that others can be inspired by how you've used them!

I hope you like the templates - let me know how you get on! :)

Templates © dan99crafter@gmail.com 2010

Friday, 5 March 2010

Creativity

I read a great quote by Sir Isaac Newton today (you know, the apple-on-head-I'll-call-it-gravity-guy), which inspired me to create this piece. The quote reads:

An essential aspect of creativity is not being afraid to fail.
—Isaac Newton

I created an 8"x8" mosaic of 64 one inch stamped tiles and then cut a mask on the Cricut to fix over the top. I have mixed feelings about it, in some ways it works and in others it doesn't, at least to my eye. Still, Isaac told me not to be afraid to fail, so I'm not! LOL

Wednesday, 3 March 2010

O Lucky Man!

I actually made this little guy last night, but left him out of the set - he didn't really fit, with the other 3 cards being based on female faces! Then came today's Three Muses Challenge, with it's "men" theme, and I realised it was his lucky day, and he gets his moment in the spotlight! :)
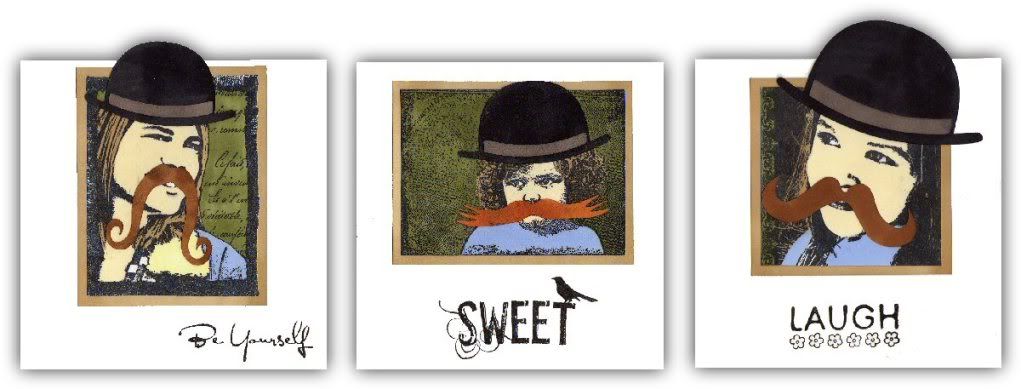
Once again a 5x5 card, stamped/coloured image with hat from my Hats and Crowns collection and moustache from the font I linked to yesterday :)

Tuesday, 2 March 2010

Fun Note Cards

I was inspired to make these silly note cards earlier tonight when my friend Barbara from one of the Cricut groups posted a link to a moustache font (it's here if you want it!).

I cut several of the shapes in several sizes on my Cricut. The bowler hats are from my Hats and Crowns collection (google "My Crafty Files" to find them, or email me).

I hope you like them, I had a lot of fun making them! LOL Feedback welcome, click the image to see it larger :)

Monday, 1 March 2010

Watch the Birdy(house)!


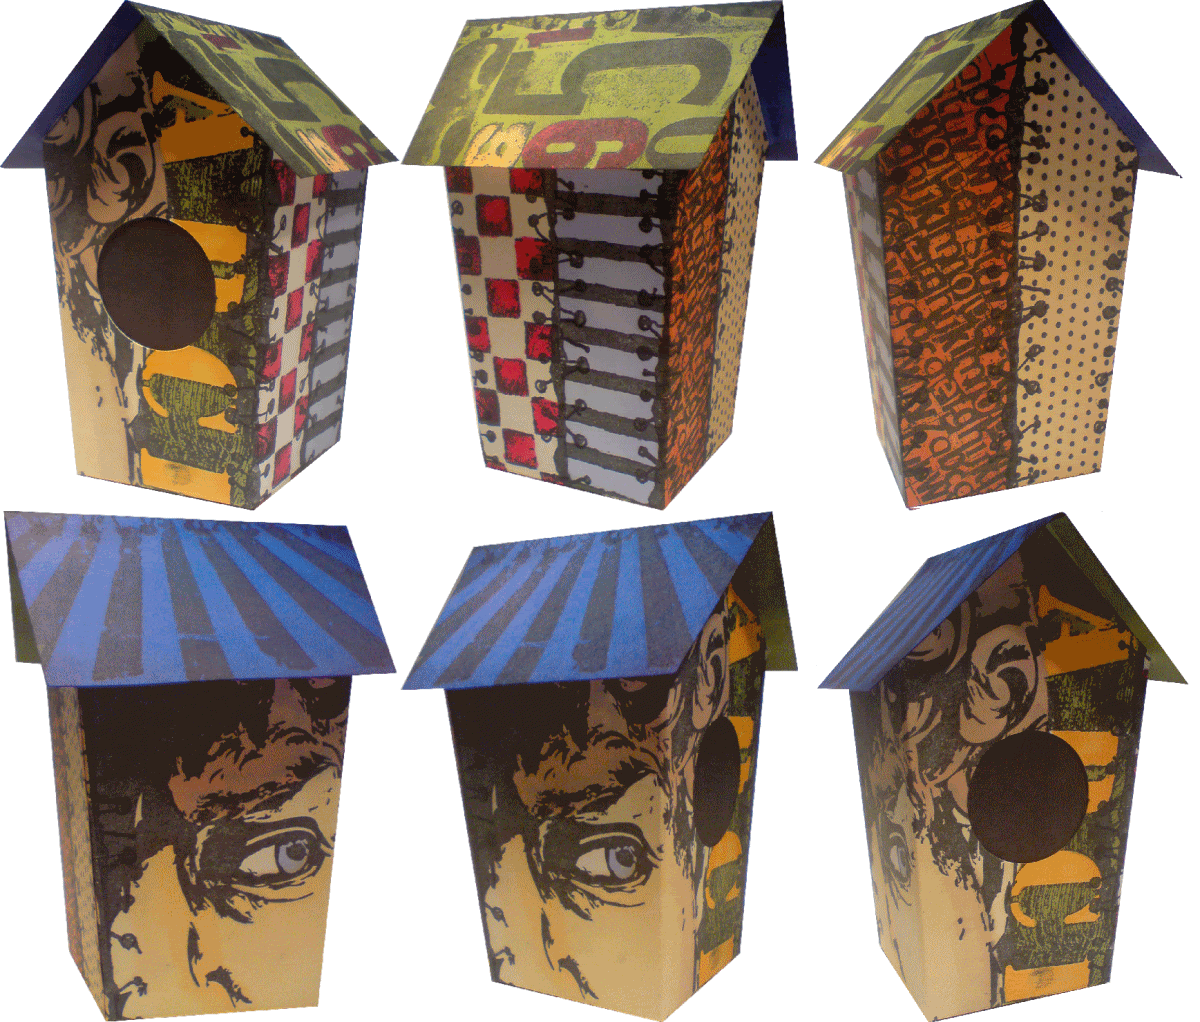
I was having a play around with some stamps tonight when I decided to cut and decorate one of my Cricut/Robo birdhouses. (You can find 3 of them on my other site, email me for the address or google "my crafty files"). I don't have many supplies with me so couldn't do much more than stamp and colour them - I wanted to add glossy accents to the "stiches" holding the panels together, but didn't even have that with me.

I've tried to make a little animation so that you can see all sides of it - I hope it works for you! :)
Feedback welcome, click any image to see it larger.


Sunday, 28 February 2010

Clown Shadow Box and David the Clown

I've been wanting to use one of these 3x3 shadow boxes for a while, so I took advantage of today's Sunday Stamper clown theme to use one. I apologise for the photo, I think I had the camera on a bit of an angle - the frame really was square! Don't even get me started on the dotty shadow around the edge, that wasn't intended either, LOL

No new techniques here, just the old faithfuls of stamping, distress inking and promarkery.

While I was uploading this post, I had another idea for the Sunday Stamper clowns theme - a fun way to use the new Tim Holtz David Head stamp! It only took 5 minutes to knock it together, but I'm really inordinately pleased with it! LOL Feedback welcome, as ever, click on the image to see a larger view! :)

Saturday, 27 February 2010

Freebie #46 - Grungepaper Roses


[I've started to make my files available from my blog again and am adding a new set each week. Check out the "Cutting Files" tab at the top of the page to see which ones are available for download.]

Many of you will be familiar with these grungepaper flowers by now, they're all over the internet. I thought it was time for a cutting file that was custom designed rather than using a regular flower shape and then hand cutting it to get it right. I designed these files to elimate all the cutting, not just cutting out the flower shapes, but removing petal segments and cutting a hole in the centre once they've been glued in shape. You can, of course, cut these from regular cardstock, but if you can get hold of some grungepaper, please try it, the end result is SO MUCH better!

This is what the pieces look like after they've been cut on the Cricut.

I've coloured the pieces with promarkers and stamped a dotted design over the top. You could use paints, inks or even glue patterned paper to the grungepaper pieces.
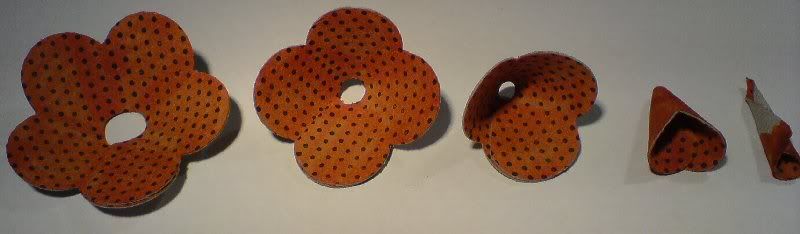
On the 3 largest pieces, overlap the end petals and glue into place with glossy accents or some other strong adhesive (I've used my ATG gun here, which is ok as long as you don't get it everywhere). Roll up the smallest piece and glue. Form the remaining piece into a cone, overlapping the edges slightly and glue in place.
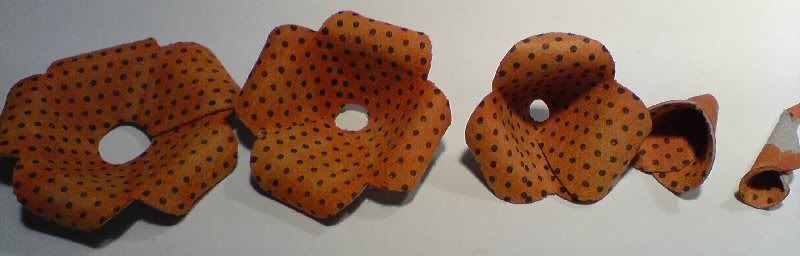
Curl the petals on all pieces and then assemble, glueing each piece into place. If you find the hole in the centre of a piece is too small, just snip it larger with scissors.

Let me know how you get on, I'd love to see your completed roses!!

Please remember
you are only allowed to download this file for your own use and may not distribute it to others in any form. I spend a great deal of time creating my designs, please respect the terms under which they are given.

Again, this template will be "live" for 1 week. Next week it will be taken down, and new ones will replace it. Don't forget, if you have any requests, pass them on! I can't promise, but I will take suggestions into account when planning future templates.

These files may not be uploaded to a group, forum or website for sale or redistribution, or shared among individuals. They are expressly for the personal use of each person that downloads them from this blog.

There is only 1 file but I have put it into a zip file to make downloading easier. After saving it, open in the usual way, and drag the file out onto your desktop or wherever you wish to save it.

There are 2 versions of each template:
  • An SVG version which can be imported into the Sure Cuts a Lot or Make the Cut program and then cut out on your Cricut.
  • A DXF version which is Craft Robo friendly, and ready to be imported into your Robomaster software (I'm not a Robo user, so if there are any problems with this, please let me know!)
Simply click on the appropriate button below to download the file!

Any feedback on the templates is more than welcome, and if you have any suggestions for possible future templates you'd like to see, please let me know! If you make anything using one of the templates, please post a link to it here so that others can be inspired by how you've used them!

I hope you like the templates - let me know how you get on! :)

Templates © dan99crafter@gmail.com 2009

Friday, 26 February 2010

Grungepaper Rose

Well, I saw that bandwagon truckin' on by, and I just had to jump on it, didn't I? LOL

Here is my take on a grungepaper rose. It's the first one I've made, and I need a little more practise in folding the petals just right, but I don't think it's too bad all things considered! LOL The rose shown is cut from cardstock, inked, stamped, assembled and rock candy stickle-d. I have also cut one from grungepaper but I haven't assembled it yet, so will add that one later!

And here's the grungepaper version, a much better result, I think you'd agree!

I can see now why these are usually made from grungepaper, it's much easier to work with, more forgiving and gives a much better curl on the petals!

Wednesday, 24 February 2010

The Shock of the New

I make no great artistic claims for this tag and my head was pretty devoid of any direction I wanted to go with it while I was making it - my aim was simply to try out some new stamps, new cutting files and rock candy crackle paint, to see how they performed.

The bike chain stamp is part of a set I bought a while back from Technique Tuesday. When I created my cog files I didn't have my cricut with me, so this was my first time of actually cutting them. Some of the cogs are from the set I gave away here a week or two ago and some others and the game spinners are designs I created later, which are now available on my other site (google "My Crafty Files" to find it). It may not show up too well, but the crackle paint is on the red door.

I hope you like it, click on the image for a better view :)

Tuesday, 23 February 2010

Freebie #45 and Sneaky Peek Revealed!

Well, after a LOT of work today, here is the completed project that I gave you a peek of yesterday!

It was inspired by a beautiful journal cover made by Judi Riesch in Lynne Perrella's book "al-pha-bet-i-ca". (Thanks to Dyan Reaveley from Art From the Heart for recommending the book - it's full of some great inspiration!)

Judi made her cover using lots of brass letter stencils. I didn't have any, and wasn't inclined to go out and buy them, so, of course I turned to my trusty Cricut! All of the pieces cut from 2 sheets of A4 or 8.5x11 cardstock - 1 for the stencils and 1 (in blackout mode) to cut the tiles for the bottom layer.

I've created mine by stamping and colouring with promarkers and Distress Inks, but you could just as easily make one using patterened papers and cardstock! Here is a clearer view of how all the pieces fit together once they've been cut:


There are 2 files, on at A4 size and one at 8.5x11, ready to be cut on your Cricut or Craft Robo.
Please remember you are only allowed to download this file for your own use and may not distribute it to others in any form. I spend a great deal of time creating my designs, please respect the terms under which they are given.

Again, this template will be "live" for 1 week. Next week it will be taken down, and new ones will replace it. Don't forget, if you have any requests, pass them on! I can't promise, but I will take suggestions into account when planning future templates.

These files may not be uploaded to a group, forum or website for sale or redistribution, or shared among individuals. They are expressly for the personal use of each person that downloads them from this blog.

There are 3 files and I have put them into a zip file to make downloading easier. After saving it, open in the usual way, and drag the files out onto your desktop or wherever you wish to save them.

There are 2 versions of each template:
  • An SVG version which can be imported into the Sure Cuts a Lot or Make the Cut program and then cut out on your Cricut.
  • A DXF version which is Craft Robo friendly, and ready to be imported into your Robomaster software (I'm not a Robo user, so if there are any problems with this, please let me know!)
Simply click on the appropriate button below to download the file!

Any feedback on the templates is more than welcome, and if you have any suggestions for possible future templates you'd like to see, please let me know! If you make anything using one of the templates, please post a link to it here so that others can be inspired by how you've used them!

I hope you like the templates - let me know how you get on! :)

Templates © dan99crafter@gmail.com 2009
Related Posts with Thumbnails