Friday, 28 August 2009

Evil Clowns Tag

Although I haven't been stamping much of late, it didn't stop me from regularly buying new stamps! I decided tonight to sit down and have a first play with some of the ones that I hadn't tried out yet.

These are all from Stampers Anonymous, and were coloured using Promarkers. The background used distress inks.

I wrote the poem in the centre myself. It's held in place with two mini copper paper clips and it reads:

"painted face, beaming smile
when you see me, run a mile.
nose so red, face so white
Creeping in your house tonight"

Click on the image to see a larger view.

Wednesday, 26 August 2009

The Beginnings of a Book....


I've had an idea kicking around in my head for quite a long time now, for a book that I want to make. Today I finally got around to starting it! :)

I'm not going to say too much about it right now, but I'll post each illustration page as I complete it. There will be pages with words on too, but I'll show those with the completed book.

Budding Sherlocks among you will have spotted that it's going to be bound with the Bind-it-all. I actually designed the page shape (including the BIA holes) in Inkscape and cut it on the Cricut with SCAL. I thought it would be easier to add the binding holes that way rather than punch the pages after I'd decorated them. You might also have noticed that it's going to be a word book of sorts (that's a letter S at the top right). You're getting no more out of me for now than that! :)

The background was created using 3 colours of acrylic paint - black, white and denim - which were blended on the page with a wet wipe. The moon is cast from paper clay in a silicone mould and was painted white after it had dried (the clay dries pure white, so I can't see a difference, lol).

The houses and birds are both custom stamps that I had made for me a couple of years back. Both were stamped with black Versafine ink. Using a small square punch I made a stencil for the window and coloured it by scribbling through the stencil with a Ranger white pen. The same pen was then used to write the "z"s in place. I'm really happy with how this has turned out, and I just hope that the other pages live up to it! LOL

Click on the image to see a larger view.

Monday, 24 August 2009

Soar

It's been quite some time since I last stamped something, too long! After (finally) completing the re-organisation of my crafting space, it feels great to be able to get back to it, I've missed it!

I started by painting the shallow wooden box white with acrylic paint. I cut a piece of chipboard the right size to fit inside it and created the background as an acrylic painting, although it does also feature some stamping - a harlequin background stamped in white acrylic paint and an alphabetic background from Cornish Heritage Farms.

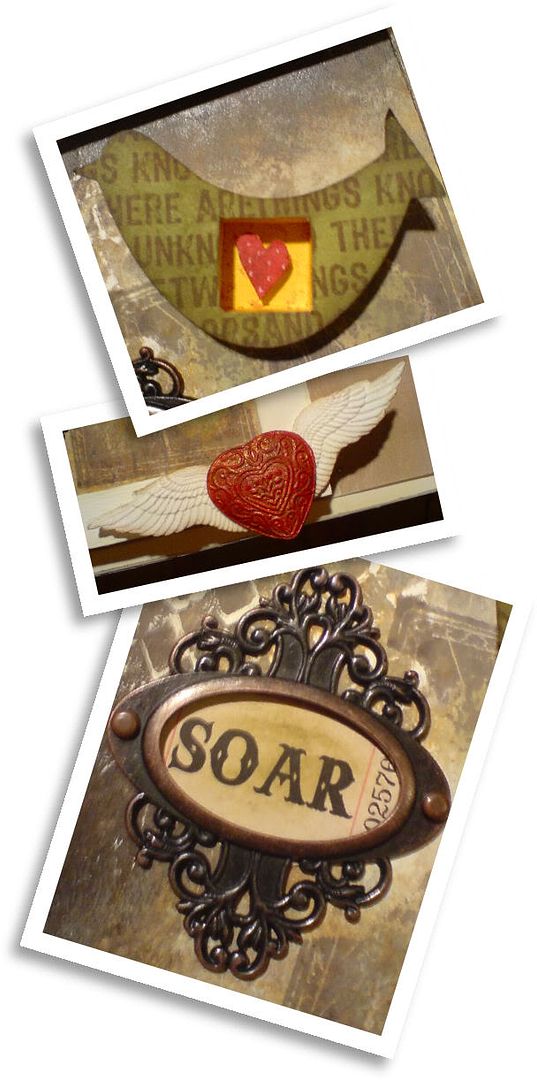
The bird's eggs on the frame border are by PaperArtsy, and they were stamped and cut out from card I had painted with a turquoise wash. The birds eggs inside the frame are from a set by Oxford Impressions. The "soar" ticket and the fancy bookplate are both Tim Holtz Idea-ology.

The bird is my own design, cut on the Cricut. It was coloured with Peeled Paint distress ink and then stamped in Coffee archival ink with a phrase from Darkroom Door stamps. The edges were coloured with a Walnut Stain distress pad. The heart inside the compartment was cut out freehand and then coloured red with a Marvy pen. The white dots were applied with a Ranger Inkssentials pen.

Finally, the heart and wings were moulded from air-dry clay, using Krafty Lady art moulds. The heart was painted with red acrylic paint and then copper wax was applied to it. Wings and heart were then edged with Walnut Stain distress ink.

I hope you like it, I really had a lot of fun making it. Now to clean up the mess I made! :)

Sunday, 23 August 2009

Freebie #37!

Ribbon Storage

Edit - This template is no longer available from this site. Email me for details of how to access earlier designs!


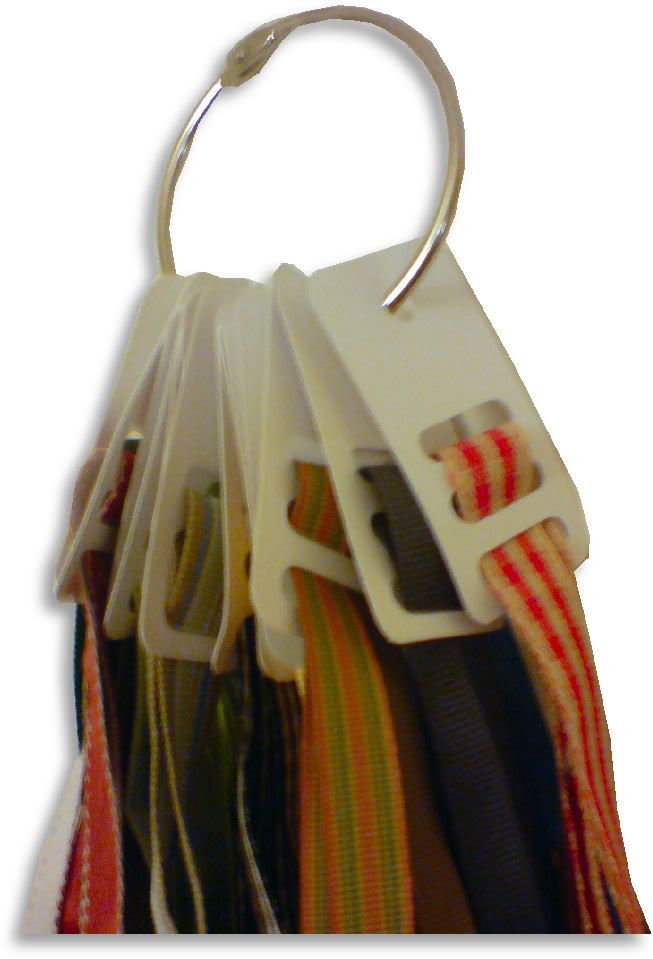
I've been storing my ribbon on these handy tags for quite some time now, but with ribbon storage seeming to be a hot topic on some of the groups I'm in right now, I thought it was time to offer them here!

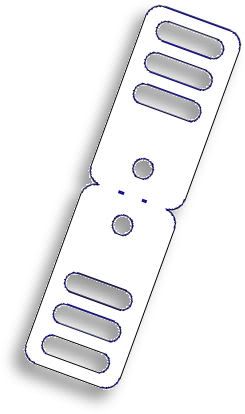
The tag is designed in a fold-in-half style. This means that if you're using thinner cardstock for them, you can fold them in half for extra strength. If you're using strong cardstock, just snip them in half with scissors for twice as many tags!

Thread your ribbons onto the tags and store them on a large book ring. No more ribbon tangle nightmares! If you store your ribbon in a box with the ends of your ribbon poking out through holes, this means an end to "mystery ribbon" - where you pull out a piece of ribbon only to see that there's not enough for the project you're working on, so you open up the box and try to thread the ribbon back through the hole again (until it happens the next time!).

Again, this template will be "live" for 1 week. Next week, it will be taken down, and new ones will replace it. Don't forget, if you have any requests, pass them on! I can't promise, but I will take suggestions into account when planning future templates.

These files may not be uploaded to a group, forum or website for sale or redistribution, or shared among individuals. They are expressly for the personal use of each person that downloads them from this blog.

There are 2 versions of each template:
  • An SVG version which can be imported into the Sure Cuts a Lot program and then cut out on your Cricut.
  • A DXF version which is Craft Robo friendly, and ready to be imported into your Robomaster software (I'm not a Robo user, so if there are any problems with this, please let me know!)
  • I have NOT created a print and cut version for this, as explained earlier
Simply right click on the appropriate button below, and choose "save link..." or "save target..." and save your template!

Any feedback on the templates is more than welcome, and if you have any suggestions for possible future templates you'd like to see, please let me know! If you make anything using one of the templates, please post a link to it here so that others can be inspired by how you've used them!

I hope you like the templates - let me know how you get on! :)

Templates © dan99crafter@gmail.com 2009

Friday, 21 August 2009

Octagonal Exploding Box


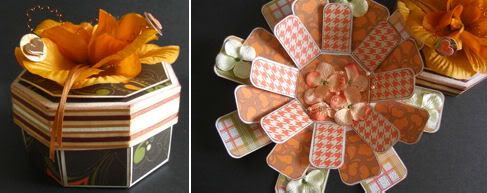
In conjunction with the UK Scrappers Forum, here are the template files for an octagonal exploding box designed by Voodoo Vixen. I've included files for the base, lid and a file containing the base and lid together, so that when you resize the base, the lid will always remain a perfect fit.

There are 3 files , so I have put them into a zip file to make downloading easier. After saving it, open the zip file in the usual way, and drag the templates out onto your desktop or wherever you wish to save them.

There are 3 versions of each template:
  • A printable version (PNG files) that you can import into a program like Word, then resize, print, cut out and use like any other paper template (these are NOT Word files, so don't use File/Open in Word! Use Insert/Picture to bring them into a Word document).
  • An SVG version which can be imported into the Sure Cuts a Lot program and then cut out on your Cricut.
  • A DXF version which is Craft Robo friendly, and ready to be imported into your Robomaster software (I'm not a Robo user, so if there are any problems with this, please let me know!)
Simply right click on the appropriate button below, and choose "save link..." or "save target..." and save your template!


Templates © dan99crafter@gmail.com 2008

Monday, 10 August 2009

Freebie #36!

Lattice Masks

EDIT - These files are no longer available from this site. Email me for details on how to access my earlier files!
I've given away some of these lattices before, and as I had to make some new ones for a project I'm working on, I decided I'd offer them for download here!

Cut them out of patterened paper to make a really funky background, or why not do as I have - cut them out of acetate (it cuts like butter on the Cricut!) and then lay the lattice over your project and apply ink by dabbing with a piece of foam or a stencil brush! I know I'll use these spots and stars time and time again, and I'm sure you will too! :)

If you make something with one of these, please post a link to it, I *love* to see what folks do with my files!!

Again, this template will be "live" for 1 week. Next week, it will be taken down, and new ones will replace it. Don't forget, if you have any requests, pass them on! I can't promise, but I will take suggestions into account when planning future templates.

These files may not be uploaded to a group, forum or website for sale or redistribution, or shared among individuals. They are expressly for the personal use of each person that downloads them from this blog.

There are 2 versions of each template:
  • An SVG version which can be imported into the Sure Cuts a Lot program and then cut out on your Cricut.
  • A DXF version which is Craft Robo friendly, and ready to be imported into your Robomaster software (I'm not a Robo user, so if there are any problems with this, please let me know!)
  • I have NOT created a print and cut version for this, as explained earlier
Simply right click on the appropriate button below, and choose "save link..." or "save target..." and save your template!

Any feedback on the templates is more than welcome, and if you have any suggestions for possible future templates you'd like to see, please let me know! If you make anything using one of the templates, please post a link to it here so that others can be inspired by how you've used them!

I hope you like the templates - let me know how you get on! :)

Templates © dan99crafter@gmail.com 2009

Monday, 3 August 2009

Freebie #35!

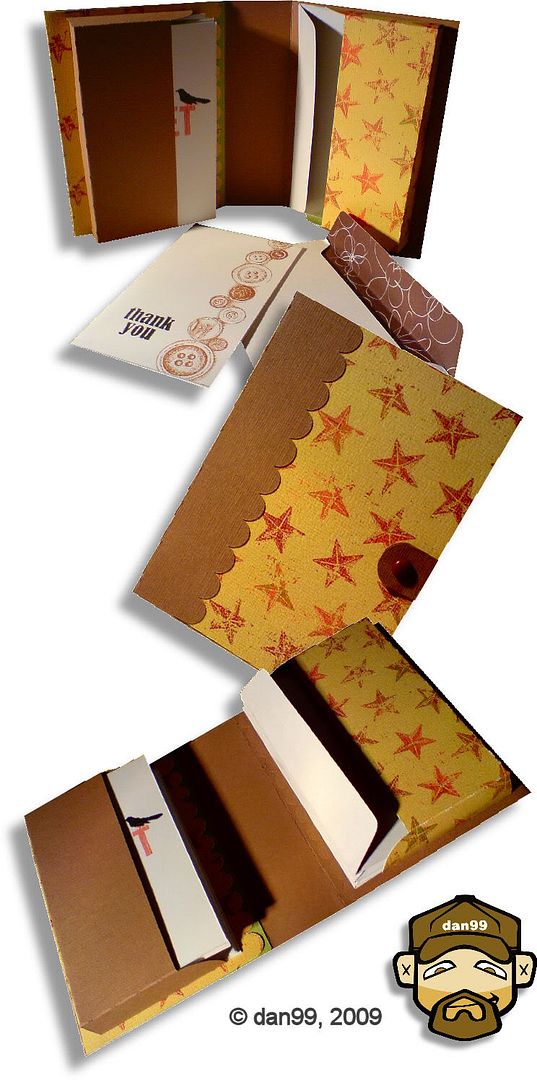
Notecard and Envelopes Case

Edit: These files are no longer available from this site. Email me for details of how to access past files!

I'm scratching my head trying to think of something to say about this one! Um... I designed it and cut it and assembled it and am happy with it - I guess there's not much more to say other than that it would make a great gift!! LOL

I used sticky velcro dots on the closure for my set, but you could omit the strap if you wanted and use ribbon to fasten it closed. I cut this to fit 5x3 inch notecards and envelopes, and at that size it will cut on the original Cricut and the Cricut Create. Obviously, if you have a Cricut Expression or a Craft Robo, you will be able to cut it at a larger size!

To fit 5x3 inch cards, I used these sizes:
  • side 1 - 5.5 x 10.64 inches
  • side 2 - 5.5 x 7.9 inches
  • strap - 4 x 1.5 inches
  • card pocket - 8.05 x 4.25 inches
  • envelope pocket - 8.30 x 4.5 inches (this is 1/4 inch bigger in both dimensions than the card pocket - you'll have to see how much bigger your envelopes are than your cards and change this if needed)
If you make one of these, please post a link to it, I *love* to see what folks do with my files!!

Again, this template will be "live" for 1 week. Next week, it will be taken down, and new ones will replace it. Don't forget, if you have any requests, pass them on! I can't promise, but I will take suggestions into account when planning future templates.

These files may not be uploaded to a group, forum or website for sale or redistribution, or shared among individuals. They are expressly for the personal use of each person that downloads them from this blog.

There are 2 versions of each template:
  • An SVG version which can be imported into the Sure Cuts a Lot program and then cut out on your Cricut.
  • A DXF version which is Craft Robo friendly, and ready to be imported into your Robomaster software (I'm not a Robo user, so if there are any problems with this, please let me know!)
  • I have NOT created a print and cut version for this, as explained earlier
Simply right click on the appropriate button below, and choose "save link..." or "save target..." and save your template!

Any feedback on the templates is more than welcome, and if you have any suggestions for possible future templates you'd like to see, please let me know! If you make anything using one of the templates, please post a link to it here so that others can be inspired by how you've used them!

I hope you like the templates - let me know how you get on! :)

Templates © dan99crafter@gmail.com 2009

Monday, 27 July 2009

Freebie #34!

Cutting Machine Concertina Organiser

Edit - I've started to make my files available from my blog again and am adding a new set each week. Check out the "Cutting Files" tab at the top of the page to see which ones are available for download.
While making some of Tricia Morris's Expanding Memories organisers as featured on the much-missed Scrapbook Lounge, I kept thinking to myself "I'm sure I could make something similar to this on the Cricut, where all the cutting and measuring would be done for me". It's taken me a while, but I've finally gotten around to doing it. Tricia's organiser is based around hinged chipboard panels and is sturdier because of that, but I went for quickness of construction and Cricut-cutability!

No more laborious measuring and concertina folding for the sides either - I've cut tiny fold guides on each piece to make it a breeze to fold and assemble! Although this was inspired by Tricia's project, I started from scratch and the construction is quite different. I've also rethought the way that it closes. I haven't made a print/cut version of this, because if you're cutting the whole project by hand you may as well make Tricia's original! You can see how to make her project in this video. If you need the bookplate and file tab shapes, they can be found on my other site, "My Crafty Files".

In the download files I've included files in the SVG download for baby cricut and expression (the sides are the same for both, the top and bottom panels for the baby cricut have "baby" in the name).

To fit more on a page, I've left you to cut your inner panels using a paper trimmer. If you're cutting the Expression or Robo version, where you need inner panels that are 5"x7", you can save card by cutting as shown below:


Again, this template will be "live" for 1 week. Next week, it will be taken down, and new ones will replace it. Don't forget, if you have any requests, pass them on! I can't promise, but I will take suggestions into account when planning future templates.

These files may not be uploaded to a group, forum or website for sale or redistribution, or shared among individuals. They are expressly for the personal use of each person that downloads them from this blog.

There are 2 versions of each template:
  • An SVG version which can be imported into the Sure Cuts a Lot program and then cut out on your Cricut.
  • A DXF version which is Craft Robo friendly, and ready to be imported into your Robomaster software (I'm not a Robo user, so if there are any problems with this, please let me know!)
  • I have NOT created a print and cut version for this, as explained earlier
Simply right click on the appropriate button below, and choose "save link..." or "save target..." and save your template!

Any feedback on the templates is more than welcome, and if you have any suggestions for possible future templates you'd like to see, please let me know! If you make anything using one of the templates, please post a link to it here so that others can be inspired by how you've used them!

I hope you like the templates - let me know how you get on! :)

Templates © dan99crafter@gmail.com 2009

Wednesday, 22 July 2009

Video Tutorial - Sure Cuts a Lot 2 First Look

Craft Edge released a comprehensive new version of their Sure Cuts a Lot software today. Those who visit my blog regularly will know what a huge fan I am of this program. It opens up whole new creative ways to use your Cricut, allowing you to use any of the TrueType fonts on your PC to cut words and titles, as well as designs you make yourself or download from the internet.

Among the new features are multiple selections and groupings, support for multiple layers and pages, vertical typing, customizable workspace arrangement and a quick and easy Autotrace function.

I haven't had too much time to play, so there may be more things that I haven't discovered yet, but one thing I am sure of, I LOVE IT! :)

Edit: I can't, in all conscious, leave this post to stand in it's original form. After some time using SCAL 2, it seems there are quite a few bugs in it. Hopefully Craft Edge release an update soon to fix some of the problems with it! (I will still love it once that's done!)
Breaking news:
I've heard that Craft Edge hope to have an update available in the next couple of days or so :)

I would recommend watching the full screen version of this video, you won't see a lot of the detail in a smaller window! As it's a large file, if you play it and it stops part way through, it just means it hasn't fully downloaded to your computer yet, so be patient :)

To see a full screen version, click here.

Thursday, 25 June 2009

10 more seconds...

Here is another metal covered frame I made, this time as part of a 2 day "metal masterclass" that I took a while back at LB Crafts. Rather than using the cuttlebug this time, I used a selection of the Ten Seconds Studio texture moulds, and finished off with some brown acrylic paint to accentuate the sunken areas. This is also one large piece of metal, rather than the 4 panels that were used for yesterday's example.

Inside the frame is one of the stamped index cards I made a while back. If you want a clearer view of it, you can see it here.
Related Posts with Thumbnails