Monday, 1 March 2010

Watch the Birdy(house)!


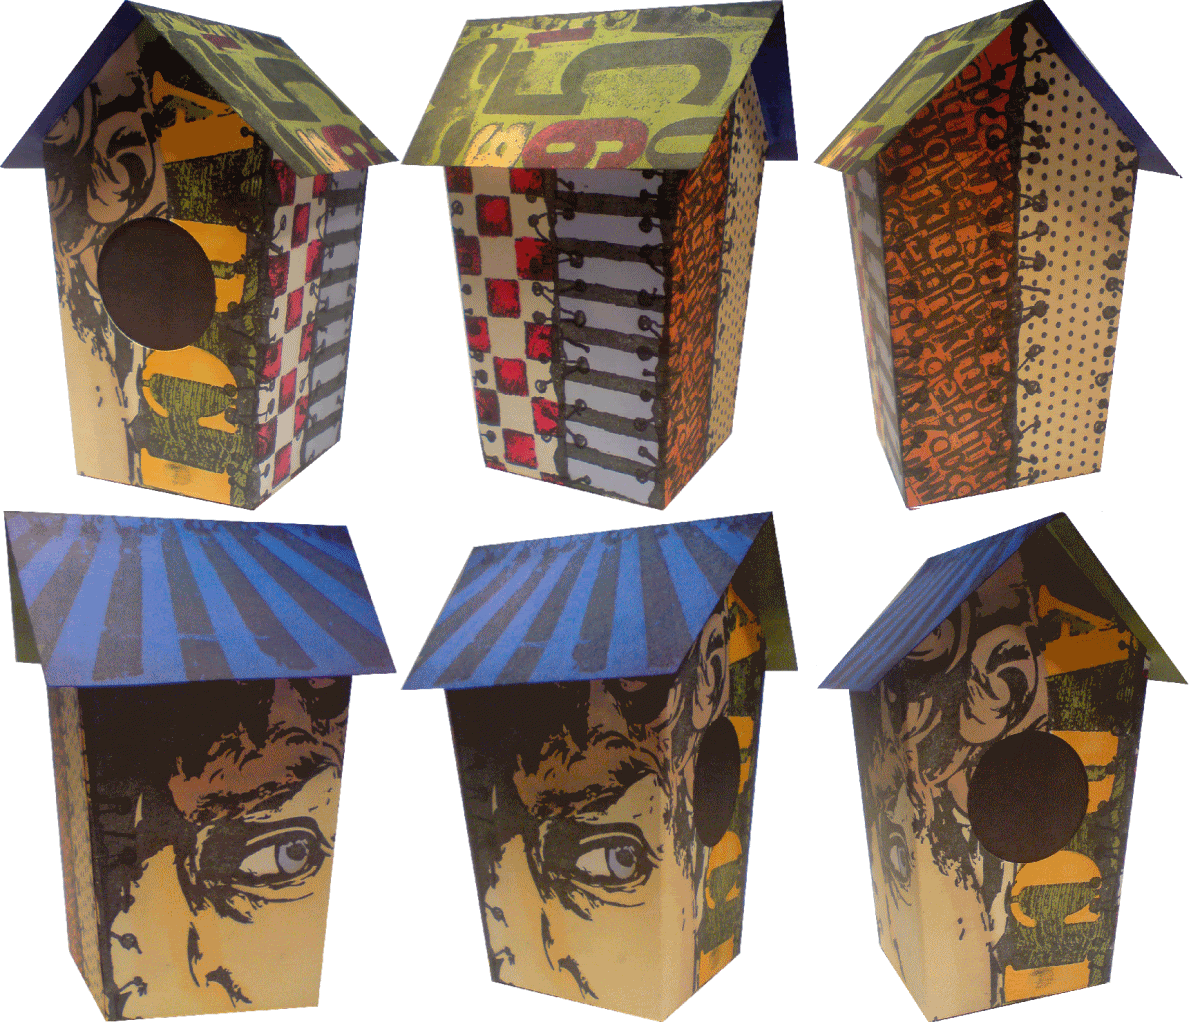
I was having a play around with some stamps tonight when I decided to cut and decorate one of my Cricut/Robo birdhouses. (You can find 3 of them on my other site, email me for the address or google "my crafty files"). I don't have many supplies with me so couldn't do much more than stamp and colour them - I wanted to add glossy accents to the "stiches" holding the panels together, but didn't even have that with me.

I've tried to make a little animation so that you can see all sides of it - I hope it works for you! :)
Feedback welcome, click any image to see it larger.


Sunday, 28 February 2010

Clown Shadow Box and David the Clown

I've been wanting to use one of these 3x3 shadow boxes for a while, so I took advantage of today's Sunday Stamper clown theme to use one. I apologise for the photo, I think I had the camera on a bit of an angle - the frame really was square! Don't even get me started on the dotty shadow around the edge, that wasn't intended either, LOL

No new techniques here, just the old faithfuls of stamping, distress inking and promarkery.

While I was uploading this post, I had another idea for the Sunday Stamper clowns theme - a fun way to use the new Tim Holtz David Head stamp! It only took 5 minutes to knock it together, but I'm really inordinately pleased with it! LOL Feedback welcome, as ever, click on the image to see a larger view! :)

Saturday, 27 February 2010

Freebie #46 - Grungepaper Roses


[I've started to make my files available from my blog again and am adding a new set each week. Check out the "Cutting Files" tab at the top of the page to see which ones are available for download.]

Many of you will be familiar with these grungepaper flowers by now, they're all over the internet. I thought it was time for a cutting file that was custom designed rather than using a regular flower shape and then hand cutting it to get it right. I designed these files to elimate all the cutting, not just cutting out the flower shapes, but removing petal segments and cutting a hole in the centre once they've been glued in shape. You can, of course, cut these from regular cardstock, but if you can get hold of some grungepaper, please try it, the end result is SO MUCH better!

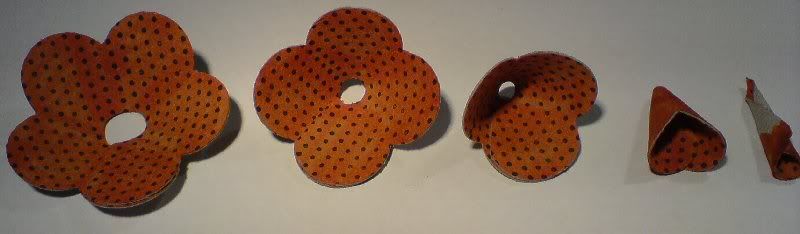
This is what the pieces look like after they've been cut on the Cricut.

I've coloured the pieces with promarkers and stamped a dotted design over the top. You could use paints, inks or even glue patterned paper to the grungepaper pieces.

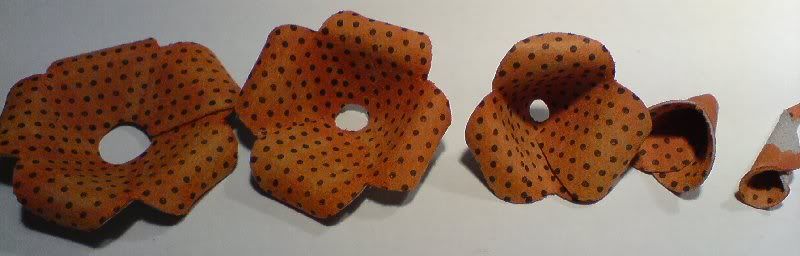
On the 3 largest pieces, overlap the end petals and glue into place with glossy accents or some other strong adhesive (I've used my ATG gun here, which is ok as long as you don't get it everywhere). Roll up the smallest piece and glue. Form the remaining piece into a cone, overlapping the edges slightly and glue in place.

Curl the petals on all pieces and then assemble, glueing each piece into place. If you find the hole in the centre of a piece is too small, just snip it larger with scissors.

Let me know how you get on, I'd love to see your completed roses!!

Please remember
you are only allowed to download this file for your own use and may not distribute it to others in any form. I spend a great deal of time creating my designs, please respect the terms under which they are given.

Again, this template will be "live" for 1 week. Next week it will be taken down, and new ones will replace it. Don't forget, if you have any requests, pass them on! I can't promise, but I will take suggestions into account when planning future templates.

These files may not be uploaded to a group, forum or website for sale or redistribution, or shared among individuals. They are expressly for the personal use of each person that downloads them from this blog.

There is only 1 file but I have put it into a zip file to make downloading easier. After saving it, open in the usual way, and drag the file out onto your desktop or wherever you wish to save it.

There are 2 versions of each template:
  • An SVG version which can be imported into the Sure Cuts a Lot or Make the Cut program and then cut out on your Cricut.
  • A DXF version which is Craft Robo friendly, and ready to be imported into your Robomaster software (I'm not a Robo user, so if there are any problems with this, please let me know!)
Simply click on the appropriate button below to download the file!

Any feedback on the templates is more than welcome, and if you have any suggestions for possible future templates you'd like to see, please let me know! If you make anything using one of the templates, please post a link to it here so that others can be inspired by how you've used them!

I hope you like the templates - let me know how you get on! :)

Templates © dan99crafter@gmail.com 2009

Friday, 26 February 2010

Grungepaper Rose

Well, I saw that bandwagon truckin' on by, and I just had to jump on it, didn't I? LOL

Here is my take on a grungepaper rose. It's the first one I've made, and I need a little more practise in folding the petals just right, but I don't think it's too bad all things considered! LOL The rose shown is cut from cardstock, inked, stamped, assembled and rock candy stickle-d. I have also cut one from grungepaper but I haven't assembled it yet, so will add that one later!

And here's the grungepaper version, a much better result, I think you'd agree!

I can see now why these are usually made from grungepaper, it's much easier to work with, more forgiving and gives a much better curl on the petals!

Wednesday, 24 February 2010

The Shock of the New

I make no great artistic claims for this tag and my head was pretty devoid of any direction I wanted to go with it while I was making it - my aim was simply to try out some new stamps, new cutting files and rock candy crackle paint, to see how they performed.

The bike chain stamp is part of a set I bought a while back from Technique Tuesday. When I created my cog files I didn't have my cricut with me, so this was my first time of actually cutting them. Some of the cogs are from the set I gave away here a week or two ago and some others and the game spinners are designs I created later, which are now available on my other site (google "My Crafty Files" to find it). It may not show up too well, but the crackle paint is on the red door.

I hope you like it, click on the image for a better view :)

Tuesday, 23 February 2010

Freebie #45 and Sneaky Peek Revealed!

Well, after a LOT of work today, here is the completed project that I gave you a peek of yesterday!

It was inspired by a beautiful journal cover made by Judi Riesch in Lynne Perrella's book "al-pha-bet-i-ca". (Thanks to Dyan Reaveley from Art From the Heart for recommending the book - it's full of some great inspiration!)

Judi made her cover using lots of brass letter stencils. I didn't have any, and wasn't inclined to go out and buy them, so, of course I turned to my trusty Cricut! All of the pieces cut from 2 sheets of A4 or 8.5x11 cardstock - 1 for the stencils and 1 (in blackout mode) to cut the tiles for the bottom layer.

I've created mine by stamping and colouring with promarkers and Distress Inks, but you could just as easily make one using patterened papers and cardstock! Here is a clearer view of how all the pieces fit together once they've been cut:


There are 2 files, on at A4 size and one at 8.5x11, ready to be cut on your Cricut or Craft Robo.
Please remember you are only allowed to download this file for your own use and may not distribute it to others in any form. I spend a great deal of time creating my designs, please respect the terms under which they are given.

Again, this template will be "live" for 1 week. Next week it will be taken down, and new ones will replace it. Don't forget, if you have any requests, pass them on! I can't promise, but I will take suggestions into account when planning future templates.

These files may not be uploaded to a group, forum or website for sale or redistribution, or shared among individuals. They are expressly for the personal use of each person that downloads them from this blog.

There are 3 files and I have put them into a zip file to make downloading easier. After saving it, open in the usual way, and drag the files out onto your desktop or wherever you wish to save them.

There are 2 versions of each template:
  • An SVG version which can be imported into the Sure Cuts a Lot or Make the Cut program and then cut out on your Cricut.
  • A DXF version which is Craft Robo friendly, and ready to be imported into your Robomaster software (I'm not a Robo user, so if there are any problems with this, please let me know!)
Simply click on the appropriate button below to download the file!

Any feedback on the templates is more than welcome, and if you have any suggestions for possible future templates you'd like to see, please let me know! If you make anything using one of the templates, please post a link to it here so that others can be inspired by how you've used them!

I hope you like the templates - let me know how you get on! :)

Templates © dan99crafter@gmail.com 2009

Monday, 22 February 2010

Sneaky Peeky!


I was hoping to show you this project in it's entirety tonight, but I didn't get much time to myself today to get it finished so here is a sneaky peek at the work in progress!

Each frame was cut on the Cricut using Sure Cuts a Lot and then inked/promarkered/stamped/written on/vintage photo-ed to within an inch of it's life! :) Hopefully I'll get a chance to finish it in the next couple of days (fingers crossed!).

Alice Through the Iron Gates

Another oldie today - I could have sworn that I've blogged this before, but after a thorough search, it appears not!

I used layers of chipboard to form a compartment, which I gilded with metal leaf on the inside. It contained some Alice-themed playing cards and a mini-book with part of the story and some of Tenniel's classic illustrations.

Chipboard doors were added with metal hinges and fastenings.

Click on an image if you want to see a larger version. ! :o)

[Edited to add - Google is telling me I blogged this in Oct '07, but I can't find the post! I can only think I deleted it at some point, but for what reason I can't imagine! Ah well, here it is again, lol]

Saturday, 20 February 2010

Freebie #44!

Matchbook Madness

[I've started to make my files available from my blog again and am adding a new set each week. Check out the "Cutting Files" tab at the top of the page to see which ones are available for download.][Edit to add - there seems to be a problem with Google Documents, where I save my files to share them. It's asking people without an account to sign up, even though I have checked the "no need to sign up" box for my files. Until this is sorted out I have gone back to where I used to store them. Apologies if you had a problem earlier, but all should be well now!]

Like a few of (what I consider to be) my better freebies, this one arose because it was something I needed for a project I'm working on.

There are so many uses for this fun matchbook. I carry one with me to my local craft shop, with samples from all my inkpads in it, 4 to a page, so I can easily match up cardstock and embellishment colours. Cut in a larger size it would make a great purse-sized brag book, perfect for a cute way to present and bind a mini-book too! I've made the pages perforated so they can be torn out (which is what I needed), but if you don't want that feature, just cut them in blackout mode to lose the perforations and you'll still have a little nick at each side of the page to show where to crease (and it won't be seen, it's hidden by the front flap!)

At regular matchbook size it can hold around 9 pages (depending on the thickness of your cardstock). Cut it at a larger size and you have room for more pages! 2 of the examples in the photo were punched with a cropodile and held together with brads, the middle one used the more conventional stapled binding. You could also just glue in the pages if you wanted!

There are 3 files, the outer, a page, and a group of 1 outer and 9 pages, ready to be cut from an A4 or 8.5 x 11 sheet of cardstock. If you want to cut your own outer and pages, just be sure you keep the proportions and size the page just a touch narrower than the cover to get the best look!

Please remember you are only allowed to download this file for your own use and may not distribute it to others in any form. I spend a great deal of time creating my designs, please respect the terms under which they are given.

Again, this template will be "live" for 1 week. Next week it will be taken down, and new ones will replace it. Don't forget, if you have any requests, pass them on! I can't promise, but I will take suggestions into account when planning future templates.

These files may not be uploaded to a group, forum or website for sale or redistribution, or shared among individuals. They are expressly for the personal use of each person that downloads them from this blog.

There are 3 files and I have put them into a zip file to make downloading easier. After saving it, open in the usual way, and drag the files out onto your desktop or wherever you wish to save them.

There are 2 versions of each template:
  • An SVG version which can be imported into the Sure Cuts a Lot or Make the Cut program and then cut out on your Cricut.
  • A DXF version which is Craft Robo friendly, and ready to be imported into your Robomaster software (I'm not a Robo user, so if there are any problems with this, please let me know!)
Simply click on the appropriate button below to download the file!

Any feedback on the templates is more than welcome, and if you have any suggestions for possible future templates you'd like to see, please let me know! If you make anything using one of the templates, please post a link to it here so that others can be inspired by how you've used them!

I hope you like the templates - let me know how you get on! :)

Templates © dan99crafter@gmail.com 2009

Thursday, 18 February 2010

Twinchie Time

I wanted to have a play around today with a lot of different techniques, mainly because I'm working in unfamiliar surroundings right now, with unfamiliar stuff, and wanted to put it all to the test :) Twinchies were the order of the day as there was no need to produce larger pieces, it was the process that was important rather than the end product! I hope you like em, click on the image to see a larger view :)
Related Posts with Thumbnails