Monday, 18 October 2010

Tishoo, tishoo, we all fall down!


Over on the Simon Says Stamp & Show Challenge blog today the new theme is "Anything But a Card". Since I still have more empty walls to fill here at home, I decided to make a shadow frame piece.

I covered the frame with tissue tape, the first time I've used it, and I must say I love it - so quick and easy to get a good result! This is a bit of a Tim Holtz extravaganza, as it includes several of his stamps, the Lost and Found pad, salvage stickers and a bit of idea-ology metal.

I hope you like it :) As ever, click the pics to see a larger view!

Why not pop over to the challenge blog and see the amazing entries by the rest of the design team? Even better, join in the fun! :)

Our ever-generous sponsor Simon Says Stamp is offering a $25 gift voucher again this week! The winner will be chosen at random from those who enter the challenge, so why not give it a try?


Monday, 11 October 2010

Metally Challenged!

Over on the Simon Says Stamp & Show Challenge blog today the new theme is "Metal". Since I submitted a 10 Seconds Studio metal piece for last weeks "Numbers" challenge, I thought I'd take a different tack with this one.

I stitched across the tag with copper wire (and it was REAL copper wire, not the silver stuff with brown dye on it!) and twisted some of it to make a heart embellishment with a key in the centre. Inevitably, other metal crept into frame too, including the two screw head brads (which I love, and though I have lots of them I'm already worrying about the day they're all gone, lol). The red heart was made with white paper clay which was then coloured.

This is also the first project I've photographed with my new camera and everything seems to be in focus - YAY! :)

I hope you like it :) As ever, click the pics to see a larger view!

Why not pop over to the challenge blog and see the amazing entries by the rest of the design team? Even better, join in the fun! :)

Our ever-generous sponsor Simon Says Stamp is offering a $25 gift voucher again this week! The winner will be chosen at random from those who enter the challenge, so why not give it a try?


Friday, 8 October 2010

The Acid Test

Well, in my last post I said that I was so disgusted with the quality of the photo that I was going to buy myself a camera rather than continue to use my 5MP camera phone. New camera duly arrived today and here's the result, even from taking a quick snap with it's auto settings it seems better to me. What do you think? The camera phone pic is on the left, the new camera pic is on the right. Click on the image to see a larger version, where the differences should be clearer! :)

The central image with the moustache is certainly more in focus. The lighting was different due to taking the pic at a different time of day so that makes it a little harder to compare as it's not really like for like. At the end of the day, I'm pleased with the camera and think that it's going to allow me to take much better photos of my work, and I guess that's all that matters! :)

Wednesday, 6 October 2010

How to Pass

"Gothic Elements" is the theme over on the Gingersnap Creations blog this week. Hopefully you can see that the gothic element I went with was a gothic arch!

The solid arches and the frame borders for them were cut on the Cricut using the SCAL program, as were all of the hats and the moustache. The stamped images were coloured using shades of warm grey Promarker. The frame borders were stamped in Barn Door distress ink using one of Tim Holtz's stamps, then coloured with a yellow promarker. A piece of graphic 45 paper for the background and some TH memo pins complete the project, which is housed in a shadow frame (from Tesco, sadly they no longer have them).

BTW, I am so disgusted with the quality of this photo that I've ordered a new camera! This is probably an instance of a bad workman blaming his tools, but time will tell! :)

Pop over to the GC blog to see how the other DT members have interpreted the challenge - go on, you know you want to! :)

Monday, 4 October 2010

Numbers Challenge

Over on the Simon Says Stamp & Show Challenge blog today the new theme is "Numbers". I've been a bit naughty and am showing a project using 10 Second Studios materials and tools. After all, 10 is a number, right? :)

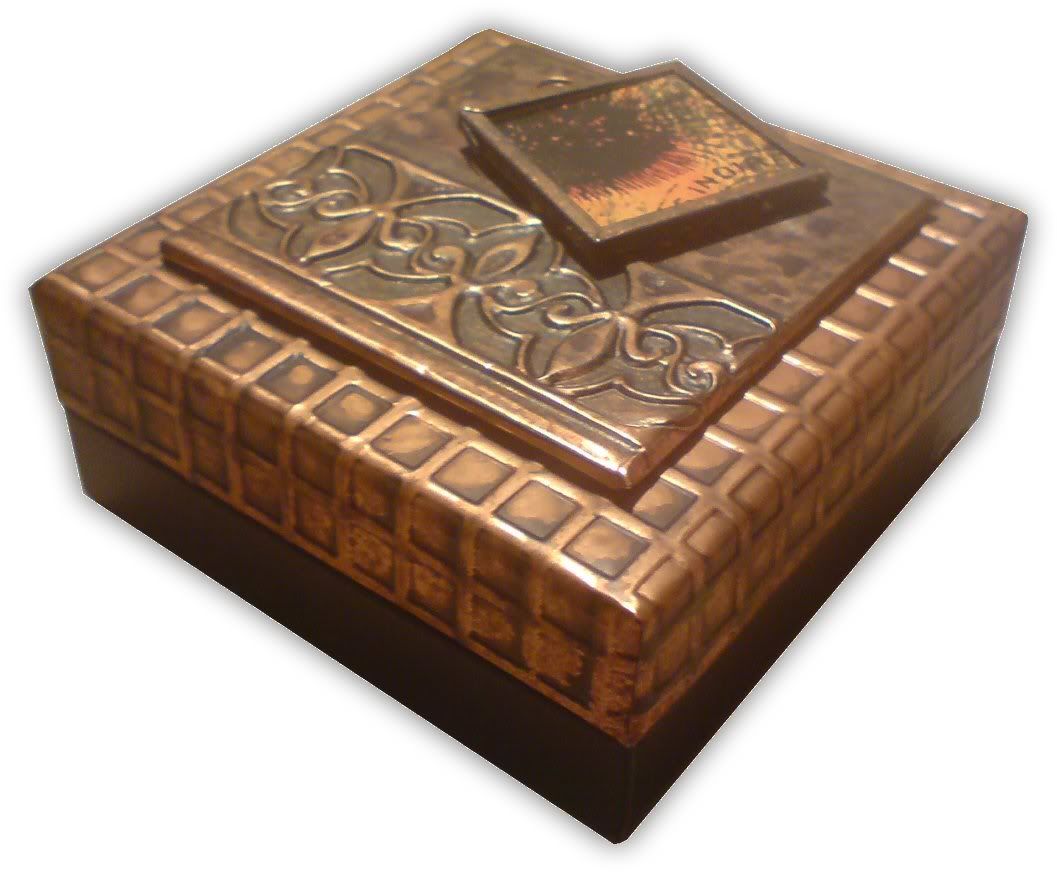
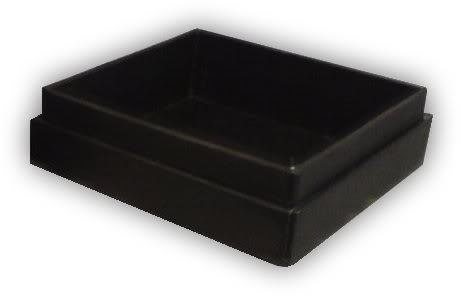
Another recycled item, this time a gift box made from 2 bases from Tria pen boxes. I've been unable to make anything new this week, so regular readers of my blog may recall having seen this before. You can see what the bases look like below. I removed the inner lip from one of them, and it became the lid, fitting perfectly onto the other base!

Using a paper stump and rounded silicone tool, I taped the metal onto the plate and then rubbed it into the design. I combined brown and green acrylic paint and a lot of water to make my own distressing spray, which I poured into a mini-mister. After each spritz, the metal was dried with a heat tool, until I was happy with the result.

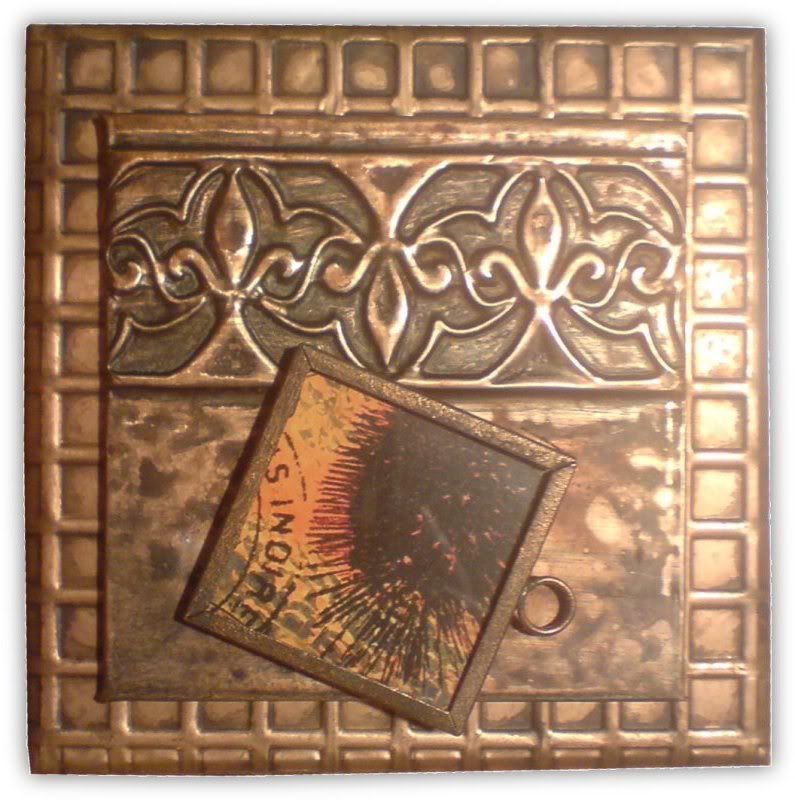
The tile on the top was made several months back, on a metal class at LB Crafts. The copper was embossed on a Ten Seconds Studio mould and distressed with a patina spray. A square of patterned paper was cut from a Crafty Individuals sheet and placed in a silver Ranger Memory Frame, which had been rubbed with copper wax.

That’s about it, I hope you like it! :o)

Why not head over to the SSS&S blog and check out how the other design team members have interpreted the challenge - their work is amazing! Even better, why not join in yourself? Simon Says Stamp have another great prize up for grabs again this week! :)

As ever, click on the image if you want to see a larger view :)

Monday, 27 September 2010

Halloween Box-o-Tags!


First of all, let me get this out of the way immediately, the candy corn in the pic is faked, I photoshopped it in! I looked in every sweet shop I could think of to find some to sprinkle on the table for these pics but just couldn't get any - candy corn just isn't a UK thing! I hope you'll forgive my artistic licence! :)

On with business...
Over on the Simon Says Stamp & Show Challenge blog today the new theme is "Distressed/Sanded". I'm a bit of a stamping purist at heart and restricted myself to straightforard stamping for this project, I thought it would work well with the images, style and theme I was going for.

You've heard of a jack-o-lantern? Here's a box-o-tags! I used mostly Tim Holtz and Inkadinkado Halloween stamps, in conjunction with Bundled Sage, Dusty Concord and Wild Honey distress ink pads and an Archival black ink pad. Given the nature of the theme, I used a Tim Holtz sanding block to sand the edges of everything in sight! :)

Why not head over to the SSS&S blog and check out how the other design team members have interpreted the challenge - their work is amazing! Even better, why not join in yourself? Simon Says Stamp have another great prize up for grabs again this week! :)

As ever, click on the image if you want to see a larger view :)

Wednesday, 22 September 2010

Neutrals and 1 Bold...

... is the theme over on the Gingersnap Creations blog this week. I enjoyed making last weeks inchie card so much I decided to do another, but this time stepping even further outside of my normal style to make it as stripped-down and simple as I could!

September is birthday month for many of my family, so this card is definitely going to find an owner sooner rather than later. A grid of inchie stamps using Memento Tuxedo Black were then coloured with putty, almond and berry red Promarkers. I did say it was simple - perfect though for those times when you need a card in a hurry! :)

Pop over to the GC blog to see how the other DT members have interpreted the challenge - go on, you know you want to! :)

Monday, 20 September 2010

"Your Grunge!" Challenge

Over on the Simon Says Stamp & Show Challenge blog today the new theme is "Your Grunge!". I've had grunge paper kicking around for quite some time but never really gotten around to using it much, so I thought this would be the perfect opportunity.

Part of the inspiration for this piece was the title sequence of the recent series of Big Brother here in the UK. I really enjoyed the sinister circus/mad house feel used in the titles and set decoration of the show. Those who haven't seen it or are overseas can get a sense of what I mean here.

The circus letters, bunting, awning and curtain with a hole in it were all designed on the PC and cut on the Cricut using the SCAL program. The awning was cut from grunge paper, painted with acrylic paint and then overstamped with some Tim Holtz paint splatters. It was also sanded and inked to distress it further, before being glued in place inside a 2" deep frame from Ikea.

I used my TH design ruler (those grid markings are just so darned useful!) to mark the stripes on the curtain and then coloured it using promarkers. I distressed it with a walnut stain distress ink pad applied with an ink blending tool and then overstamped some paint splatters too. "For the eye" and "See All" were stamped separately and fixed to the curtain.

I wanted the eye to be quite a distance behind the hole in the curtain so I constructed a box from white card, and stamped the eye in the middle of the bottom surface before assembling it and sticking it to the back of the curtain. By sticking the base of the box to the rear of the frame it also allowed the curtain to stand 1/2 way between the front and back of the frame, adding more dimensionality to the composition.

I wanted the eye to look like a black and white photograph, though it's just a stamp. so I coloured it with various shades of grey promarker and then used the shape cut out from the hole in the curtain as a mask to apply a shadow around the eye. The circus letters were coloured with promarker and then stuck into place. At the very back is a piece of Graphic 45 striped paper and infront of that a partially coloured section of a TH clowns stamp.

I deliberately left some parts of this piece partially coloured or un-coloured as I wanted to stress the artifice of the whole piece and in a way make myself part of it all. The pointy hat is a section cut from a large notepaper stampe. coloured with promarkers then distressed with walnut stain. All of the elements were layered with 3d foam tape and the memo pins stuck into place.

I hope you like it :) As ever, click any of the pics to see a larger view!

Why not pop over to the challenge blog and see the amazing entries by the rest of the design team? Even better, join in the fun! :)

Our ever-generous sponsor Simon Says Stamp is offering a $25 gift voucher again this week! The winner will be chosen at random from those who enter the challenge, so why not give it a try?


Wednesday, 15 September 2010

Blog Hop Candy Winner!

Thanks everyone for joining in with the blog hop over at Simon Says Stamp! Those of us on the Simon Says Stamp and Show Design Team loved looking through all your creative entries!

I've used Random.org to select a winner from the comments on my blog, and the winner is Ingrid, who made the comment below:
Ingrid said...

Pretty scary card... lol! Thanks for the hop-fun :-)
Hugs Ingrid

Please email me with your address Ingrid and I will make sure your bat stamp gets off in the mail to you!

Inchies Halloween Card

Over on the Gingersnap Creations blog there's a new challenge starting today - the theme is "inchies".

I decided to step outside my comfort zone for this challenge, and tried to make something clean and spare, not my usual style at all!

The inchies were stamped with Tim Holtz stamps and the background coloured with a "pumpkin" Promarker. They were then mounted onto a square of orange card and fixed to the card front.

Not much else to say about it really, other than I hope you like it! Why not pop over to the GC blog to see how the other design team members have interpreted the challenge? :)

Wednesday, 8 September 2010

Holiday Blog Hop


Simon Says Stamp are sponsoring an awesome blog hop with some great prizes including a $100 spending spree and it all starts today! The theme for the hop is "holidays" and full details of how to join in with all the fun can be found at the Simon Says Stamp and Show blog!

My piece for this week's theme is a halloween card, as you can see :) All of the elements were stamped in black using various stamps from the Tim Holtz range and coloured using distress ink pads and marker pens. The title on the Witch Hazel label is highlighted with glossy accents and the October calendar page is covered with acetate affixed with glossy accents. The charms hanging from the metal memory frame are two of Tim's newest Halloween stamps, stamped onto shrink plastic. The photo of "Vlad" is one of the photos from the Lost and Found paper stack. The white parts such as the teeth were scratched with a craft pick (or pokey tool if you prefer!) and the hair and cape were added using marker pens. It was finished off with a piece of chain and a gold brad.

Oh, one thing I forgot! You need a clue letter from me, don't you? I think I'll lEt you guEss what it might bE! :)

And now for the blog candy... Those of you who leave a comment on this post will be entered into a prize draw to win Tim Holtz's Vintage Bat stamp, which I used to create one of my shrink plastic charms, courtesy of Simon Says Stamp!

Your next stop on the blog hop is Lynne's amazing blog - have fun!!

Monday, 30 August 2010

Layers Challenge

The theme this week over on the Simon Says Stamp & Show challenge blog is "Lots of Layers". I tackled the challenge from two separate angles - multilayered stamping and by having the squares of the main image at different heights within the shadow-box frame.

Strips of Lost and Found cardstock were used to face the front of the frame. The main piece inside the frame was stamped and coloured, then cut into 9 squares, each of which was distressed. The image was then re-combined, with the pieces at different heights and angles.

I hope you like it, it was a lot of fun to make! :) Click on the picture for a larger view!

Why not head over to the challenge blog to see what the other designers have created for this weeks challenge, they're a talented bunch! (While you're there, why not enter the challenge yourself? There's another FANTASTIC prize up for grabs, a $25 spending spree, courtesy of sponsor Simon Says Stamp!).

Tuesday, 24 August 2010

How lucky was I?!

As those of you who read my blog regularly may know, I have good friends in California who live very close to the location of the regular Carson stamp shows, where Tim Holtz's new stamp collections often first go on sale. I have been to the show a number of times myself, but if I can't make it my friends VERY kindly go and pick up any new stamps that I want (I did say they were GOOD friends, right?).

When Tim's most recent collections were launched a few weeks back, that's what happened - I picked out the sets I wanted and a friend went to the show on the Saturday morning to pick them up for me. It turns out that one of the sets was Tim's 100th Collection for Stampers Anonymous, and to celebrate, he signed (in gold) the first 100 sets to be sold. Imagine how surprised I was when I got my package from the US and opened it up to find that I GOT ONE OF THOSE SETS!! A certain chum of mine has already suggested that I should give them to her (I'm not saying who, but she's been newly added to Tim's blog roll!). Sorry to say, that ain't gonna happen! :)

Monday, 23 August 2010

Tim Style!

The theme over on Simon Says Stamp & Show this week is "Tim Holtz Style", and those of you who are familiar with my blog will know that this was right up my street! :)

I decided to use some of Tim's newest stamp designs along with some of his older ones that were particular favourites of mine (especially the numbers stamp on the left and right sides of the frame, and the David stamp, which you can't really see cos it's stamped in Antique Linen on the backing paper in the frame). I'm particularly pleased with the frame, which was glossy black to start with. I sanded it a little to give a key for acrylic paint to stick to, then painted it with two coats of a deep red. Finally I gave it a coat of gold, and after it dried I sanded it in places to let the red show through. It provided a perfect base to stamp in Ranger Archival Jet Black on the sides of the frame. I thought the sprinkling of idea-ology cogs and game spinners just finished off the photo nicely! :) Click on the image for a larger view.

There are some AWESOME projects by other members of the design team, why not go over to Simon Says Stamp & Show to check them out? :)

Oops, nearly forgot.... thanks to Simon Says Stamp there's another great prize for this weeks challenge! An autographed copy of Tim Holtz's book "A Compendium of Curiousities", a signed tote bag, a set of his stamps, an ink blending tool with foam pads and some Distress inks - what a fantastic prize! As ever, one of the entrants will be chosen at randome to win the prize - it could be YOU! :)

Wednesday, 18 August 2010

Go 3d!

The theme over on Gingersnap Creations this week is "Go 3d". For my entry to the challenge, I decided to make this trio of beach huts (goodness knows, we haven't had much of a summer here in the UK, so anything summery by way of home decor items can only help to brighten things up!). I wanted to acheive that washed-out , sun-bleached feel, so I used Weathered Wood, Antique Linen and Milled Lavender Distress ink pads. The stamps were from Tim Holtz's Tiny Textures and Floral Tattoo sets.

The huts were cut from white cardstock on the Cricut, and then stamped and assembled. Not quite my normal style here, I was trying to go a little outside of my comfort zone and aimed for something fresh and spare in style. Thanks for taking a look, why not check out the other entries on the Gingersnap Creations blog?

Monday, 16 August 2010

Studio 490 Style

Well, what a fantastic start to the new Simon Says Stamp and Show Challenge we had last week! Over 200 entries - thanks so much to everyone who took part!! The theme for this week's challenge is "Studio 490 Style", which means in the style of amazing artist and designer Wendy Vecchi. Unfortunately I don't own any of Wendy's stamp designs, but that doesn't mean that I can't try to make something in her style! I've always admired her blog header, so I thought I'd make something inspired by it. (Check out Wendy's blog here to see what I'm talking about).
As ever, I designed the blank pieces on my computer, then cut them with the Cricut. After that, I used Distress Inks and a range of stamps, including some Tim Holtz, to complete my project.

Thanks to Simon Says Stamp there's another great prize this week, to be given at random to one of the entrants to the challenge - take a look at the prize pic below, it's really worth winning! Why not head over to the challenge blog for some inspiration and see how the other Design Team members have interpreted the theme? While you're there, why not think about entering the challenge? Go on, you know you'll have fun! :)


Monday, 9 August 2010

Things with Wings...

... is the theme of the first ever Simon Says Stamp and Show Challenge. Sponsored by Simon Says Stamp, there's also a fantastic prize on offer to one lucky entrant this week, which includes one of Tim Holtz's new stamp sets, some Distress Ink pads, a Tiny Attacher and other wonderful goodies! The whole prize is pictured below:


All you have to do for a chance to win is enter this week's challenge - make something that fits with the theme "Things with Wings"! Why not go over to the challenge blog for some inspiration and see the different ways in which the design team have interpreted the theme? Here is my entry (click on the image for a larger view):
This clown's head is one of my favourite Tim Holtz stamps, and I've had the idea for this piece kicking around in my head for some time now. Thankfully the theme of "Things with Wings" has allowed me to get it out of my system! :)

The outlines of all the body parts and wings were drawn on the computer and then cut out on the Cricut using the Sure Cuts a Lot program. Barn Door, Peeled Paint, Dusty Concord and Old Paper Distress Ink pads were used for colouring, either direct to paper or with a water brush. All stamping used a Momento Tuxedo Black ink pad, and most of the stamps were by Tim Holtz at Stampers Anonymous, particularly these sets: Tiny Textures, The Big Top and Spills and Splatters.

Comments welcomed, as ever, and don't forget to enter the challenge yourself! :)

Sunday, 8 August 2010

The Return of the Sneaky Peeky!!

I've just finished my first project for the Simon Says Stamp and Show DT, but everything is under wraps until the challenge goes live at 12.01am Monday (Ohio time!). What I can show you though, is a sneak peek at the prize that's up for grabs for one of the lucky entrants to the challenge! Magnifying glasses at the ready, here it comes....

A fantastic prize, huh? Isn't that one of those thingies in the middle? Aren't those some of those other thingies down the left hand side? In fact, that pic is chock full of fabulous thingies just waiting to be won, perhaps even by YOU!! Check out the challenge here (once it goes live of course, at midnight Sunday!). Why not have a rehearsal and check it out right now? You can meet the members of the new design team, and when the challenge goes live you'll be an old hand at visiting the blog and will know where to go :)

Saturday, 7 August 2010

New home, new challenge!

As announced over on the Simon Says Stamp Challenge Blog, I have accepted a place on their new design team! I'm looking forward to some exciting challenges with them - I've already seen the first few and I'm feeling inspired already! :) Why not check out their blog - there's an AWESOME prize up for grabs, all you have to do is enter the first challenge, which goes live in a couple of days! (I can't tell you exactly what the prize is, cos I've only seen a small pic of it, but I recognised several of the items and they are really worth winning!). Good luck!!

Friday, 6 August 2010

I'm back!! Well, almost....

I'm *finally* in my new house, and am busy getting my new craft studio ready for the weekend! Hopefully you'll see the fruits of all this labour in the next few days! Thanks so much for your continued support....the long limbo is nearly over! :)

Tuesday, 6 July 2010

As some of you may know, I am in the process of relocating to another part of the country.  Currently I am between homes, having moved out of my old place before my new home is ready.  As all of my belongings have been in storage for some time now, obviously I have been unable to make anything new to add to my blog.  Normal service will be resumed in the next few weeks I hope! I'm grateful for your patience :)

Wednesday, 19 May 2010

Vintage Vegas Birthday Gift

My neice asked me if I'd make a piece of art for her house a few weeks ago, and as her birthday was coming up I said it could be her gift. She was pretty prescriptive about what she wanted - it had to contain vintage Elvis/Vegas stuff, Vargas pin-up girls and tattoo designs by "Sailor Jerry", so the resulting piece is much more her than it is me, but that's fine because she absolutely loved it :) (Her husband liked it too, which wasn't as important, but he's gonna have to see it every day, so it's just as well, lol)

It's pretty large, the frame is around 18" square and 1 1/2" or so deep, which allowed plenty of room for dimensional elements. The heart, spade, club and diamond symbols were made by melting coloured UTEE, pouring it onto a craft sheet and then cutting out the shapes with cookie cutters before it hardened. Most of the vintage movie posters/playing cards etc were found online and printed out, then distressed/inked/sanded to make them look older. As ever, click on the image to see a larger view! :)

[Edit to add - The frame is Ribba from IKEA. It comes in a few sizes, all the same depth, maybe an inch and a half or so. I used the 50cm x 50cm one (approx 20" x 20")]

Gingersnap Creations Challenge: Quotes

A new challenge has started on the Gingersnap Creations Blog today and the theme is Quotes.

I chose to quote some lines from the Rolling Stones song "Ruby Tuesday". I'm not much of a Stones fan to be honest, but I really love the Melanie version of this song, and listened to it on repeat while I worked on this :) (You can hear it here if you're interested).

The text around the edge of the tag and the notepaper were computer generated (the notepaper having been stamped first with a TH stamp and then scanned into the computer). "Ruby" is one of my favourite stamps in my collection, a PaperArtsy image that I come back to time and again. She was stamped with a black Memento ink pad then coloured with Promarkers. The background was Promarker'd, distress inked and stamped with a TH scratches stamp. The notepaper was stamped with TH's small coffee cups and my handy fingerprint "stamp" :)

Check out the Gingersnap Creations blog to see the fun ways in which the other Design Team members have interpreted the theme! Go on, you know you want to! :)

Saturday, 15 May 2010

Freebie #56!

Cupcake Wrapper and Flag

There are so many of these floating around the internet and I'm sure that many of you already have some, but I received a request this week for a cupcake wrapper so I thought I'd do my own, and throw in a cupcake flag for good measure!

These pretty scalloped cupcake wrappers with their cute little flags will brighten any party table! I cut these samples out of some of the free designs that can be downloaded from Shabby Princess, but obviously you can use whatever paper or cardstock fits best with the theme of your table!

Please remember you are only allowed to download this file for your own use and may not distribute it to others in any form. I spend a great deal of time creating my designs, please respect the terms under which they are given.

Again, this template will be "live" for 1 week. Next week it will be taken down, and new ones will replace it. Don't forget, if you have any requests, pass them on! I can't promise, but I will take suggestions into account when planning future templates.

These files may not be uploaded to a group, forum or website for sale or redistribution, or shared among individuals. They are expressly for the personal use of each person that downloads them from this blog.

There is 1 file but I have put it into a zip file to make downloading easier. After saving it, open in the usual way, and drag the file out onto your desktop or wherever you wish to save it.

There are 2 versions of each template:
  • An SVG version which can be imported into the Sure Cuts a Lot or Make the Cut program and then cut out on your Cricut.
  • A DXF version which is Craft Robo friendly, and ready to be imported into your Robomaster software (I'm not a Robo user, so if there are any problems with this, please let me know!)
Simply click on the appropriate button below to download the file!

Any feedback on the templates is more than welcome, and if you have any suggestions for possible future templates you'd like to see, please let me know! If you make anything using one of the templates, please post a link to it here so that others can be inspired by how you've used them!
I hope you like the templates - let me know how you get on! :)

Templates © dan99crafter@gmail.com 2010

Wednesday, 12 May 2010

Gingersnap Creations Challenge: Pencils

A new challenge has started on the Gingersnap Creations Blog today and the theme is Pencils.

Immediately I thought of that expression "I've seen more fat on a butcher's pencil" (I know, I know! Let's not get started on how my mind works!). Lost Coast Designs came up trumps for this piece, as both the pencils and the 3 waiters (who I turned into butchers) came from their collection. The text was computer printed, the brad was not :)

The pencils were stamped first, then masked off while I stamped the 3 butchers. The aprons were cut from white card, coloured and glued onto the tag. The pencils and background were coloured with promarkers and the tag was lightly edged with Fired Brick distress ink.

Check out the Gingersnap Creations blog to see the fun ways in which the other Design Team members have interpreted the theme! :)

Monday, 10 May 2010

Apple Blossom Thank You

This is the first project I've made using stamps from Scrolls Work, and let me start by saying how blown away I was by the quality of the stamps! These have to be the most deeply etched stamps I've ever used, making a crisp, clean impression very easy to achieve!

I decided to make this card using kraft card - a striped kraft for the card base and Bazill kraft card for everything else. I used #4555 Lg Apple Blossom, which I stamped using Bundled Sage distress ink to make a background. I then coloured between the flowers with a Vanilla Promarker. The individual flowers were then stamped separately with Sepia Archival ink and coloured with 3 different shaes of blue, pink and orange. The were cut out and applied to the card using adhesive foam tape.

#1820 Thank You
was stamped in Sepia Archival ink, and then mounted on a brown mat, as was the main part of the card, and then assembled with my trusty ATG gun :) As ever, click on the image for a larger view!

Saturday, 1 May 2010

Freebie #55!

Baby Building Block

So many uses for this weeks freebie - be it for baby shower invitations, "it's a girl! (or boy)" cards, scrapping toddler photos. You can even leave the letters off and replace them with dots to make a dice!

Please remember you are only allowed to download this file for your own use and may not distribute it to others in any form. I spend a great deal of time creating my designs, please respect the terms under which they are given.

Again, this template will be "live" for 1 week. Next week it will be taken down, and new ones will replace it. Don't forget, if you have any requests, pass them on! I can't promise, but I will take suggestions into account when planning future templates.

These files may not be uploaded to a group, forum or website for sale or redistribution, or shared among individuals. They are expressly for the personal use of each person that downloads them from this blog.

There is 1 file but I have put it into a zip file to make downloading easier. After saving it, open in the usual way, and drag the file out onto your desktop or wherever you wish to save it.

There are 2 versions of each template:
  • An SVG version which can be imported into the Sure Cuts a Lot or Make the Cut program and then cut out on your Cricut.
  • A DXF version which is Craft Robo friendly, and ready to be imported into your Robomaster software (I'm not a Robo user, so if there are any problems with this, please let me know!)
Simply click on the appropriate button below to download the file!

Any feedback on the templates is more than welcome, and if you have any suggestions for possible future templates you'd like to see, please let me know! If you make anything using one of the templates, please post a link to it here so that others can be inspired by how you've used them!

I hope you like the templates - let me know how you get on! :)

Templates © dan99crafter@gmail.com 2010

Wednesday, 28 April 2010

Gingersnap Creations Challenge: Kraft

Another great challenge over at Gingersnap Creations today, this time a colour theme, "kraft". I used a kraft paper covered notebook as my base. I stamped and masked with Momento black ink and then used pastel shades of promarker to pick out some of the details. Why not pop over to their blog to see how the design team have interpreted the challenge? Go on, you know you want to! :)

Saturday, 24 April 2010

Freebie #54!


Milk Carton Gift Box
Another week, another gift box. I think I'm hooked on making them, I get a kick out of being able to cut something that I would have had to go out and buy! :)

Finished off with a cute scalloped top, there are all kinds of ways you can use these boxes! Most of the folds are obvious, so I haven't marked the score points, but I have added them where they were needed - remember to add a fold joining the the bottom two points of the upside down "Y" fold.

Please remember you are only allowed to download this file for your own use and may not distribute it to others in any form. I spend a great deal of time creating my designs, please respect the terms under which they are given.

Again, this template will be "live" for 1 week. Next week it will be taken down, and new ones will replace it. Don't forget, if you have any requests, pass them on! I can't promise, but I will take suggestions into account when planning future templates.

These files may not be uploaded to a group, forum or website for sale or redistribution, or shared among individuals. They are expressly for the personal use of each person that downloads them from this blog.

There is 1 file but I have put it into a zip file to make downloading easier. After saving it, open in the usual way, and drag the file out onto your desktop or wherever you wish to save it.

There are 2 versions of each template:
  • An SVG version which can be imported into the Sure Cuts a Lot or Make the Cut program and then cut out on your Cricut.
  • A DXF version which is Craft Robo friendly, and ready to be imported into your Robomaster software (I'm not a Robo user, so if there are any problems with this, please let me know!)
Simply click on the appropriate button below to download the file!

Any feedback on the templates is more than welcome, and if you have any suggestions for possible future templates you'd like to see, please let me know! If you make anything using one of the templates, please post a link to it here so that others can be inspired by how you've used them!

I hope you like the templates - let me know how you get on! :)

Templates © dan99crafter@gmail.com 2010

Friday, 23 April 2010

Bargain Storage!

Ok, so I don't usually make this kind of post on here, but I found such a bargain today that I wanted to share it! :)

These A5 accordian organisers are really sturdily made, and they're only £1 in Asda - £1!! The colours have not photographed very true, the top is really teal, not baby blue (oh, that rhymes, lol). Anyway, get down to Asda before they're all gone! :) (Oh, and there's also an A4 version for £3)

Tuesday, 20 April 2010

Stripey Flower Batik Card Thing

A simple looking card this one, but oddly enough, a lot going on technique-wise! :)

I started out by stamping the distressed lines with Versamark ink and embossing them with clear powder, to act as a resist. Then I applied distress inks (punctured tyre, shattered teapot and sprinkled corsage I think), and stamped the flowers in black. I then placed some kraft paper over the whole thing and ironed it to melt the embossing powder again, which soaked up into the paper. I then applied stripes of various promarkers over the top, to colour the white lined areas (mouldy peas, awkward silence, scraped knee and disappointed parent, if I remember rightly). Finally I overstamped the flowers with versamark and embossed with clear powder for a bit of shine. Oh, and I cut a white mat for it, colouring the edges with two overlapping shades of promarker (witchety grub and I-can't-believe-it's-not-butter).

As ever, click the pic for a larger view :)

Monday, 19 April 2010

Bottle Contents

Here's the first of a few cards I've made in the last few days. Not much to link them thematically, except perhaps the use of Wendy Vecchi stamps and white space! :)

The bottle was stamped on cardstock that had been blended with distress inks and then overstamped with water on a large polka dot stamp. It was highlighted in areas with a pale blue promarker. Background, mat and text panel also were coloured with promarkers. That about wraps it up :) As ever, click the image for a larger view!
Related Posts with Thumbnails