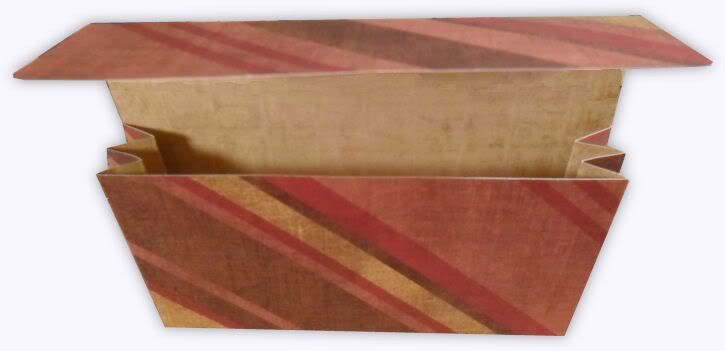
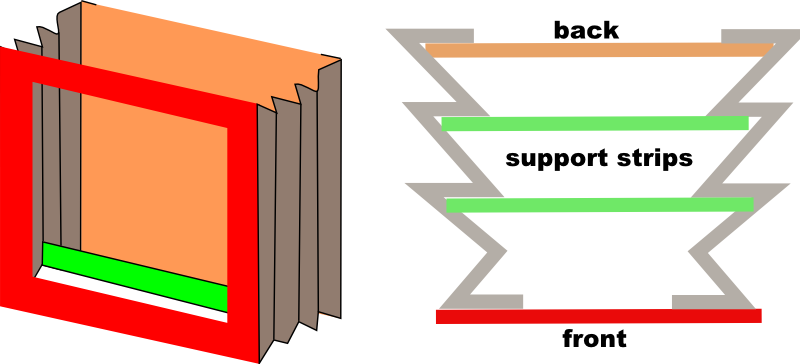
Following yesterday's post of a set of notecards with matching gift box I've had a number of emails asking about the box, so I thought I'd offer it as todays freebie :) This shallow gift box with snugly fitting lid comes in either SVG or DXF format, ready to cut on the Cricut, Craft Robo or other digital cutters.
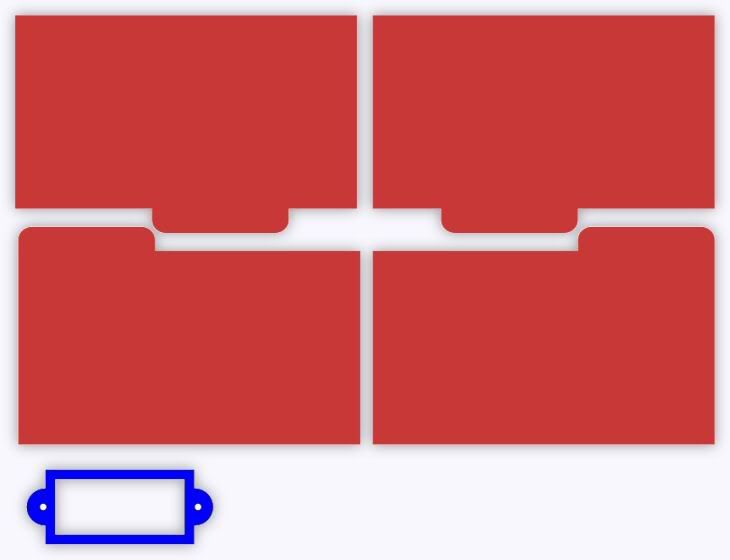
I originally designed the box at 5 1/2 inches square, to fit the cards I'd made, but I've included a sizing chart below, which shows the width and height to cut the box and lid to make a range of box sizes. Remember, this is a square box, so the two shapes you cut should be square in proportion. For example, for a 3x3 box, the base should be 5.2 x 5.2 and the lid should be 4.77 x 4.77.
Note: Although I calculated these sizings I haven't tried cutting in all the sizes yet. I already knew that the 5.5 box cuts perfectly, so I then went on to make a sample cut of the 3x3 size, which also worked just fine. I figured that as the 3x3 was the smallest and most fiddly to assemble that would be the one that was most likely to go wrong, so I was relieved when it worked! :)
| Box size |
Base w/h |
Lid w/h |
| 3 x 3 |
5.2 |
4.77 |
| 3.5 x 3.5 |
6.04 |
5.54 |
| 4 x 4 |
6.9 |
6.3 |
| 4.5 x 4.5 |
7.76 |
7.06 |
| 5 x 5 |
8.62 |
7.85 |
| 5.5 x 5.5 |
9.5 |
8.625 |
| 6 x 6 |
10.34 |
9.38 |
| 6.5 x 6.5 |
11.22 |
10.14 |
Please remember you are only allowed to download this file for your own use and
can not share it or distribute it to others in any form. I spend a great deal of time creating my designs, please respect the terms under which they are shared.
Again, this template will be "live" for 1 week. Next week it will be taken down. Don't forget, if you have any requests, pass them on! I can't promise, but I will take suggestions into account when planning future templates.
These files may not be uploaded to a group, forum or website for sale or redistribution, or shared among individuals. They are expressly for the personal use of each person that downloads them from this blog.
There are a few files and I have put them into a zip file to make downloading easier. After saving it, open in the usual way, and drag the files out onto your desktop or wherever you wish to save it.
There are 2 versions of each template:
- An SVG version which can be imported into the Sure Cuts a Lot or Make the Cut program and then cut out on your Cricut.
- A DXF version which is Craft Robo friendly, and ready to be imported into your Robomaster software (I'm not a Robo user, so if there are any problems with this, please let me know!)
Simply click on the appropriate button below to download the file!
Any feedback on the templates is more than welcome, and if you have any suggestions for possible future templates you'd like to see, please let me know!
If you make anything using one of the templates, please post a link to it here so that others can be inspired by how you've used them!
I hope you like the templates - let me know how you get on! :)
Files © dan99crafter@gmail.com 2011

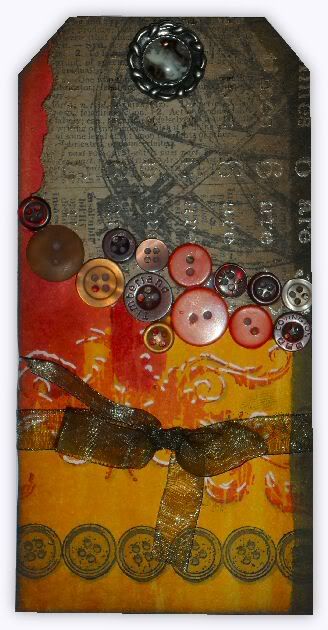 I usually prefer my buttons to be made from Cadbury's chocolate, but in this case I've made an exception! The theme for this week's Simon Says Stamp and Show Challenge is "buttons" and I've made a feature of Kraft Resist cardstock and buttons (both real and stamped) on this tag. The tag was coloured with Distress Stains, which were also used to dye the white organza ribbon I used.


