Pages

Thursday, 31 March 2011

Love Shrine


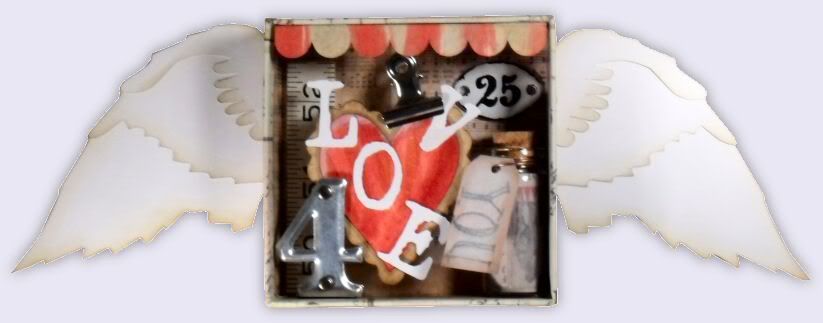
When I started typing this post and I called it Love Shrine, I wish I'd made some kind of house and called it Love Shack, that would have been cool! LOL  Maybe next time :)

This is one of the boxes left over from my printer's tray project, covered in Lost and Fond cardstock and edged with tissue tape.  The wings, letters, heart and awnings were cut on the Cricut using the Sure Cuts a Lot software.  It was fun to make, hopefully as much fun to look at! :)

Wednesday, 30 March 2011

Time for a facelift!

After 3 or so years with the same blog design, it's finally time for a change! I promised myself that when I reached 1000 followers I would freshen up the design and now the time has arrived. Thanks to all of you who have been interested enough to sign up as a follower, I really appreciate it! :) Huge thanks to my friend Julian who has gone above and beyond the call of duty to help with the complicated coding that was needed to make this redesign work!

It's taken a week or two to get this together so I hope you like it - I'd really be grateful for any feedback you care to give!

Tuesday, 29 March 2011

Tutorial - How to make your own printer's tray

I've had a few emails since I posted yesterday's hat-themed printer's tray, asking where I bought it from. The truth is, I made it myself! I took photos throughout the process, so here's a quick tutorial to show how I did it :)

I started out with a bunch of small boxes - the smallest ones I bought at a pound shop, 3 for 49p, the large ones came from Michaels in the US, I forget how much they were but I'm thinking around 50 cents each. I used the lids from 2 large and 6 small for this project. Obviously you can use any size of box, in any arrangement you like.

I used my ATG gun to stick the lids together. Notice that the bottom box was too large so I took a 1/2 inch slice out of it. It doesn't matter if the join is a bit raggy, it won't be seen once it's covered with patterned cardstock.

The small lids were slightly shallower than the large ones, so I added 2 strips of chipboard on the back to even out the height. I then completely covered the back with another sheet of chipboard to make the tray more sturdy.
Notice that I've added a length of wire to hang it on the wall (string would work too if you don't have any wire).

The wire was twisted on the inside and is unseen once the compartments have been lined with patterned cardstock.

Finally, each compartment was lined with patterned cardstock and edged with tissue tape. It's all ready now to be filled with whatever goodies you choose! :) It's also a LOT cheaper than one you'd buy in the shops (I'm sounding like a Blue Peter presenter now LOL) I hope this was useful for some of you - see you tomorrow! :)

Monday, 28 March 2011

If you want to get ahead, get a hat!

The theme over on the Simon Says Stamp and Show Challenge this week is "A Hat". Before starting on this project I thought about hats for quite a while, turning things over in my head, trying to decide what I was going to do. Iconic bowler hat images such as those from A Clockwork Orange and Magritte's paintings came to mind, and were incorporated into this printer's tray, along with a nod towards the Mad Hatter from Alice in Wonderland!

Our ever-generous sponsor Simon Says Stamp is offering a $50 gift voucher as the prize again this week! The winner will be chosen at random from those who enter the challenge, so why not give it a try? At the very least why not head over to the Challenge Blog to see how the other members of the design team have interpreted this weeks theme! :)


Sunday, 27 March 2011

Doing My Bit for the Environment!

So there I was, looking at my desk, thinking "I need to throw away all this mess". There were bits of stamped images, scraps of paper I'd colour washed, a mess of leftover elements from other projects. Instead of throwing them away, I decided to recycle some of them, and this card is the result! I'm quite proud of myself for helping reduce the hole in the ozone layer, in my own small way! :)

I've entered this card into the Sunday Stampers Challenge this week, which is themed "embossing folders" - the stars on the right of my card were cut from card embossed with a Cuttlebug folder.

Saturday, 26 March 2011

Freebie #61!

Fancy-edged Book

[This file is no longer available here - contact me for info on how to get older files]

Believe it or not, if you cut with a page height of 3.5 inches (perfect size for a brag book), all 7 pages will fit onto 1 sheet of 12x12 cardstock! If you use double-sided cardstock you can cut the whole thing from one 12x12 sheet and just turn each alternate page over for a quick, stylish base for making a stunning keepsake gift!

Please remember you are only allowed to download this file for your own use and can not share it or distribute it to others in any form. I spend a great deal of time creating my designs, please respect the terms under which they are shared.

Again, this template will be "live" for 1 week. Next week it will be taken down. Don't forget, if you have any requests, pass them on! I can't promise, but I will take suggestions into account when planning future templates.

These files may not be uploaded to a group, forum or website for sale or redistribution, or shared among individuals. They are expressly for the personal use of each person that downloads them from this blog.

There is 1 file and I have put it into a zip file to make downloading easier. After saving it, open in the usual way, and drag the file out onto your desktop or wherever you wish to save it.

There are 2 versions of each template:
  • An SVG version which can be imported into the Sure Cuts a Lot or Make the Cut program and then cut out on your Cricut.
  • A DXF version which is Craft Robo friendly, and ready to be imported into your Robomaster software (I'm not a Robo user, so if there are any problems with this, please let me know!)
Simply click on the appropriate button below to download the file!

Any feedback on the templates is more than welcome, and if you have any suggestions for possible future templates you'd like to see, please let me know! If you make anything using one of the templates, please post a link to it here so that others can be inspired by how you've used them!

I hope you like the templates - let me know how you get on! :)


Files © dan99crafter@gmail.com 2011

Friday, 25 March 2011

Converse Revisited

Those of you who have followed my blog for a while might feel that you've seen this card before. Well, you have....kinda. I made this card almost exactly a year ago, and a friend just asked me if I'd make one for her, but in green and blue. Always an obliging chap, here's the result! :)

I had made the background paper myself in Inkscape, so it was easy to change the colour from red to green and reprint it. It's matted on black American Crafts linen textured cardstock (basically their version of Bazill) and the shoes are stamped in Memento Tuxedo Black ink then coloured with promarkers.

As ever, click the image for a larger view. See you tomorrow! :)

Thursday, 24 March 2011

A Painted Card

More patterned paper today, though I've almost obliterated it with paint! Costco cardstock, Lost and Found stack, brown and white acrylic paint, Stampotique stamps and a white paint pen.

A simple enough list of ingredients, and one of my favourites of the cards I've been making lately! :)

Wednesday, 23 March 2011

Gingersnap Creations - "Ginger/Copper/Rust" Challenge

"Ginger/Copper/Rust" is the theme over on the Gingersnap Creations blog this week. This also marks my last project for the design team. It's been a fun (though crazy) time, with "life" getting in the way for a while, during which time I had to step down from the team for a spell. I'm so grateful that they were kind enough to give me that time when other priorities took me away from crafting temporarily!

This card has copper stars, a copper tab and brads and rusty colours so I think it qualifies! :)

I want to take this opportunity to wish the team every success for the future and hope that the team members, both new and old, have a great next 6 months! Why not pop over to the GC blog to see how the DT members have interpreted the challenge - go on, you know you want to! :)


Tuesday, 22 March 2011

A Concertina Card Organiser

I decided today to be super-organised and get myself in gear to try, for the first year, to send handmade cards at Christmas! I have never done it before, always copping out and buying them, but this year it will be different! :) Plus, making this organiser has helped with my new resolution to use more patterned paper! :)
Those of you who have followed my blog for a while might remember that I designed this file a year or two ago and all the pieces are cut on the Cricut using the SCAL program. As I have bought a huge box of 5" cards with envelopes, that is the size I will be making, so this box is 5 1/2" wide and 6" or so tall. I reckon I should be able to fit about 30 or so cards with envelopes in it.
Now all I have to do is be self-disciplined enough to actually make the cards! LOL Oh, the ingredients... Top paper is from My Minds Eye Christmas Glittered stack, bottom is from a Costco tote full of double sided cardstock. The picture is from Tim Holtz's Seasonal card stack and the ticket is one of his stamps.

Each time I've made one of these I've used a different method of fastening them shut. This time I've used adhesive magnets. They work well, but are so strong that they were coming off the closure rather than unstick from each other, so I beefed up the adhesive on them with a strip from my ATG gun, and now they work fine! :)

Monday, 21 March 2011

A Word to the Wise

The theme over on the Simon Says Stamp and Show Challenge this week is "A Word". For this dream-y card I started by covering my card base with randomly placed pieces of torn tissue tape, which was then covered with espresso and red pepper paint dabbers applied with kitchen paper. The butterfly from Tim Holtz's Spring Sprung stamp set was stamped on the painted background with Memento Tuxedo Black ink, then over-painted with white paint dabber applied with an artist's paintbrush, coloured with marker pens and restamped. The piece was edged with Walnut Stain distress ink. The letters are cut from the Lost and Found card stack and covered with glossy accents for extra shine. Finally, the mat was cut from the Retro Grunge card stack.

Our ever-generous sponsor Simon Says Stamp is offering a $50 gift voucher as the prize again this week! The winner will be chosen at random from those who enter the challenge, so why not give it a try? At the very least why not head over to the Challenge Blog to see how the other members of the design team have interpreted this weeks theme! :)


Sunday, 20 March 2011

Freebie #60!

Diorama Card

[As always, these files were only available for 1 week from this blog and have now been removed. Contact me for details of how to access older files]

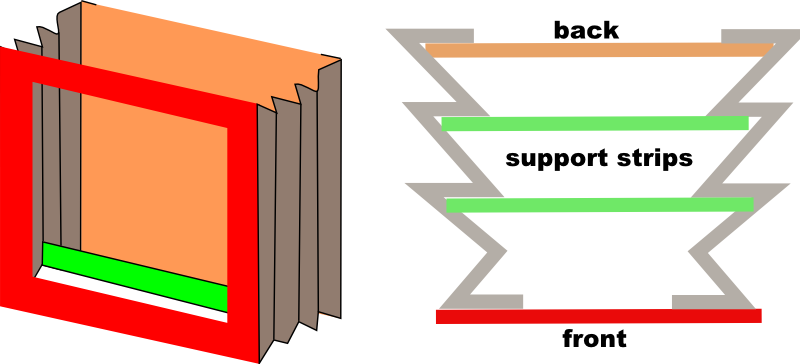
After posting the diorama card I showed here, I have received several emails asking for copies of the file, so I thought I would give it away as a freebie tonight. Below is a diagram showing how the card goes together. The support strips are used to attach elements at different levels within the card. The great thing about this card is that it also will squash flat for putting in an envelope! Remember to decorate the front and back before you assemble the card.

The file contains elements for the front, back, sides and support strips, which all fit onto a 12x12 sheet of card, to produce a 5x5 card. If you want a larger card, just cut out a larger front, back and strips, and cut the sides on your paper trimmer (they should be 4" x the height of your card).
Please remember you are only allowed to download this file for your own use and can not share it or distribute it to others in any form. I spend a great deal of time creating my designs, please respect the terms under which they are shared.

Again, this template will be "live" for 1 week. Next week it will be taken down. Don't forget, if you have any requests, pass them on! I can't promise, but I will take suggestions into account when planning future templates.

These files may not be uploaded to a group, forum or website for sale or redistribution, or shared among individuals. They are expressly for the personal use of each person that downloads them from this blog.

There is 1 file and I have put it into a zip file to make downloading easier. After saving it, open in the usual way, and drag the file out onto your desktop or wherever you wish to save it.

There are 2 versions of each template:
  • An SVG version which can be imported into the Sure Cuts a Lot or Make the Cut program and then cut out on your Cricut.
  • A DXF version which is Craft Robo friendly, and ready to be imported into your Robomaster software (I'm not a Robo user, so if there are any problems with this, please let me know!)
Simply click on the appropriate button below to download the file!

Any feedback on the templates is more than welcome, and if you have any suggestions for possible future templates you'd like to see, please let me know! If you make anything using one of the templates, please post a link to it here so that others can be inspired by how you've used them!

I hope you like the templates - let me know how you get on! :)


Files © dan99crafter@gmail.com 2011
Saturday, 19 March 2011

Not Quite as White as it's Painted!

This is the first time in a while I've used the painted mask technique. At least, that's what *I* call it! To be honest, I haven't seen anyone else doing it, so maybe I'm the only one. Or perhaps everyone else thinks it's rubbish so I'm left here on my own, deluded, LOL You can see an earlier (and more ambitious) attempt at this technique here.

This card uses another square of yesterday's patterned paper (hey, two 4 1/2 inch squares in two days, I'll work my way through my paper mountain in no time at this rate! NOT! lol). I stamped the globe and when it had dried I painted over it with white acrylic paint and sanded it slightly to give a smoother surface, before stamping again over the top. It makes the image appear to be part of the design of the paper, because you can slightly see some of the stripes through it. Well, that's how it appears to me, anyway :)

2 more offcuts of patterned paper, some coffee stain images and a text passage, all Tim Holtz stamps by Stampers Anonymous. That's about all there is to it, see you again tomorrow! :)

Friday, 18 March 2011

This is a Declaration of War!

This simple card is not imposing in it's own right, it's what it represents, dear reader, that is the important thing! Today I am formally declaring all-out war against the stacks and stacks of 12x12 paper that I have that I never use!

The sheet I have used in the background is from a My Mind's Eye christmas pad I have, and some of the stripes are faintly glittered. It was sitting there, to be honest, looking at me in a slightly arrogant way, thinking it was safe at least until late November. Let me tell you, when I cut into it, it didn't know what had hit it! (insert maniacal laugh here)

This is only the start, the tyrannical rule of the 12x12s over my craft room is coming to an end! :)

Thursday, 17 March 2011

What? No Stamping?!?!?

I'm almost embarrassed to post this here! lol It's a wooden box I've been saving to keep some stationery in, and I decided to cover it with paper from Tim Holtz's Lost and Found card stack. I took the closure off the front first and then...um... stuck paper to it and put the closure back. The top was cut slightly smaller and edged with tissue tape. So simple, but I think it looks really great, so here it is! :)

Wednesday, 16 March 2011

All Work and No Play...

This was one of those times I like the best, when I just sit down at my desk and start to play with no clear idea in mind of what I'm aiming for :) It doesn't always make for the best results, but it's a lot of fun!

The tag background was brown and red acrylic paint applied with a baby wipe in broad strokes. I deliberately chose to use stamps that don't get as much of an airing as some others, so it was fun to get to know them again. All stamping was with a Memento Tuxedo Black ink pad, and colouring courtesy of Promarkers, a white paint pen and Walnut Stain Distress Ink. The photo came from Tim Holtz's Lost and Found card stack, and was torn, sanded and scratched before being fixed in place with a screw-topped brad.

As ever, click on the image for a better view! :)

Tuesday, 15 March 2011

Do or Diorama!

This is my first attempt at a diorama card, and I had a lot of fun making it, with a few small headaches on the way, lol Basically it's a flat back and a window front, with concertina'd sides that allow you to fix different elements at different levels inside the card. I made a file for the whole thing and cut it on my Cricut, along with the "dream" letters, the house and the birds.

Apart from that it was basically memento, distress ink and promarker wizardry (well, as close as I can get to wizardry anyway! lol)

Monday, 14 March 2011

It's Written in the Stars!

The theme over on the Simon Says Stamp and Show Challenge this week is "Stars". This is actually the 2nd piece I've made for this theme - I didn't like the first one so I scrapped it and went back to square one!

I lightly "limed" the wood frame by painting it white and then sanding most of the paint off. I covered the box with a sheet from Tim Holtz's Retro Grunge card stack and trimmed the edges with tissue tape. The panels were coloured with paint dabbers applied with a wet wipe to spread the colour out more and give a lined effect. The edges of each panel were distressed with Walnut Stain Distress Ink. Stamp sets used included Bitty Grunge, Winged Things II, Regal Findings, and Steampunk, all by Tim Holtz@Stampers Anonymous.

Our ever-generous sponsor Simon Says Stamp is offering a $50 gift voucher as the prize again this week! The winner will be chosen at random from those who enter the challenge, so why not give it a try? At the very least why not head over to the Challenge Blog to see how the other members of the design team have interpreted this weeks theme! :)


Sunday, 13 March 2011

Freebie #59!

Gothic Arch Cards

[As always, my files are only free here for 1 week, so this set is no longer available from my blog. Contact me for details of how to access expired file sets.]

It's been a while since my last one, so it's great to be able to offer you another free cutting file this week! This set came about when someone emailed me asking if I had a file for a gothic arch greetings card. I didn't, so I set about creating one!

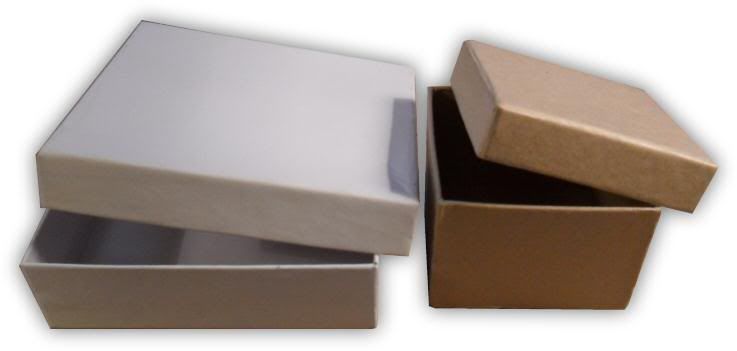
The photo is rubbish, I know, but it shows that they cut just fine and hopefully you get the general idea of what's included in the file! There are 4 designs of card in the file along with additional panels you can use for extra layers on the front if you wish. All designs are in one file, so after you've unzipped it and imported it into your software you can choose which you want to cut and hide or delete the others to use another time.

Please remember you are only allowed to download this file for your own use and can not share it or distribute it to others in any form. I spend a great deal of time creating my designs, please respect the terms under which they are shared.

Again, this template will be "live" for 1 week. Next week it will be taken down. Don't forget, if you have any requests, pass them on! I can't promise, but I will take suggestions into account when planning future templates.

These files may not be uploaded to a group, forum or website for sale or redistribution, or shared among individuals. They are expressly for the personal use of each person that downloads them from this blog.

There is 1 file and I have put it into a zip file to make downloading easier. After saving it, open in the usual way, and drag the file out onto your desktop or wherever you wish to save it.

There are 2 versions of each template:
  • An SVG version which can be imported into the Sure Cuts a Lot or Make the Cut program and then cut out on your Cricut.
  • A DXF version which is Craft Robo friendly, and ready to be imported into your Robomaster software (I'm not a Robo user, so if there are any problems with this, please let me know!)
Simply click on the appropriate button below to download the file!

Any feedback on the templates is more than welcome, and if you have any suggestions for possible future templates you'd like to see, please let me know! If you make anything using one of the templates, please post a link to it here so that others can be inspired by how you've used them!

I hope you like the templates - let me know how you get on! :)

Files © dan99crafter@gmail.com 2011
Saturday, 12 March 2011

He's the King of the castle!

As you can probably tell by now, I'm still not tired of doing these 5x5 cards :) I think this one is probably my favourite of the 3 so far.

There was a lot involved with this one, I'll try and summarise just the basic points! Background was misted with weak Meadow Color Wash solution, then drips of full strength Meadow added. 1/2 of background was covered with coloured tickets paper from the Lost & Found card stack. Strip of tissue tape added across the top. "KINGS" was cut from Lost & Found and placed on card. Clock was stamped and cut out then applied to bottom of card and trimmed. Trimmed clock piece added to top right of card. Game spinner and brad added. Boy stamped, cut out, coloured and fixed in place. Stripes stamped and cut out in crown shape, red metallic brads added, then fixed to boy's head. Arm (a leftover from another project) fixed in place. Pale grey promarker border added to key elements. Matted onto square of ticket paper from L&F, then stuck onto blank card.

Phew! I think I've included all the salient points! :)

Friday, 11 March 2011

The Red Shoes

Not only the title of this card, but also a great classic British movie and a fantastic album by the amazing Kate Bush! :) In both of those cases, the red shoes are ballet shoes of course, not a battered pair of Converse sneakers! I doubt that they make ballet shoes to fit my canoe-sized feet and I wear Converse Chuck Taylors ALL THE TIME, so it was always obvious which way I was gonna go with this :)

All of the stamps are from Tim Holtz@Stampers Anonymous (except for the sneakers, which is my favourite stamp and seems not to be available any longer If it was I'd buy a second so I always had a spare, lol).

There's nothing specially out of the ordinary technique-wise here, apart from the red background which was acrylic paint applied with a moist wipe, and the orange which was 2 squirts of sunset orange in a full mini-mister of water to give a softer (and more economical) spray of colour.

I'm really enjoying card-making at the moment, expect more soon! :)

Thursday, 10 March 2011
It's rude to point!

A few weeks ago, while on an outing to York for the day, I bought a box of 5"x5" square cards and envelopes and have been itching to have a go at one ever since! I also got a few of Tim Holtz's new stamp sets a day or two ago, and this card includes some of the images from the "Steampunk" set. The house was inspired by some I saw on the Paperbag Studios blog (though I think theirs may be stamps and mine was hand drawn).

During the Tim Holtz class I took a couple of weeks ago, he gave us a dictionary page to use as we wished. I didn't use mine on the configurations box project, so made use of it on this card. I stuck it to white card and cut out a square for the main panel, a smaller one for the house and a triangle for the roof.

I distressed the main panel with Walnut Stain DI around the edges and stamped some splatters from the "Bitty Grunge" stamp set in Brushed Corduroy DI. I blended Rusty Hinge DI on the roof and Fired Brick on the house. Using a black pen and a white pen I drew freehand lines around the roof, window and house and then used a red and an orange promarker to make the edges a little more punchy.

The doors were white card, embossed with large dots in the cuttlebug then sprayed with Red Pepper Color Wash spray. I cut a "T" with scissors in the panel then folded the doors back, drawing panels on them with a white pen. I then used PVA glue to fix the doors to the house. The Steampunk man was stamped in Walnut Stain DI and cut out then glued in the doorway.

The hands were stamped and coloured with promarkers then cut out. I placed a strip of tissue tape down the right side of the main panel and then the house, roof and hands were fixed to the background and edged with grey promarker. Finally I cut a mat from some patterned cardstock and coloured the edge using the same brown promarker as I had used on the sleeves, to tie the whole thing together, colourwise. I glued mat to card and main panel to mat and Bob's yer uncle! :) I had a lot of fun making this, I think I need to go out and find an old dictionary somewhere so I can do more! :)

I've entered this in this week's Theme Thursday challenge, which is "hats".

Wednesday, 9 March 2011

Gingersnap Creations - "Office Supplies" Challenge

"Office Supplies" is the theme over on the Gingersnap Creations blog this week. After completing the configurations box that I blogged here I had 3 of the small boxes left, which I thought would be perfect for this project.

I started by joining the 3 boxes together with my ATG gun, then covered them with paper from the Tim Holtz "Crowded Attic" card stack, finishing off the edges with Tissue Tape. I pierced 4 holes in the bottom and inserted large chrome brads to act as feet. I added 2 metal handles to the front and filled the compartments with office supplies (of course!). The tickets were from the "Lost & Found" card stack and the vintage eyeglasse came from the Artistic Stamper. Click one of the images for a larger view.

Pop over to the GC blog to see how the other DT members have interpreted the challenge - go on, you know you want to! :)

Tuesday, 8 March 2011

Moi? Je ne suis pas branché!

Which is to say "Me? I'm not trendy!", and believe me, I'm not! LOL (A fact that I'm sure can be vouched for by those who know me!) But I did think this guy from one of the PaperArtsy Urban Snapshot plates is kinda cool looking, hence the "branché" on the tag.

I sat down to start work on this with absolutely no idea in my head as to what I was going to do, other than start out by spraying colour onto a blank tag. I tipped a load of metal stencil letters onto my desk to see what I could spell with them and the word "branché" just jumped out at me, which tied in nicely with the choice of stamp for the main figure :) I've also been listening to a bit of french music in the last couple of days so I'm sure there's a residual influence there too!

I sprayed the tag with Cranberry and Stream Color Wash sprays and then laid down some of the stencil letters and sprayed again with Sunset Orange. The top panel is a leftover piece from a sheet from the Tim Holtz "Crowded Attic" card stack. The guy was stamped seperately and cut out then fixed in place and coloured with Promarkers. I used the stencils with a white pen to spell out the word, and then doodled a bit with black and white pens. I stamped the star, cut it out and fixed it in place, then finally edged the whole tag with some Walnut Stain distress ink.

As ever, click the image for a better view! :)

Monday, 7 March 2011

It Ain't Heavy Metal!

The theme over on the Simon Says Stamp and Show Challenge this week is "Metal", so when I started making a frame for last week's piece I decided to encrust it with metal embellishments to fit with this week's theme!

I painted the frame with a mixture of Red Pepper and Espresso paint dabber and sanded it to give a smooth surface and to distress the edges. After that, it was simply a case of raiding my embellishment boxes! All items were fixed in place with Claudine Hellmuth's Matte Multi Medium.

Our ever-generous sponsor Simon Says Stamp is offering a $50 gift voucher as the prize again this week! The winner will be chosen at random from those who enter the challenge, so why not give it a try? At the very least why not head over to the Challenge Blog to see how the other members of the design team have interpreted this weeks theme! :)


Sunday, 6 March 2011

Doing what comes nature-ally!

The theme set by my friend Hels over on the Sunday Stamper today is "Nature". I thought this frame, decorated with variagated leaves fitted nicely with the theme, so, um, here it is :)

I painted the wood frame with white acrylic paint dabber, then sanded it to give an even, "limed" look. The leaves were stamped with tuxedo black memento ink, then coloured with a variety of green promarker shades. I didn't want to post the frame here with nothing in it, so I filled it with an image cut from Tim Holtz's new "Crowded Attic" card stack.

As ever, click on the image for a better view! :)

Saturday, 5 March 2011

Tim Holtz Class Project

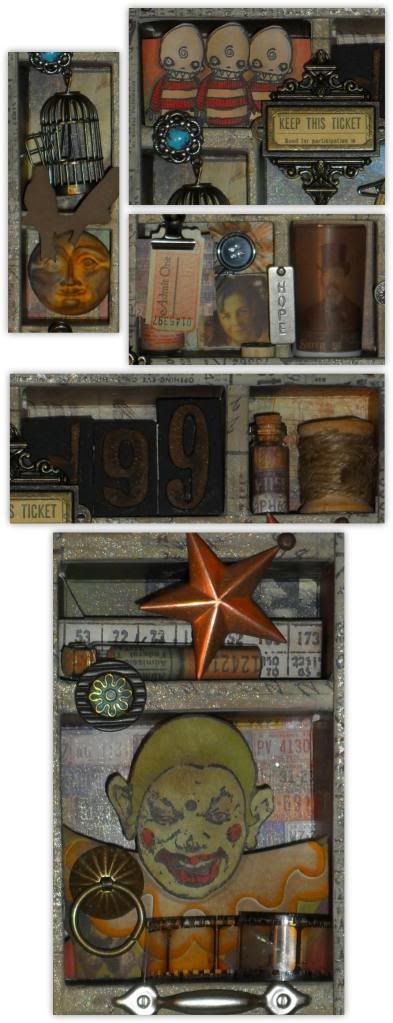
As I mentioned here a couple of days ago, I was lucky enough to take a class with Tim Holtz a week or so ago. I've finally finished off the project I started in class, one of his "Configurations" boxes. It hasn't photographed that well, but I'm really pleased with how it turned out! I have 4 more of these waiting to be started, so you'll be seeing more of them in due course! :)

As ever, click either of the images to get a better view!

Friday, 4 March 2011

Something Just for Me!

It suddenly occurred to me tonight that every single time I've made one of these framed moo pieces I've given it away to someone else. Since I still have a lot of empty wall space to fill, I thought it was time to redress the balance a little, so this is one is all for yours truly! :)

Made from bits and bobs of things I had left lying around so if you look carefully you might recognise parts of things you've seen here before! :) As ever, click on the pic for a better view!

Thursday, 3 March 2011

Oops, I nearly forgot!

A week or two ago I "upcycled" some of my recently made tags into a framed gift for a friend and then proceeded to completely forget to blog it! The windowed moo central panel and the mount that surrounds it were designed in Inkscape and cut on the Cricut using the Sure Cuts a Lot program.

As ever, click on the image for a beter view! :)

Tuesday, 1 March 2011

ArtsyCrafts Workshops, Part 1

As some of may know (because you saw me there - or heard me, I seem to be recognised by my voice a lot!) I went on the ArtsyCrafts Workshop last week. This was a 2.5 hours class with the awesome Lin and Leandra and a 4 hour class with Tim Holtz himself!

Needless to say, a wonderful time was had by one and all - many, many thanks to all involved for their tireless hard work and preparation for this great event! I'll show the Tim Holtz project in part 2 (I've got a few finishing touches to add to it), but shown above is the project we made in the class with Lin and Leandra. Great fun to make and I got to use some cool new products - PaperArtsy's new range of chalk acrylic paint, metallic "goop" and metal card among them. They even gave me a "boy" alternate to use instead of the dangling pearl embellishment it featured (nice, but not really my "thing" lol)! I have to say, I think it's one of the nicest things I've ever made in a class!