I received an email today asking how to remove gaps left in pages when making wordbooks in SCAL (such as those you might get with a letter A or C). This led on to a general investigation of how to edit paths in SCAL. It was much easier to make a quick video rather than type a lengthy explanation, so here it is! I hope some of you find it useful :) If you want a clearer view, there's a full screen button in the toolbar below the video.

Showing posts with label video. Show all posts
Showing posts with label video. Show all posts
Monday, 29 March 2010
Wednesday, 22 July 2009
Video Tutorial - Sure Cuts a Lot 2 First Look
Craft Edge released a comprehensive new version of their Sure Cuts a Lot software today. Those who visit my blog regularly will know what a huge fan I am of this program. It opens up whole new creative ways to use your Cricut, allowing you to use any of the TrueType fonts on your PC to cut words and titles, as well as designs you make yourself or download from the internet.
Among the new features are multiple selections and groupings, support for multiple layers and pages, vertical typing, customizable workspace arrangement and a quick and easy Autotrace function.
I haven't had too much time to play, so there may be more things that I haven't discovered yet, but one thing I am sure of, I LOVE IT! :)
Edit: I can't, in all conscious, leave this post to stand in it's original form. After some time using SCAL 2, it seems there are quite a few bugs in it. Hopefully Craft Edge release an update soon to fix some of the problems with it! (I will still love it once that's done!)
Breaking news: I've heard that Craft Edge hope to have an update available in the next couple of days or so :)
I would recommend watching the full screen version of this video, you won't see a lot of the detail in a smaller window! As it's a large file, if you play it and it stops part way through, it just means it hasn't fully downloaded to your computer yet, so be patient :)
To see a full screen version, click here.
Friday, 22 May 2009
Video Tutorial - Alpha and Opacity in Inkscape
Someone messaged me asking for help with an Inkscape problem they were having. They were trying to draw squares using the rectangle tool, but it wasn't working. I got them to send me their file to take a look at, and this video uses their problem as a means of examining the alpha and opacity properties of objects created in Inkscape.
I hope you find it useful! :)
To see a full screen version, click here.
I hope you find it useful! :)
To see a full screen version, click here.
Thursday, 30 April 2009
Video Tutorial - Creating a Mother's Day Card in Inkscape
Someone on one of the Cricut groups I belong to asked for some help in making an SVG design she had into a Mother's Day Card. Upon looking at the file I realised there were a few issues with it that might not make it perfect for using in that way.
I created this video for her to show how to alter the file so that it would make a better card, and I include the SVG of the end result here. The original file came from someone else's blog so I can't distribute it here unfortunately, but if you want to mess around trying some of the things I demonstrate, you can use the file I've included on this page!
I hope you find it useful! :)
To see a full screen version, click here.
If you'd like a copy of the file that I produced at the end, you can get it by right clicking and saving here.
Tuesday, 20 January 2009
Video Tutorial - Creating Paper Piecing Files from a Coloured Image using Inkscape software (free from inkscape.org)
Someone asked me for hints on how to do that, and I thought that making a video would the quickets and clearest way to do that!
This will work for both the Cricut with SCAL and the Craft Robo (and related machines). Just remember that Inkscape saves as SVG by default, so if you're a Robo user, remember that when you save your files, you'll need to choose "Save As..." and then select DXF as your file type from the drop down list at the bottom of the save menu.
I hope you find it useful! :)
Sunday, 18 January 2009
Video Tutorial - JPG to SVG
I know there are several tutorials already out there on how to do this, but since someone asked me to do it, I thought I may as well give my take on it!
Although I use Paint Shop Pro in this video to get my image ready for tracing, all graphics packages these days have similar tools, so you shouldn't have too much trouble adapting it to your own program. It also demonstrates the basics of tracing an image in Inkscape. I hope you find it useful :)
I talk of saving the file as an SVG and cutting it on the Cricut in Sure Cuts a Lot, but obviously, you could also save it as a DXF file and cut it on the Craft Robo or related machines.
Thursday, 15 January 2009
Video Tutorial - Aperture Name Card in Inkscape

Following a couple of email requests, I decided to make a video showing how to make one of these cards in Inkscape. Soon after, someone else in one of the Cricut groups made a video on the same topic (great job Heidi!), so I changed my plans slightly. I'm still making the card, but I've included some stuff on how to use rulers and guides and a couple of methods to manipulate text so that the letters join up to make a continuous word.
Tuesday, 13 January 2009
Video Tutorial - Setting Inkscape's Default Page Properties
When I was making last night's video, I thought to myself "maybe some people will wonder how Inkscape always starts up with a 12x12 page on my computer" and thought I might do a short video on how to set that up. Then today, someone asked about that very thing, so I knew it was a good idea! :)
UPDATE April 2015
I received a comment on this post today, saying that this technique no longer works on Inkscape v. 0.91 (the current latest version at time of writing). I have stuck with version 0.48 ever since I installed it so I thought I'd better install the new version and check it out for myself! I installed v. 0.91 and the process for setting up the default page size to 12", as shown in the video below, still works just fine as far as I can see, it's worked for me anyway.
Monday, 12 January 2009
Video Tutorial - Creating Word Books in Inkscape
Following several questions in various groups I belong to, I've decided to make this video. There are several ways of making word books like these, so I stress that this is my way of doing it, others may do it differently! :) Although I mention Sure Cuts a Lot frequently during the video, obviously you could save your files as DXF and use them to cut on the Craft Robo or related machines.
If you want to see a full screen version of this, click here.
It was a *really* tight squeeze fitting this into the 10 minute limit, so I had to remove the title page and opening introductory comments, so forgive me for that! :)
If you want to see a full screen version of this, click here.
It was a *really* tight squeeze fitting this into the 10 minute limit, so I had to remove the title page and opening introductory comments, so forgive me for that! :)
Wednesday, 10 December 2008
Video Tutorial - Removing Parts of an SVG Image
In one of the online groups I belong to (SureCutsALotUsers) there has recently been some discussion about ways to remove parts of an SVG image using the Inkscape program. I decided to make this short video to demonstrate a couple of the methods I use.
I hope you find it helpful!
I hope you find it helpful!
Tuesday, 9 December 2008
Video Tutorial - Sizing my Moo Frame in SCAL
A few people have sent me questions about how to correctly size this file in SCAL. I used 8.5x11 cardstock and cut the file at 8x10 inches with no problem.
I've created a quick video to demonstrate the process. I know that when I host my videos in Photobucket, some of you can't see them. The quality of the video is so much better that I am continuing with that, but I have also included a Google Video version for those who may have problems! If you can see both, notice the quality difference - Google Video is fuzzy by comparison! You can see why I prefer to use Photobucket for my videos! :)
Photobucket Video
Google Video
Monday, 17 November 2008
Video Tutorial - Santa Ornament Card!
I've had a few email requests asking questions about exactly how I made the card I posted here yesterday, so I've made a video tutorial for it. It's a bit rough and ready, 'cos I did it in a hurry, but hopefully you'll get the general idea!
What you need:
Distress Ink pads in Fired Brick, Broken China and Faded Jeans
Versamark ink pad
Black waterproof ink pad (Archival, Staz-on or Versafine)
Santa rubber stamp (I used the "A letter to Santa" set by Stampers Anonymous)
Paint-splatter stamp (or you could use a snowflakes stamp)
An ink blending tool and foam pads
An ornament-shaped or round card blank
Post-it notes
Scrap paper
Water brush (or regular artist's brush and water)
Green watercolour pens
Red Stickles glitter glue
White embossing powder
Heat tool
Non-stick craft mat
A dry artist's paintbrush
Thursday, 13 November 2008
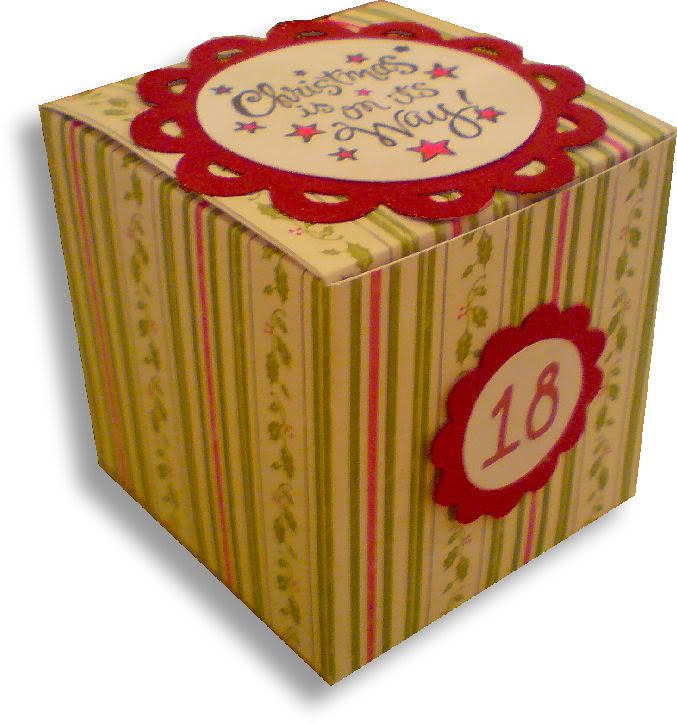
Advent/Gift Box Freebie!
 [Edit - These files are no longer available from this site. Email me for details on how to access earlier files.]
I can hear you! Yes... you... I can hear what you're thinking just as if you were saying it out loud... "Oh no, not another advent idea!". :) What can I tell you? Roll on December 1st, then I can stop thinking about this stuff!!
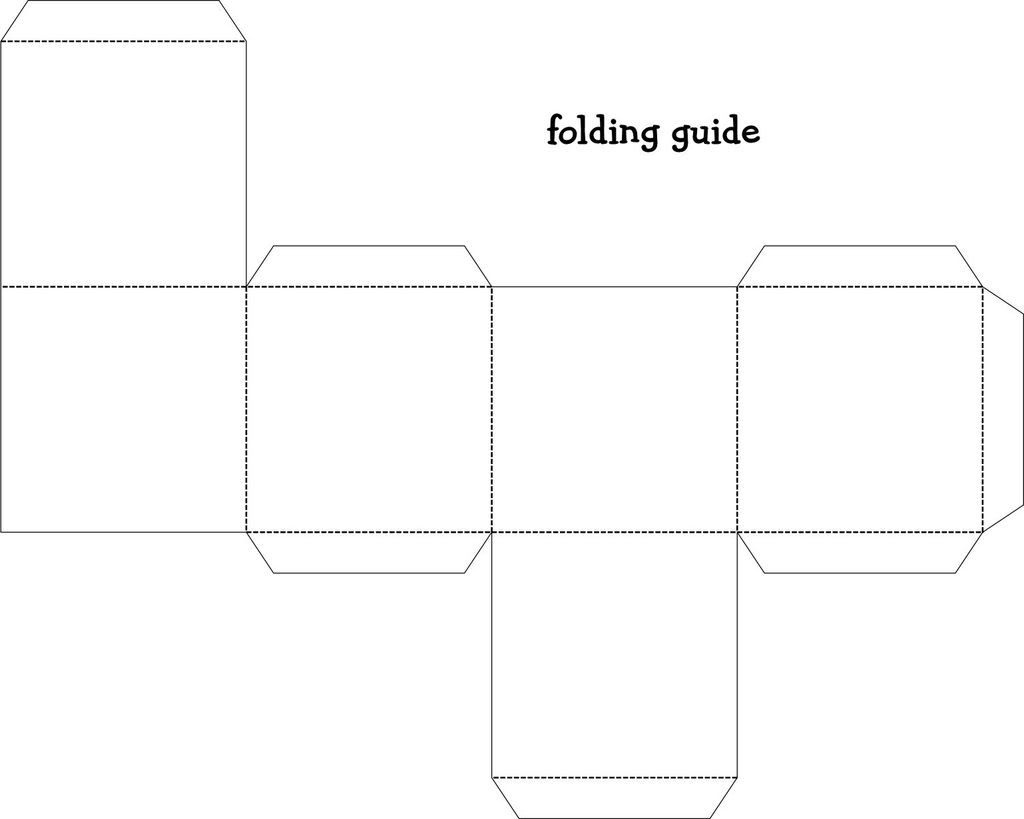
This idea was actually prompted by an email I received, asking if I knew of a box template that you could cut on the Cricut that would make a box with 10cm sides (approx. 4 inches). Conventional box templates have a row of 4 sides together, with a tab at the end, and so can be cut no larger than around 2 3/4 inches per side on a 12" mat.
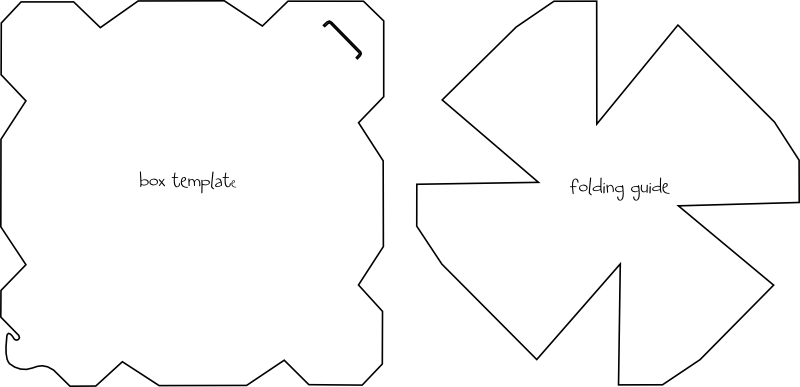
So, I came up with 2 designs: A conventional box template (which doesn't solve the problem but is always good to have) and a large box template, which will allow you to cut a box up to around 5 inches or so in size.
These work great in a small size as advent boxes that can be hung from the tree or arranged in a bowl. They're faster to make than the takeout boxes I showed earlier, and unlike the sour cream container there's no need to rip them to open them, so they can be packed away again and used next year!
Here is the folding guide for the conventional box template:
The large box template requires you to cut 2 pieces. If you are using double sided cardstock, remember to flip one of them, otherwise you will have a box with two different patterns on it!. I've included a video at the end of this post with a reminder on how to flip a shape in SCAL before cutting it. Cutting each piece as large as possible from 2 sheets of 12x12 cardstock will give a box of sides just over 5 inches in length.
Here is the construction and folding guide for the large box template:

Again, these templates will be "live" for 1 week. Next Saturday, they will be taken down, and new ones will replace them. Don't forget, if you have any requests, pass them on! I can't promise, but I will take suggestions into account when planning future templates.
These files may not be uploaded to a group, forum or website for sale or redistribution, or shared among individuals. They are expressly for the personal use of each person that downloads them from this blog.
There are 2 files this time, so I have put it into a zip file to make downloading easier. After saving it, open in the usual way, and drag the template out onto your desktop or wherever you wish to save them.
There are 3 versions of each template:
- A printable version (PNG files) that you can import into a program like Word, then resize, print, cut out and use like any other paper template (these are NOT Word files, so don't use File/Open in Word! Use Insert/Picture to bring them into a Word document).
- An SVG version which can be imported into the Sure Cuts a Lot program and then cut out on your Cricut.
- A DXF version which is Craft Robo friendly, and ready to be imported into your Robomaster software (I'm not a Robo user, so if there are any problems with this, please let me know!)
Any feedback on the templates is more than welcome, and if you have any suggestions for possible future templates you'd like to see, please let me know! If you make anything using one of the templates, please post a link to it here so that others can be inspired by how you've used them!
I hope you like the templates - let me know how you get on! :)
Templates © dan99crafter@gmail.com 2008
Monday, 3 November 2008
Video Tutorial - Advent Sour Cream Container

Let's start by getting one thing straight, I'm not claiming to have invented these! Originally I thought they'd started out on Split Coast Stampers, but after googling it, they're all over the place! One thing I haven't seen is a video on how to make them, so I thought I'd give it a shot!
These are really simple to make and look wonderful hanging on the tree or piled up in a big bowl, ready for the morning scramble to find the next package to open!
I use circles and scalloped circles on these that I have cut on my Cricut with SCAL. Hopefully many of you downloaded the scalloped shapes when they were a freebie on my blog. If you have the scalloped Nestabilities dies, you could use those instead! These are really fun to make, so why not try 'em? Enjoy!
Sunday, 2 November 2008
Video Tutorial - Basic Inkscape Tools
 In this tutorial, I show how to create a simple holly wreath in Inkscape which can then be saved as an SVG or DXF file, for cutting on your Cricut or Craft Robo. Hopefully you'll see that the techniques I use can be adapted to create any shape you like!
I don't claim to be an Inkscape expert by any means, but hopefully, if you're new to the program, you will see how shapes can be created simply just from a collection of straight lines and a little tweaking! After cutting the wreath shown here, I added "berries" created from red card with a hole punch!
[Edit - Thanks for your question Carolyn, I should have mentioned that in the video! Yes, when you're finished if you save, it will save as an SVG by default. If you want to save a DXF for cutting on the Craft Robo, choose Save As and select DXF from the filetype list at the bottom of the save window.]
Wednesday, 29 October 2008
Video Tutorial - Alcohol Inks 101, Part 2
 Part 2 of the video on Alcohol Inks, with 3 more techniques for you. The two small tags at the front of the picture above were created using the Dragging Technique from this video.
I suddenly remembered while typing this post that I'd made an ATC a long while back that uses two of these techniques - Tortoiseshell acetate and colouring embellishments! Here it is:
Tuesday, 28 October 2008
Video Tutorial - Alcohol Inks 101, Part 1
 I've had a few email requests to make a video about alcohol inks, and ever one to be helpful where I can, here it is! The video turned out pretty long, so I've split it into two parts, part 2 follows tomorrow!
Friday, 24 October 2008
Saturday Freebie #21 with Video Tutorial!!
Takeout Box!
 [Edit - these files are no longer available from this site. Email me for details on how to access previous weeks files]
It's Saturday again, and that can only mean one thing - it's time for some new, original, FREE shapes for you to download!!
These takeout boxes are perfect for small gifts for any occasion! They're great for wedding favors, trick-or-treat candies or even a fun advent calendar like the one I showed yesterday! Hang them from the tree with ribbons for an extra festive touch! I have also included a video tutorial on how to cut the box and guide using SCAL and how to fold it.
 Included below is a video tutorial on how to cut and fold the box. If you're a Cricut owner who is new to SCAL, take a look at it, it gives you some idea how SCAL can expand the range of things your Cricut will do! If you find the video a little fuzzy, you can view a full-screen version here.
Again, these templates will be "live" for 1 week. Next Saturday, they will be taken down, and new ones will replace them. Don't forget, if you have any requests, pass them on! I can't promise, but I will take suggestions into account when planning future templates.
These files may not be uploaded to a group, forum or website for sale or redistribution, or shared among individuals. They are expressly for the personal use of each person that downloads them from this blog.
There is only 1 file this week, but I have put it into a zip file to make downloading easier. After saving it, open in the usual way, and drag the template out onto your desktop or wherever you wish to save them.
There are 3 versions of each template:
Any feedback on the templates is more than welcome, and if you have any suggestions for possible future templates you'd like to see, please let me know! If you make anything using one of the templates, please post a link to it here so that others can be inspired by how you've used them!
I hope you like the templates - let me know how you get on! :)
[Edit - these files are no longer available from this site. Email me for details on how to access previous weeks files]It's Saturday again, and that can only mean one thing - it's time for some new, original, FREE shapes for you to download!!
These takeout boxes are perfect for small gifts for any occasion! They're great for wedding favors, trick-or-treat candies or even a fun advent calendar like the one I showed yesterday! Hang them from the tree with ribbons for an extra festive touch! I have also included a video tutorial on how to cut the box and guide using SCAL and how to fold it.
Use the folding guide to locate the 4 pierce(or mark) points to mark the base of the box. Once these points have been accurately marked, follow the fold chart below (outside of box is facing up):
Included below is a video tutorial on how to cut and fold the box. If you're a Cricut owner who is new to SCAL, take a look at it, it gives you some idea how SCAL can expand the range of things your Cricut will do! If you find the video a little fuzzy, you can view a full-screen version here.These files may not be uploaded to a group, forum or website for sale or redistribution, or shared among individuals. They are expressly for the personal use of each person that downloads them from this blog.
There is only 1 file this week, but I have put it into a zip file to make downloading easier. After saving it, open in the usual way, and drag the template out onto your desktop or wherever you wish to save them.
There are 3 versions of each template:
- A printable version (PNG files) that you can import into a program like Word, then resize, print, cut out and use like any other paper template (these are NOT Word files, so don't use File/Open in Word! Use Insert/Picture to bring them into a Word document).
- An SVG version which can be imported into the Sure Cuts a Lot program and then cut out on your Cricut.
- A DXF version which is Craft Robo friendly, and ready to be imported into your Robomaster software (I'm not a Robo user, so if there are any problems with this, please let me know!)
Any feedback on the templates is more than welcome, and if you have any suggestions for possible future templates you'd like to see, please let me know! If you make anything using one of the templates, please post a link to it here so that others can be inspired by how you've used them!
I hope you like the templates - let me know how you get on! :)
Templates © dan99crafter@gmail.com 2008
Thursday, 2 October 2008
Video Tutorial Part 2 - Bind-it-all Basics
 Here is part two of the video tutorial, this time covering the basics of binding projects using the Bind-it-All, and in particular, a simple method to punch projects that require more than 6 holes!
I have also included links at the bottom of this post to printable step-by-step guides for binding your projects, which you can refer to while you work. Simply click on the size you require, A4 or US Letter (8.5x11)
Win a notepad! [NOW CLOSED]
If you'd like your name in the draw to win one of the samples I created during the filming of this video, leave a comment on this post. I will select winners at random in a few days time. Good Luck!! :)
Hopefully you should find these instructions easy to follow. Let me know how you get on!
A4 Printable Step-by-step guide
US Letter Printable Step-by-step guide
Tuesday, 30 September 2008
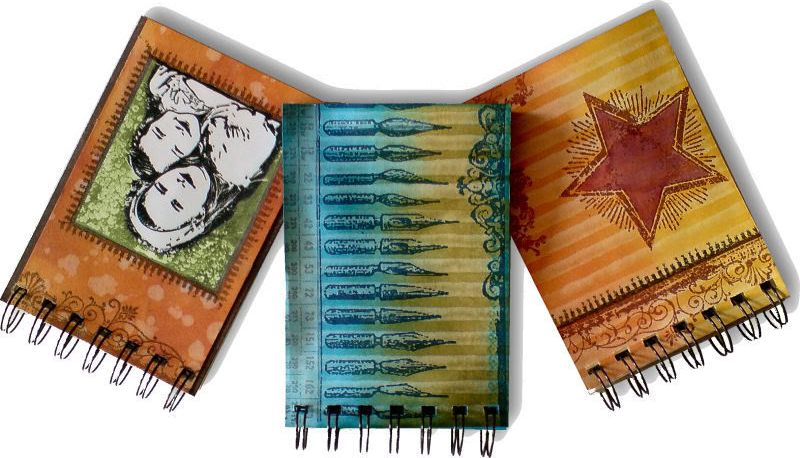
Video Tutorial - Blurred Focus and Water Stamping Techniques
In this 2-part tutorial, I will be showing you how to make cool wire-bound notepads like the ones shown above - perfect as stocking stuffers or teacher gifts!In part 1, we'll look at 2 interesting stamping techniques, one using water instead of ink, and one using a single inkpad for a tone-on-tone effect (you can use different colours too, like I did with the image of the two girls above).
In part 2 (tomorrow) we'll focus on the basics of binding projects with the Bind-it-all machine, including a fool-proof method of easily positioning your holes on projects longer than 3 inches! I know from the emails I've received in the past that many of you are intimidated by binding with more than 6 holes, as you're concerned about knowing where to punch the holes correctly. Hopefully that problem will be a thing of the past! There will also be a chance to win one of the samples I made during the video!!
If you're not familiar with techniques of blending distress inks, start by checking out my earlier tutorial here!
Subscribe to:
Posts
(
Atom
)