Showing posts with label tag. Show all posts

Monday, 13 August 2012

I wait...


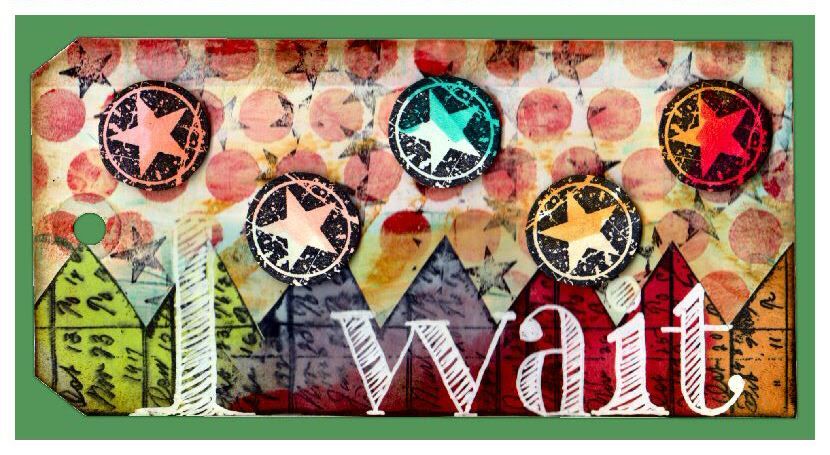
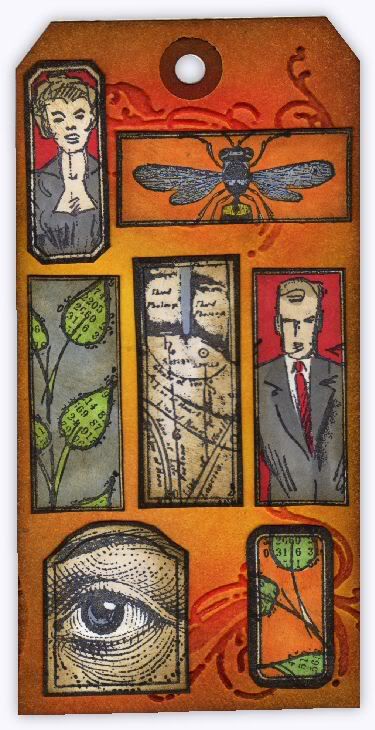
The theme over on the Simon Says Stamp and Show Challenge is "Favourite Technique".  One of the things I've always loved doing is scraping paint onto card.  I've tried using an artist's palette knife in the past but I find that I keep coming back to the Ranger craft scraper for this technique - it just feels better and I think the results I get are more successful with it.  Add to that the fact that the Claudine Hellmuth Studio paints are so packed with pigment that you get great coverage with the smallest amount and it's a great combo!

I started out by using the Ranger scraper to apply layers of paint onto my manila tag - teal, red, tan and finally white.  I stencilled the circles with Fired Brick distress ink applied with an ink blending tool.  To get the patchy effect on the black stars I applied ink to the stamp in a haphazard way and repeatedly stamped them with my acrylic block at an angle so only part of the stamp made contact with the tag.

The pointy bit along the bottom is an old wood mounted stamp of Tim Holtz's, which he has now brought out in cling form in one of the Classics sets.  It was stamped separately and coloured with blended distress inks, cut out and fixed in place.  The circle stars were stamped seperately and coloured with distress stains then cut out and stuck to the tag on 3d foam for a little added dimension.

Finally I took my trusty white pen and drew on the lettering of "I wait".  Oh, and of course I blended a little Gathered Twigs ink around the edge for a slight aged feel.

Supplies I used included:


Our ever-generous sponsor Simon Says Stamp is offering a $50 gift voucher as the prize again this week, just make something for the challenge and you could the winner! The winner will be chosen at random from those who enter the challenge, so why not give it a try? At the very least why not head over to the Challenge Blog to see how the other members of the design team have interpreted this weeks theme! :)

Don't forget, Simon Says Stamp have a great Facebook page too!  Check them out here!

Monday, 18 June 2012

Once seen, never forgotten?


This weeks theme on the Simon Says Stamp and Show Challenge is "a bit of brown".   I spent a few days thinking about this theme before I started work on my tag, and my mind kept coming back, again and again, to old sepia toned photos.  I started thinking about memory too, how some things are vivid in our memories forever and others slowly fade over time.


We keep photos and ephemera to remind us of people and events from the past, but as the name implies, they are ephemeral, objects created with a short life-span built into them.  What happens to our memories once the reminders are no longer with us?  Anyway, all of that was squashed together into this tag! :)

Our ever-generous sponsor Simon Says Stamp is offering a $50 gift voucher as the prize again this week, just make something for the challenge and you could the winner! The winner will be chosen at random from those who enter the challenge, so why not give it a try? At the very least why not head over to the Challenge Blog to see how the other members of the design team have interpreted this weeks theme! :)


Sunday, 18 March 2012

Rainbow Mona

A bit of playing around with ink, paint and stamps again, just for a change! :)  Of course, what I should have been doing is making a Mother's Day card for tomorrow, but I've already bought one.  I know, bought one, how embarrassing, eh? LOL

Monday, 19 December 2011

It's Tag Tim(e)!

This weeks theme on the Simon Says Stamp and Show Challenge is "Tim and Tags".  I could have gone with inspiration from Tim's 12 Tags of Christmas, but decided instead to just use a lot of his products on my Christmassy tag!

I decided not to use Promarkers on this card, for a change, and went back to my trusty Koi waterbrush to paint Santa with Distress Stains.  I really enjoyed doing it, will have to do that more often! :)


Our ever-generous sponsor Simon Says Stamp is offering a $50 gift voucher as the prize again this week! The winner will be chosen at random from those who enter the challenge, so why not give it a try? At the very least why not head over to the Challenge Blog to see how the other members of the design team have interpreted this weeks theme! :)

Monday, 1 August 2011

A Night at the Movies!

The theme for this week's Simon Says Stamp and Show Challenge is "a tag", and I had so much fun making this vintage movie-themed tag!

The green part was white card embossed in one of the Tim Holtz embossing folders from the "Playing Games" set.  I then sprayed with green and blue colorwash sprays, which I diluted with water and applied with a mini mister.  I then took a Wild Honey distress ink pad and applied it directly to the ticket to highlight the raised areas.

The stamps used were from Tim's set "At the Movies".  The popcorn was a bit of precision multi-stamping (which I always love trying - sometimes it works, sometimes it doesn't, lol!).  I started out by inking the stamp with Barn Door distress ink and then used a baby wipe to remove the ink from all but the central circle.  After stamping, I inked the stamp with black Versafine ink and used the baby wipe to remove the ink from the central circle, before stamping again in the same place.  I'm pretty easy-going about this technique and don't mind if the two colours don't quite match up, but surprised myself by getting this one bang in the right place on the first try!  I coloured the background and highlighted parts of the popcorn kernels with promarkers and distressed the edges with Frayed Burlap distress ink, before folding it across one corner and running the ink pad down it to give a dark line.

I used a similar technique on the "sister eileen" movie details, but this time stamped the whole thing with Wild Honey and then restamped the top part again with black ink.  I wasn't as accurate with the positioning on this piece, so if you look carefully you will see wild honey peeping out along the edge of the black lettering.  Things often end up printed like this in real life, so if you try it and that happens, don't worry about it, think of it as extra "character"! :)

Edges were distressed with Frayed Burlap ink, and I added some strips of tissue tape to the left and right edges before I fixed the elements in place.  Finally I added a brown button with some baker's twine, to echo the red in the popcorn ad.

Phew!  These things take much longer to type than they do to create! LOL

Our ever-generous sponsor Simon Says Stamp is offering a $50 gift voucher as the prize again this week! The winner will be chosen at random from those who enter the challenge, so why not give it a try? At the very least why not head over to the Challenge Blog to see how the other members of the design team have interpreted this weeks theme! :)

Monday, 4 July 2011

A bit like flour!

(Flourish - geddit?)

The theme for this week's Simon Says Stamp and Show Challenge is "a flourish".  On my tag I used the flourish from the French Connection Texture Fade set - although it's ATC sized, it can easily be used on larger projects such as this!

All the stamped images are inside panels stamped from the 7 Gypsies Rectangle set, which I've had for a while, but hadn't gotten around to using.  I have a feeling that today's project won't be the last thing I use them on! :)

Our ever-generous sponsor Simon Says Stamp is offering a $50 gift voucher as the prize again this week! The winner will be chosen at random from those who enter the challenge, so why not give it a try? At the very least why not head over to the Challenge Blog to see how the other members of the design team have interpreted this weeks theme! :)

Monday, 6 June 2011

Just Taggin' Along!

The theme for this week's Simon Says Stamp and Show Challenge is "a tag".  Having recently got a bumper pack of manila tags, I was all set for this theme! :)

I started off by using an ink blending tool and distress ink pads in Barn Door, Wild Honey and Walnut Stain to create the background. The circles were stamped in Coffee archival ink and the fleur de lys, stars and clock were stamped in black archival ink.  Finally elements were painted with an artists paint brush using paint dabbers and highlighted with a white pen.

Our ever-generous sponsor Simon Says Stamp is offering a $50 gift voucher as the prize again this week! The winner will be chosen at random from those who enter the challenge, so why not give it a try? At the very least why not head over to the Challenge Blog to see how the other members of the design team have interpreted this weeks theme! :)

Saturday, 16 April 2011

Freebie #64!

Windowed Pocket Tags
Following a request I received this week, tonight's freebies are windowed pocket tags.  Perfect for holding a journalling spot on a scrapbook page, as a cute frame for a small photo, the focus on the front of a card or just as an extra special tag on a gift for a loved one!  Why not use these pocket tags to hold special messages or ephemera such as tickets?

There are 5 designs in total - circle, square, heart, scalloped square and solid, just cut them on double sided cardstock, glue or tape down the tabs and you're all set!  I've included marks to show where to fold and I've also included reinforcement circles for that authentic stationery look.  All 5 are in 1 file, just cut the ones you need!

Please remember you are only allowed to download this file for your own use and can not share it or distribute it to others in any form. I spend a great deal of time creating my designs, please respect the terms under which they are shared.

Again, this template will be "live" for 1 week. Next week it will be taken down. Don't forget, if you have any requests, pass them on! I can't promise, but I will take suggestions into account when planning future templates.

These files may not be uploaded to a group, forum or website for sale or redistribution, or shared among individuals. They are expressly for the personal use of each person that downloads them from this blog.

There is one file and I have put it into a zip file to make downloading easier. After saving it, open in the usual way, and drag the files out onto your desktop or wherever you wish to save it.

There are 2 versions of each template:
  • An SVG version which can be imported into the Sure Cuts a Lot or Make the Cut program and then cut out on your Cricut.
  • A DXF version which is Craft Robo friendly, and ready to be imported into your Robomaster software (I'm not a Robo user, so if there are any problems with this, please let me know!)
Simply click on the appropriate button below to download the file!

Any feedback on the templates is more than welcome, and if you have any suggestions for possible future templates you'd like to see, please let me know! If you make anything using one of the templates, please post a link to it here so that others can be inspired by how you've used them!

I hope you like the templates - let me know how you get on! :)

Files © dan99crafter@gmail.com 2011

Wednesday, 16 March 2011

All Work and No Play...

This was one of those times I like the best, when I just sit down at my desk and start to play with no clear idea in mind of what I'm aiming for :) It doesn't always make for the best results, but it's a lot of fun!

The tag background was brown and red acrylic paint applied with a baby wipe in broad strokes. I deliberately chose to use stamps that don't get as much of an airing as some others, so it was fun to get to know them again. All stamping was with a Memento Tuxedo Black ink pad, and colouring courtesy of Promarkers, a white paint pen and Walnut Stain Distress Ink. The photo came from Tim Holtz's Lost and Found card stack, and was torn, sanded and scratched before being fixed in place with a screw-topped brad.

As ever, click on the image for a better view! :)

Tuesday, 11 January 2011

A Kinda-sorta Self-portrait (ish)

I had so much fun making the tag for yesterdays Simon Says Stamp and Show challenge, that I decided to revisit and rework it as a sort of self portrait.

I started out my taking a photo of my hand holding an ink blending tool, and converting it to a black and white pencil sketch in my graphics software. I then printed it out on white card, which I cut down to make a white tag with my hand in one corner. I printed again onto thin paper, and cut the hand out to use as a mask.

I masked off the hand and stamped "Head" by Stampotique (their name for this boy stamp). I also stamped the filmstrip down the side in two sections, first masking off the area where the trail from the ink blending tool was to go.

Next, I masked off the hand, boy and filmstrip and stamped the backgrounds. A bit of Promarkery magic, and bob's yer uncle :) Finally I applied some walnut stain around the edges and put some acetate filmstrip ribbon over the stamped filmstrip sections.

I had a lot of fun doing this :) If you're wondering which is the self-portrait part, the hand or the chubby boy with the enormous head, keep your wonderings to yourself! LOL As ever, click on the image to see a larger view :)

Thursday, 6 January 2011

Another Day, Another Play!

Day 2 of my ongoing play with the new set of Dylusions stamps by Dyan Reavely that I got just before Christmas. No aim, no rhyme, no reason, just messing about with the same set of stamps again - I love 'em! They stamp so crisply and the designs leave so many possibilities open for testing the creative juices with a bit of fun play :)

Today though, my knee isn't hurting (hurrah! and thanks for the kind wishes yesterday!), so I can take the time to let you know exactly what I did.

I began this tag yesterday, but set it aside immediately to get on with the tag I showed here yesterday. I started out with the Lettuce Color Wash spray by Ranger. I placed my tag on my craft sheet and spritzed a line on my mat, aiming an inch or two to the left of my tag, so I got a graduated fade where the edges of the spray jet hit the tag. (I then left this tag to dry, resuming work on it today. I spritzed water on the green I'd sprayed on my mat and dabbed yesterday's tag on it, to give the jumping off point for yesterdays design).

Returning to the dried tag today, I inked the rest of the tag with Barn Door distress ink, applied with a Ranger ink blending tool. This gave me a red tag with a smudge of green down the left side.

The first thing I stamped was the row of 4 large leaves (all stamping on this tag uses a Memento Tuxedo Black ink pad, as I was going on to use Promarkers for spot colouring). I coloured them with shades of green promarker, as well as the area to the right of the leaves (giving lovely sludgey brown shades where the translucent green shows the red Distress ink below!) . I stamped them again on scrap paper and cut away the area to the left of the leaves, thereby making a mask that would cover the leaves and the area on the right edge of the tag. I placed this over the leaves and then stamped the vine of small leaves slight to the left, making it look as if they were behind the larger leaves. These small leaves were coloured with very light watery shades of green and aqua, so faint that they only altered the background red a small amount. (By the way, you CAN Promarker directly on top of dried Distress ink, it works a treat!).

The scalloped edge was then stamped on the left side of the tag and coloured with a red Promarker. Finally I stamped the column of circles and coloured them with Promarkers, directly on top of the red distress ink finishing the whole piece off with a Ranger white pen. I applied highlights with the pen and then smudged them with my fingertip before they had a chance to dry so that the highlights weren't so glaring and white.

That's about it! Funny how it takes almost as long to type the description as it did to do it! LOL I had a lot of fun anyway, and that's what it's all about, right? :) As ever, click on it if you want to see a larger view! :)

Saturday, 11 December 2010

Starry starry day

I guess it was inevitable that day would follow night, huh? :)

Plus I still had a lot of star die cuts left from last night, and it would be a shame to have let them go to waste!

Enjoy :) click on the image for a larger view - comments appreciated!

Friday, 10 December 2010

Starry starry night

Stars kept cropping up in my world today! First I was admiring some starry tags on Dina Wakely's blog, which got me in a starry mood. I sat down at the computer to make some starry die cuts for the cricut and had a bit of a surf around only to find that my friend Linda had posted a starry card that she'd been making yesterday. Clearly I was MEANT to make a starry thing - it was written in the stars! :)

I had a play around with distress ink pads, getting some saturated splotches of colour on my tag, before stamping and ink blending. I had a bit of a doodle too, with both black and white pens. Not too much else to say about it really, it is what it presents itself as :) Comments encouraged and appreciated! Click on the image to see a larger view.

Tuesday, 7 December 2010

Tim's 12 Tags of Christmas 2010, #5

Yes, yes, I know I've missed out #2, 3 and 4! What can I say? There aren't any Timtag police looking over my shoulder so I figure I'm pretty much free to suit myself :)

Quite a few differences with this one again - I didn't like the technique where white paint was dabbed over the stamped image of Santa, so I stamped mine separately, to keep the beard white and then stuck it in place, after colouring it with Promarkers. I didn't have the green label die thingy, or the metal flowers or the metal 25, so I cut substitutes for them all on the Cricut.

Oh, and at the last minute I realised I'd forgotten the strip of music paper, so there's just a bit of that. I know, I should have looked at the original more often during the process, but the microwave dinged and I had to get my chilli out. (Did you know that the Welsh for microwave is something like "pingety ping"? They said so on tv last week. Isn't that great? I'd love to speak a language that let me say pingety ping from time to time :) Oh, and I can't find my stickles. None of them. Hence the bling-free holly. Anyway, stop picking holes in it, I did my best. Tim doesn't want me to follow him slavishly you know, he wants me to be inspired and go my own way, whatever that is.

In case you hadn't noticed, the centre of the flower is identical to the outer, except smaller. That's me, playing with ideas of scale. And you thought there was no thought behind this stuff :) As ever, click on the image for a better view! :)

Friday, 3 December 2010

Tim's 12 Tags of Christmas 2010, #1

It's December again, so it must be time for Tim Holtz to delight us with his daily "12 Tags of Christmas"!

There were quite a few "bits" that I didn't have to complete this tag as demonstrated by Tim in his instructions, as follows:

House - I don't have his wonky house die and my Cuttlebug is packed away in a box somewhere, so I could neither cut it out or emboss it with his notepaper folder. Instead, I used my own wonky house design, cut on the Cricut. I used my Scor-it board to create the horizontal lines, which remained white when the house was inked. I had no mica for the windows so I used vellum with a dot pattern on it. All snow on the tag is Ranger's White Enamel Accents (first time I'd used it, and I LOVE IT).

Tree - I didn't have a bendy Prima branch thingy, so cut my own winter tree on the Cricut, inked it dark brown and snowed it with enamel accents.

Holly wreath - I didn't have any mini holly garland, so I cut a wreath and bow shape on the Cricut and coloured with Promarkers.

Fence - my own design, again cut on the Cricut.

Ticket - I had no Cut'n'Dry felt to make a custom ink pad (and to be honest, if I did, I don't think I'd do it anyway!). I inked the stamp in black and used a baby wipe to remove ink from the parts I didn't want to show as black and stamped it. I did the same again with green ink, then with red. I think it turned out pretty well! :)

I'm a day behind, so I'd better get a move on with day 2! :)

Tuesday, 30 November 2010

Spin me round again and rub my eyes

No aims, objectives, rhyme, reason, grand plan or little idea with this one, just a bit of semi-random messing about :)

I wanted to try out some stamps I hadn't used a lot, I wanted to have a go with my tiny attacher, which I'd never used and I wanted to incorporate some words of a song I've been listening to lately by Imogen Heap. (love her! So creative and innovative, hear the song here if you're interested). Oh, I also wanted to investigate tissue tape masking, a la Wendy Vecchi.

So, there you have it - I achieved all those things, and no one was hurt in the process, a great result all round! :)

Friday, 26 November 2010

Just hear those sleigh bells ring-a-ling!

I'm not sure why I've picked that title, there's not a sleigh in sight here, but the song is in my head right now so that will have to be reason enough! :)

The tag, reindeer and "believe" were cut on the Cricut. (The reindeer I think was designed by Denise from Boca - I've contacted her to confirm that, and if it is I will put in a proper credit and link).

All stamps were Tim Holtz @ Stampers Anonymous and colour was mostly distress ink pads, with a bit of promarkery thrown in for good measure! Rock Candy stickles was wiped over the letters. As ever, click on the image for a larger view. Comments welcomed! :)

Wednesday, 17 November 2010

OK, so I set myself a little challenge...

I don't know how you store your stamps, but apart from my Tim Holtz stamps which come on their own storage sheet, all of mine go onto laminated storage sheets either that I have made or bought. I stamp the images onto card before laminating, or if I'm using a store bought storage sheet, I stamp the images onto it with Stazon. My sheets aren't grouped by theme or manufacturer - when I get new stamps they're separated to fill gaps on existing sheets or I start a new sheet if needed. Not very organised, but it works for me :)

I set myself the challenge of creating a tag using only stamps from 1 storage sheet, which I picked at random from my collection. The sheet I chose is shown here so that you can a) see that I didn't cheat and b) see what a bizarre mix they were! LOL Click on it for a larger view if you wish :)

Here is the tag I came up with. Note the crafty use of the column stamp to divide up the background (crafty - I made a pun! lol). The background was coloured with distress ink pads and the elements of the composition were either promarkered or distress inked. The end result doesn't particularly mean anything or say anything, but I like to think it's kinda pretty. By my criteria at least! :)
Related Posts with Thumbnails