 Here is part two of the video tutorial, this time covering the basics of binding projects using the Bind-it-All, and in particular, a simple method to punch projects that require more than 6 holes!
I have also included links at the bottom of this post to printable step-by-step guides for binding your projects, which you can refer to while you work. Simply click on the size you require, A4 or US Letter (8.5x11)
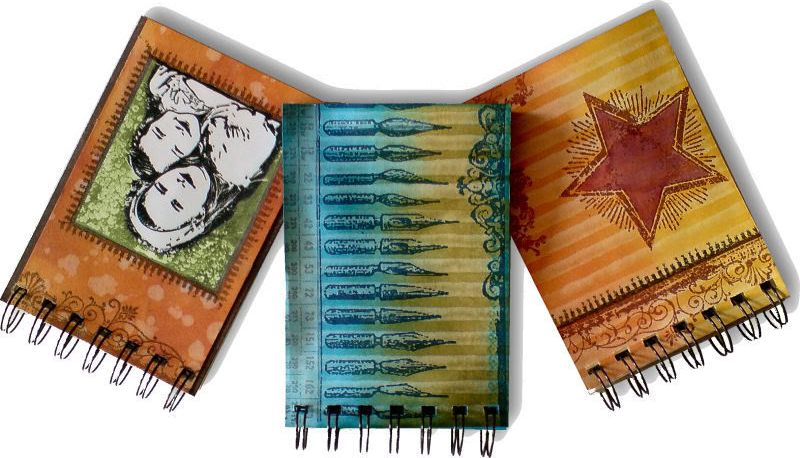
Win a notepad! [NOW CLOSED]
If you'd like your name in the draw to win one of the samples I created during the filming of this video, leave a comment on this post. I will select winners at random in a few days time. Good Luck!! :)
Hopefully you should find these instructions easy to follow. Let me know how you get on!
A4 Printable Step-by-step guide
US Letter Printable Step-by-step guide
Awesome tutorial Dan!!! I haven't used my Bind It All yet, but after watching your tutorial I am not nearly as intimidated by it :) Now to just find room to put it out and use it LOL :)
ReplyDeleteThanks so much for your videos - I'm really enjoying them and looking forward to the next one already :)
Heather
Dan that was a great video. I have a BIA and always seems to struggle when making a book. I love the idea about making that template. Never even noticed the piece to attach it on the side. Keep the videos coming.
ReplyDeleteKaren
Yes, the instructions were very good!! Too good because unfortunately, now I want a BIA. ;)
ReplyDeleteSensational video! Great tips. Time to get the BIA out and play.
ReplyDeleteSallyW
Oh my goodness! How easy is that!
ReplyDeleteI have had my bind-it-all since January ~ and never used it because I was afraid I would mess up a project. Meanwhile I have been using O rings and all kinds of other techniques to bind things until I could 'read up' on how to work the bind-it-all.
Dan I can't thank you enough. Really what allot of time you put in to help folks you don't even know. :) I am truly impressed ~ thanks so much! :D
Cindy
Dan, Thank you so much for that lesson! You made it seem so easy & I can't wait to try a project now using the Bind It All.
ReplyDeleteKim B
Forgot to say ~ love the instruction document too! I just printed it and will put it with the BIA for reference..
ReplyDelete:D
Cindy
Thanks Dan! Great job! I definitely need a BIA now :-)
ReplyDeleteTerrific tutorial Dan!
ReplyDeleteThank you!
Dan, Awesome Tutorial! Plus great note pads! Will have to dig out my BIA and use it more!
ReplyDeleteThanks
Your video made it much easier to understand than the demo at the LSS.
ReplyDeleteThank you!
marda
Dan, awesome video. I have had mine for quite a while now and have never used it. I am going to ttry this in the morning. You make it so easy to understand. Thanks so much.
ReplyDeleteRobin
Excellent tutorials! Thanks for showing us how to use the inks & not be intimidated by the BIA anymore! Your hard work is greatly appreciated!
ReplyDeleteYou make it look so easy. I am off to give my bind it all another try.
ReplyDeleteThanks so much!!!!!!
Fantastic! Brilliant! Bravo!!
Tinuke
Thank you so much for taking the time to make these videos Dan. They are fantastic! So informative and easy to follow. You're a true inspiration!
ReplyDeleteButterbee
That was a cool tutorial Dan!!!
ReplyDeleteThank you!
Mattie
Great thanks alot
ReplyDeleteBarbara
This has been so helpful. Thank you!!
ReplyDeleteDan that video is so clear and easy to follow. I do a lot of BIA projects but always panic a bit when I need to do something other than 6 holes - thank you for making it so easy.
ReplyDeleteToni :o)
This has been so helpful. Thank you!!
ReplyDeleteThanks Dan - this is a fab tutorial - I watched the demo on QVC the other day and you have explained it so much better - well done and thanks again:) Sarah xx
ReplyDeleteHi dan what a great post, Im hoping to get my bia today or tomorrow and will definately be trying this out,love the sample books.
ReplyDeleteThanks for the great tips! My mum has one of these but hasn't used it, and when I made something large, I mucked it up. But now I think I would be right!
ReplyDeleteCheers
Liz
Brilliant!! thank you so much!! I learnt so much from this tutorial.. found out why my BIA was not steady realised from your video that I never pulled the back arm out!!
ReplyDeleteYour tutorial sure makes the BIA look easy to use. Thanks. Linda
ReplyDeleteP.S. Look forward to your next tutorial. Keep 'em coming!
Dan, GREAT tutorial, I think you might have me talked into purchasing a Bind It All. Your videos are great!
ReplyDeleteKeep it up!
Brian
I am in the uk and saw this machine on qvc and now i think its going to be a must have
ReplyDeleteand now i have found your tutorial i am confident enough to give it a try
Thank you for sharing you crafty devil
wonderful tutorial
artbyjan(at)googlemail(dot)com
www.tarotwisdom.etsy.com
Thanks Dan. An excellent tutorial!
ReplyDeleteMaggie
Excellent Dan and you made it look so easy, now whys mine been in its box for almost a year ???? you are just Fab doing these videos they are just the best to understand, thankyou so much, must get that BIA out the box x
ReplyDeleteBrilliant video. easy to follow instructions. thanks for doing these.
ReplyDeleteDan--that tutorial is soooooooooooooooo good. The BIA now looks appealing--where did i put mine, its gathering dust somewhere :-)
ReplyDeleteThank you for your wonderful tutorial! I have a BIA but have never used it so you have inspired me to give it a try! More please!!!
ReplyDeleteGreat tutorial, thanks...much better than the one that comes with the BIA...looking forward to the next one!
ReplyDeleteGenious!!!!
ReplyDeleteThanks so much for all the tips....you've made it soooooo much easier to understand.
I've got a BIA for my birthday so I can't wait for it now!
Another wonderful video Dan!!! :D Thank you!
ReplyDeletegreat tutorial Dan - thanks
ReplyDeleteinspires me to actually use my BIA
Dan - that was a fab tutorial. I don't have a BIA (though I'd like one), never seen one in action, but if I'm lucky enough to get one this Christams I know I'll be off to a flying start!
ReplyDeleteTFS!
Dan, thanks for a great video I am excited because i just got my BIA this week!!! You made binding look so easy......
ReplyDeleteExcellent Dan i have used my BIA twice now and have never really got it right but now i know where i am going wrong you explained it so simply but expertly so thank you xx
ReplyDeleteThanks Dan Great tutorial, cannot wait until my Bind-it-all arrives.
ReplyDeleteSue
Guide was extrememly helpful, thanks so much. Would love to see front view of the video.
ReplyDeleteexcellent video Dan - I have been using my BIA for nearly 12 months and didn't realise that the plastic measuring guide you could place in the machine to measure the the Owires - if that makes any sense - SO simple - SO stupid of me. Thanks again - brill video.
ReplyDeleteGilly
thanks so much for that -have printed off the instructions. The number of projects I've spoiled and had to fudge something to hide the fact that the holes weren't evenly spaced at each end..well! Shall def have a play at this now!!
ReplyDeleteThanks again!
Bernie x (UKS BernieTuffs)
You should go into business making tutorials Dan, another brilliant one.
ReplyDeleteCorrina
Fantastic tutorials Dan. I have never seen a BIA machine working before and it looks so simple. Thanks for all the stamping techniques too :)
ReplyDeleteI've had mine Binditall for a long time and haven't used it. You make it look easy and I will give it a try. Thanks for the video.
ReplyDeleteKay
Fantastic tutorial Dan!!
ReplyDeleteDan that was a great video, I ordered a BIA from QVC can't wait for it to arrive so I can have a go as you have made it look "idiot friendly". Thanks
ReplyDeleteYou are a star Dan...all fear removed from punching more than six holes.
ReplyDeleteHave had my bind it all a year nearly and didnt even know about the little button that sticks out - I am so pleased you have done this video - thank you very much - feel a lot more confident using my bia now
ReplyDeleteThank you Dan -brilliant tutorial. I have a BIA which I havent used yet always been not sure how to but now off to play.
ReplyDeleteExcellent tutorial!! You make it seem SO easy to line up the holes for multiple punching. I know it technically isn't that hard but MENTALLY it seems to be. :D
ReplyDeleteGreat job!!
Kimberly
What a wonderful video, so easy to follow and great for beginners everywhere!
ReplyDeleteDawn
Wow Dan that is absolutely fantastic....well done....notes taken and will put into action on the next book :D
ReplyDeleteGreat simple straightforward video Dan - even I can follow it :) - bigger projects - bring it on LOL - looking forward to more vids
ReplyDeleteChris Granelli
Grrrrreeat couple of videos Dan and I love the books you made
ReplyDeleteFANTASTIC video Dan! I keep learning so much!!
ReplyDeleteDan,
ReplyDeleteOnce again - Excellent work! I don't have a Bind-it-All - but I've been eyeing them at the store! Now that I've seen your video - I think I'm that much closer to buying one! Hmmm...that's two things that you've inspired me to puchase...I think you should be the King Enabler now...:)
Vicki W.
excellent clear tutorial.it stops people being scared of the b.i.a you should ask commission
ReplyDeleteThanks for the video - it was really helpful.
ReplyDeleteDan - that tutorial is fantastic - so easy to follow - I feel I can now make more use of my BIA - thank you so much.
ReplyDeleteThose notebooks are awesome - hope I'm lucky
Hugs Hilda
Thanks Dan! I'm not afraid to have a go with my BIA now (had it 3 months and never used it).
ReplyDeleteMy dd and I made notebook covers last night (hers is better than mine!) and now we are going to make them into notebooks.
Donna
I just made my first notebook, following your tutorial so thanks!!!!
ReplyDeleteBrilliant video, the light bulb has come on! You explained it all so simply and it is now so easy for me to do! Thank you!
ReplyDeleteAbsolutely fantastic Dan, now I know how to use my BIA properly, thanks:) It's all sooo easy now!!
ReplyDeleteYolanda
Brilliant Video Dan, thanks you so much. I only every use 6 holes because I just couldn't get it right. Will have another go now :)
ReplyDeleteI've been thinking about buying a BIA but the demonstration I had at last year's Hobbycrafts at the NEC put me off as she made it look so difficult!
ReplyDeleteI'll definitely be buying one now, it's not difficult at all the way you show it being used!!
Thanks so much
Caz
Thank you soooo much, Dan! What a great video. You made it so clear and simple to understan. Now I get it!
ReplyDeleteBetsy
P.S. I love your accent.
Great video! Ummmm.... I think I want a Bind-it-all.
ReplyDeleteKim M.
fun stuff......thanks for taking the time to do this.......love the look!!!
ReplyDeleteSweet! You touched on all the points where it was confusing. Great tutorial and easy to follow.
ReplyDeleteDan, excellent video! This little blue machine has always intimidated me -- no more! Thank you for taking the time to make this video for us. Time for me to take mine out and make some notebooks!
ReplyDeleteBarbara
Dan,
ReplyDeleteThank you for sharing this video! I want a Bind It All!!!!
I love your small notebooks.
Your color use is AWESOME! And thank you for so gneerously sharing the how-to's in your tutorials, I am so grateful to have been told about your blog!
ReplyDeletePax et bonum,
Carol in Korea
Thanks dan! I have made some real mistakes tryong to bind more than 6 holes, I shall definately use the guide now! Really clear instructions, easy to follow.
ReplyDeleteAnother excellent tut Dan. My BIA is also gathering dust - so I guess I should get it out and dust it off. I also had trouble when needing more than 6 holes - it was a bit hit and miss, but after watching how you did it I'm going to give it another try.
ReplyDeleteThanks again for such great tuts
So that's how you do it!!! Thank you Dan for another fantastic tutorial - you make it all so clear.
ReplyDeleteDan that is the best BIA tutorial I have seen and very very clear instructions. I am inspired to get out my BIA and give it a go Thankyou xx
ReplyDeleteGreat video. If only I wasn't monetary challenged and actually owned a BIA I'd be laughing:) Owning one of your fantastic pads would be a good alternative though!!
ReplyDeleteP.S. Are you related to Tim Holtz?
Well, your tut was so awesome, I think you just sold me and 2 of my friends a BIA! We may wait a couple weeks for pink ones, but still! lol Thanks for spending our money!!! (I think??!!??!! lololol)
ReplyDeletequestion though - does the initial purchase come with any coils or do we need to order those right away. And what size is suggested as the most used?
Forgot to say thank you very much for the printable instructions - my "Dan" file is quite big now :):):)
ReplyDeletethis is the best bind-it-all tutorial I've seen yet.
ReplyDeletethank you
Your tutorials are so clear and easy to follow - thanks for all the thought you put into them. The projects are gorgeous - particularly liked the idea of water stamping - will definitely give that a try.
ReplyDeleteThanks for a wonderful, clear tutorial. Esp. love the idea of making a guide - must do that before I next use my BIA, will make things a lot easier.
ReplyDeleteOff to watch your other tutorials now.
Tracy
As it's nearly 3.15am I'm going to come back to this tutorial Dan - I have made a couple of things with my BIA but do have trouble getting the wires in correctly - usually end up mis-shapen :-/
ReplyDeleteAnne x
Dan , as usual you make things look easy:) xx
ReplyDeleteFantastic Tutorial Dan, Many Thanks Jaqi
ReplyDeleteFabulous Tutorials Dan - The Bind It All is at the top of my wish list and after seeing these I am itching to get it. Your Tutorials are so clear and easy to follow - hope there are more to come in the future!
ReplyDeleteThanks yet again, Dan!!
ReplyDeleteI've watched other tutorials on the BIA and I think I learned the most from this one!! I bought mine over the summer and haven't had the time to sit down and try it... but honestly I was also a bit intimidated STILL and I had even messed around with punching holes on it. Thanks for making it so obvious and thanks for sharing the idea of making a punching guide for it! DOH! I never was quite comfortable with the instructions I had seen before about doing this and it never occured to me to make the guide! I have the perfect strips of cardstock to do this with, too (off-cuts from large art sheets that a local store was selling for about 50cents for a stack!) Some are longer than 12 inches, even, so it will be easy to make guides in many sizes.
I so appreciated all your hard work and generosity with sharing files and ideas and your creativity! THANK YOU!
Sarah St., The Netherlands
Those notebooks are gorgeous. I love your videos. I hope I am a winner. Thanks for sharing
ReplyDeleteThe note pads are beautiful.. and the tutorial makes it seem so easy Dan. Thank you
ReplyDeleteStephanie
Stephslp@aol.com
Thanx for sharing...love the tutorial a big help to me with my BIA
ReplyDeleteThanx
Kim
bast830@comcast.net
Cool stuff! Tutorials can be so helpful. I don't have a BIA yet, but... Thanks!!
ReplyDeletecool, thanks so much Dan, I have not been abel to do more than 6 holes with my bind it all, they never seem to go right, but with your easy to follow instructions i think i will be able to do it. Love the notebooks you have made and hope i win one:)
ReplyDeleteThank you so much for this video!!!
ReplyDeleteIt was very clear and you made this task so much easier for me. After watching this I now understand so much better on how to do the longer books. I am going to refer back to this until I feel I am confident in how I am doing.
I am definately looking forward to getting a bind it all. I could use it alot now that I'm making the word books.... Thank you so much for the tutorial
ReplyDeleteThank you so much - very helpful.... and makes it sooo much clearer..... might pluck up the courage now to use mine to do more than 6 holes ina book!! LOL!
ReplyDeleteGreat job Dan! I always enjoy your tutorials and SCAL files. Thanks for sharing your knowledge with us. God Bless!
ReplyDeleteCarol
What a great tut Dan. Now maybe I'll actually use it instead of letting it gather dust... Thanks..
ReplyDeletebtw love the accent could listen to it over and over... but not in a creapy way... lol
Great tutorial Dan, thanks so much
ReplyDeleteLove the tutorial, have had my BIA for at least 9 months & never used it. Desperate to use it for a swap I am doing and with this tutorial will pluck up the courage to have a go.
ReplyDeleteSue
ld the bit at the start showing how to make the holes more than 6 !!! always had troubles with this but now it looks easy !
ReplyDeleteThat is by far the best video tutorial on the Bind It All that I have seen! So easy to understand and the template is a wonderful idea! Thanks so much for sharing that.
ReplyDeleteAbsolutely brilliant - I hadn't even realised that there was a pull out to steady the machine.
ReplyDeletePlease don't remove this as I will be using it as a reference.
EXCELLENT tutorial, thanks loads!
ReplyDeleteThank you for this helpful video!
ReplyDeleteThis is a brilliant video, thank you so much, it looks so simple when you do it, not sure why I have been struggling with more than 6 holes!
ReplyDeleteHi Dan
ReplyDeleteCould you please tell me the name of the font you use in your PDF instructions? Is it a free font?
Many thanks.
It IS a free font, but I can't remember the name, or find it on my computer! I will keep looking, because it's a font I like. If I find it, I'll post the name here!
ReplyDeleteman you so rock!
ReplyDeleteBrilliant tutorial, I've had my bind it all for about a year and haven't used it yet but with the help of your tutorial I will be using it a lot now
ReplyDeleteThank you Dan
Doreen
I've had my BIA for ages, but do not use it simply because I could not understand the directions. Thank you for doing this video. For the FIRST time, I have a cover that has evenly spaced holes from both ends. I may now actually use this machine that everyone else raves about.
ReplyDeleteExcellent, easy to follow tutorial.
ReplyDeleteThank you,
Ann
brilliant! thanks for the tutorial.
ReplyDeleteThanks for the video's. I love my BIA.
ReplyDeleteThanks for this tutorial. You answered some questions I had and the idea of making the guide is a good one.
ReplyDeleteHi Dan, like so many others I have had a BIA for a long time and never took it out of the box, as the Zutter website video did not make me feel confident, but your video certainly did and I made 2 books straight away, as travel journals for my friends sons who are going to travel around Ontario, Canada, these school holidays in a motor home with their grandparents. As soon as I finish decorating the books I will be making more projects.
ReplyDeleteThanks for making my BIA usable and not just an expensive box taking up space in a cupboard. I really appreciate it.
Cheers, Kathy.